Improve
Updates for Rock 18.1
Below is a summary of the updates for this version.
- The Form Builder now supports easier link sharing via a new link icon, with a dedicated block setting to enable sharing, and a new slug field for unique identification in URLs.
Updates for Rock 1.0
No updates made.Updates for Rock 2.0
Below is a summary of the updates for this version.
- Added documentation for the new Delay workflow action.
- Added documentation for the new Add/Remove Person to/from Organization Tag action.
- Added documentation for the new Background Check Request action.
- Added documentation for the new Log Error action.
Updates for Rock 3.0
Below is a summary of the updates for this version.
- Documented the additional 'Persist Immediately' option on
the 'Persist Workflow' action.
- Added chapter on the new workflow notes feature.
- Documented the new 'Set Attribute From Entity' action.
Updates for Rock 4.0
Below is a summary of the updates for this version.
- New workflow actions at your disposal.
- Updated some of the lava syntax for workflow attributes.
- Documented how to add a cancel button on workflows.
- Added information on creating your own workflow button styles.
- Documented the new 'List View' security setting on workflows.
- Added actions for working with Connections (Add Connection
Request Activity, Set Connection Request Status, Set Connection
Request State and Transfer Connection Request.
- Added action for removing a tag from a person.
- Added actions for adding a person to a group.
Updates for Rock 5.0
Below is a summary of the updates for this version.
- Powerful new workflow action filter match criteria.
- Added 'A Few Technical Details' chapter that documents
how attributes store their values.
Updates for Rock 6.0
Below is a summary of the updates for this version.
- Documented the new 'Workflow Number Prefix' feature.
- Changed title of Workflow Entry subsection in Securing Workflow to avoid confusion with a previous subsection in another chapter with the same title.
Updates for Rock 7.0
Below is a summary of the updates for this version.
- Added Advanced Settings section to Configuring a Workflow Type chapter.
- Updated Person Profile screenshot in Workflows section to include updated Actions menu.
- Added Text to Workflow chapter.
- Updated workflow configuration screenshots
Updates for Rock 8.0
No updates made.Updates for Rock 9.0
Below is a summary of the updates for this version.
- Added Importing and Exporting workflows.
Updates for Rock 10.0
No updates made.Updates for Rock 11.0
Below is a summary of the updates for this version.
- Added ability to launch workflows for the items in a grid
Updates for Rock 12.0
Below is a summary of the updates for this version.
- The Person Entry feature lets you gather individual and spouse information from a workflow Form without having to create workflow attributes
- Added a "Change Log" (Notes block) to the Workflow Configuration page to enable tracking updates to workflows
- Workflow Form fields can now have conditional logic applied
Updates for Rock 13.0
Below is a summary of the updates for this version.
-
A new Maximum Workflow Age setting lets you automatically
complete workflows that are older than a given number
of days
-
Added the ability to select and delete multiple workflows
at once when viewing/managing workflows from the Workflow
List block
Updates for Rock 14.0
Below is a summary of the updates for this version.
-
Rock's Form Builder lets you quickly create rich,
interactive forms using a simple drag-and-drop
interface
Updates for Rock 15.0
No updates made.Updates for Rock 16.0
No updates made.Updates for Rock 17.0
No updates made.
Welcome
Workflows are all around Rock. Do you want to know what workflows do? They're used for
check-in, requests, even to authorize changes to data. You have a choice: embrace
workflows or deny the truth. The truth is that without them you are a slave to repetition.
Stuck in a virtual prison of repetitive time-wasting activity.
.... dramatic pause... sigh...
Unfortunately, you can't just hear about what workflows can do, you must see them for yourself.
This is your last chance. After this there's no turning back. You can take the blue pill—the story ends and it's back to a life of manually clicking through screen after screen.
Or you can take the red pill—you'll enter a wonderland and discover the power that
automation can bring to your life.
The choice is yours. You must decide.
Confused about all this pill talk? This might help.
What's The Use?
Workflows. That word can be confusing. So, let's simplify it. Workflows are a series of
steps that can be automated. We all know computers are better at repetitive tasks than
humans. Rock workflows provide a framework for getting computers to do what they're good
at so we can focus on what we humans do best - relationships.
So, what can Rock do? We’re glad you asked!
-
Request Systems: One common use for Rock workflows is to create
request systems that can take information from a person and provide automated
flow based on their input. An HR Position Request or IT Request are good examples
of these functions.
-
Data Changes: Workflows can be launched in response to data
changes in Rock. For instance, you could configure a workflow to be launched
whenever a group is added to the system. This workflow could email an
administrator, or even prevent that creation if certain information about the
group is not provided.
-
Background Tasks: By using a Rock Job, you can enable a
workflow to run on a specified schedule.
When you're done with this manual, we think you'll see how workflows empower you to
create powerful application logic without needing to become a programmer. Once you
understand the basics, your mind will start racing with all of the ways you can put
them to use.
These are just the tip of the iceberg of how workflows can be used within an organization. Our fear
is the list above will pigeonhole your thinking of when and how to use workflows. When you're
looking to solve an organizational need, be sure to think out-of-the-box when it comes to using workflows.
A Sample Workflow
Let's take a look at a sample workflow to get an idea of what's possible. In our
sample, the fictitious "Rock Solid Church" has implemented a human resources
process to help manage new position approvals. With this process in place
let's say that Ted Decker wants to get approval to hire a part-time event
planner. Let's walk through the workflow that has been defined.
Sample Workflow
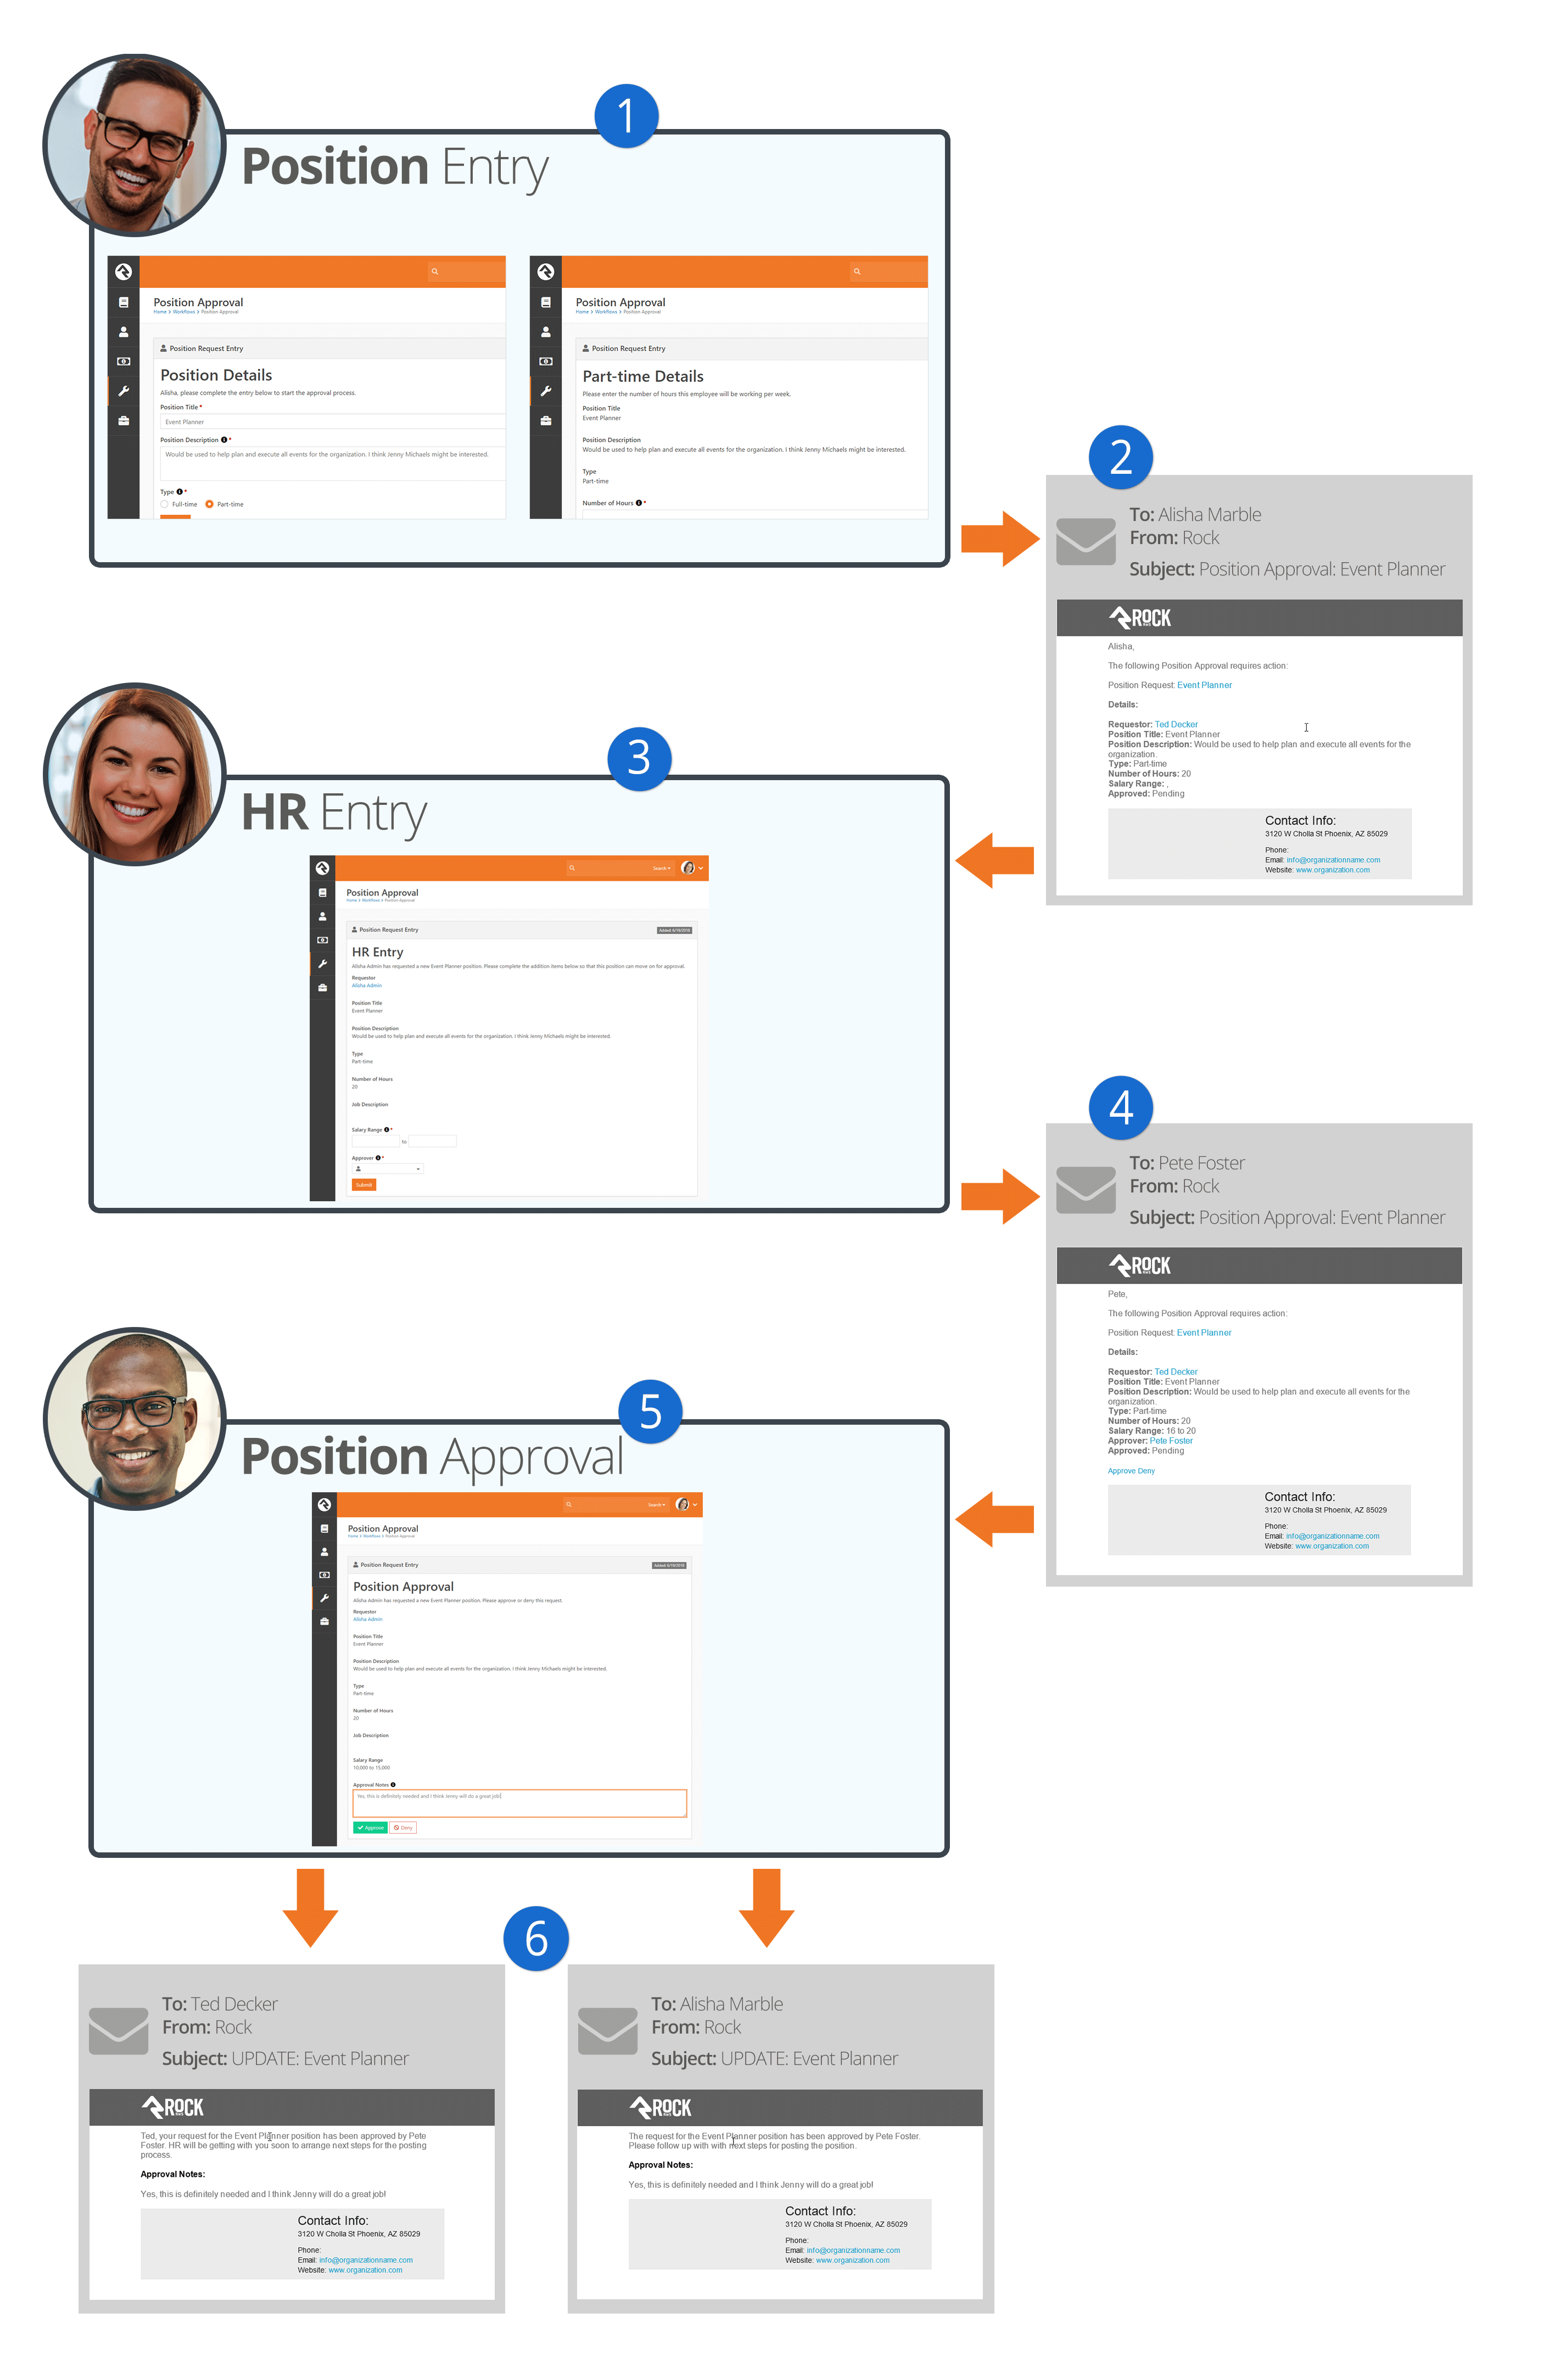
- 1Request
- Ted starts the process by entering his request into the system. Many of these
requests would be started by going to Tools > Workflows,
but you can add new workflow pages anywhere you'd like in the navigation.
On the first entry screen, Ted selected the option of needing a
Part-Time
position. The workflow took that into consideration and immediately asked him
to complete an additional entry screen specifically for part-time submissions
that asks for the number of hours needed for the position.
- 2Sent
- After all of the entry screens have been completed, the workflow
sends an email to the designated human resources worker, in this case Alisha Marble.
- 3Additional Info
- After clicking a link from the email, Alisha completes an entry form
to add additional human resources fields like salary range and who will
need to approve the position. Keep in mind this is a simple example. You
could automate the selection of the approver if you'd like. In our example
Alisha has selected the church's senior pastor Pete Foster.
- 4Approve/Deny
- The workflow now sends Pete an email regarding the position.
From the email, Pete can click to approve or deny the position.
- 5Notes
- In our example, Pete has chosen to click the link to approve
the request using the Rock website. This allows him to add further notes.
- 6Emails
- With the request approved, emails are sent to both Ted to let
him know the good news and Alisha so that she can start the needed
human resources paperwork.
This is just a quick example of one workflow. We'll look behind the scenes
of this specific workflow later in the chapter
Building a Simple Workflow.
Components Of A Workflow
Think of workflows like a big box of Lego® bricks. Each piece has a specific shape that
determines how it can be used. To become a
Master Builder,
you must understand the possibilities that lie inside each type of brick. You also need
to know how pieces work together. Before we get started with building an actual workflow
let's find out a bit more about the blocks we'll be building with.
Workflow Types vs. Workflows
Let's start with a little vocabulary.
Workflow Types
are the configuration patterns that a specific
Workflow will use to execute. As an
example, you might configure an HR Position Approval
workflow type that an employee uses to initiate an IT Director Position Request
workflow.
Attributes
Attributes
are the data elements your workflow needs to be able to process. For the
External Inquiry
example workflow type that ships with Rock, we'll need information about the requester
(name, email address, phone) as well as the topic, message and campus. Once we have
the input from the guest, we'll also need attributes that store the person being
assigned to the inquiry as well as any notes that they enter.
Attributes can represent many types of data including text, numbers, images,
locations, a person, date and more.
Activities
Activities
are groupings of actions that function together to complete a unit of work. How many
activities you use in a particular workflow is part science and part art, but in most
cases, there is not a right answer. In general, though, think of activities as phases
of your workflow. In our
External Inquiry
example there is an activity for the initial entry of the request, and activities
for each category of the inquiry (pastoral inquiry, website inquiry, finance inquiry,
etc.)
When you configure your workflow, you'll set certain activities to
Activate
at the start of the workflow. These activities can then activate other activities
depending on the nature of the input and workflow logic.
While most attributes will be defined for the entire workflow, it is also possible
to define attributes that are specific to an activity. This allows for activities to
have their own set of data items.
Actions
Activities are made up of Actions.
Actions are the smallest unit of work in a workflow. Don't let their size fool you
though. Like ants, they may be small, but they can move large objects by working
together. Some examples of what actions can do are:
-
Send an email.
-
Set the value of an attribute.
-
Present the person with a form to enter data.
-
Run a SQL query.
-
Activate a new activity.
Status
Every instance of a workflow has a Status.
There's nothing magical about the status. In fact, it's just a text field that's
updated by the actions as they process through the workflow. A well-crafted
workflow uses the status field to help communicate the stage the workflow is in.
For instance, a work request workflow might use statuses like Pending,
Open, or
Closed.
Configuring A Workflow Type
Let's take a tour of the workflow configurator located under
Admin Tools > General Settings > Workflow Configuration.
We'll break the screen down into parts to help simplify our discussion.
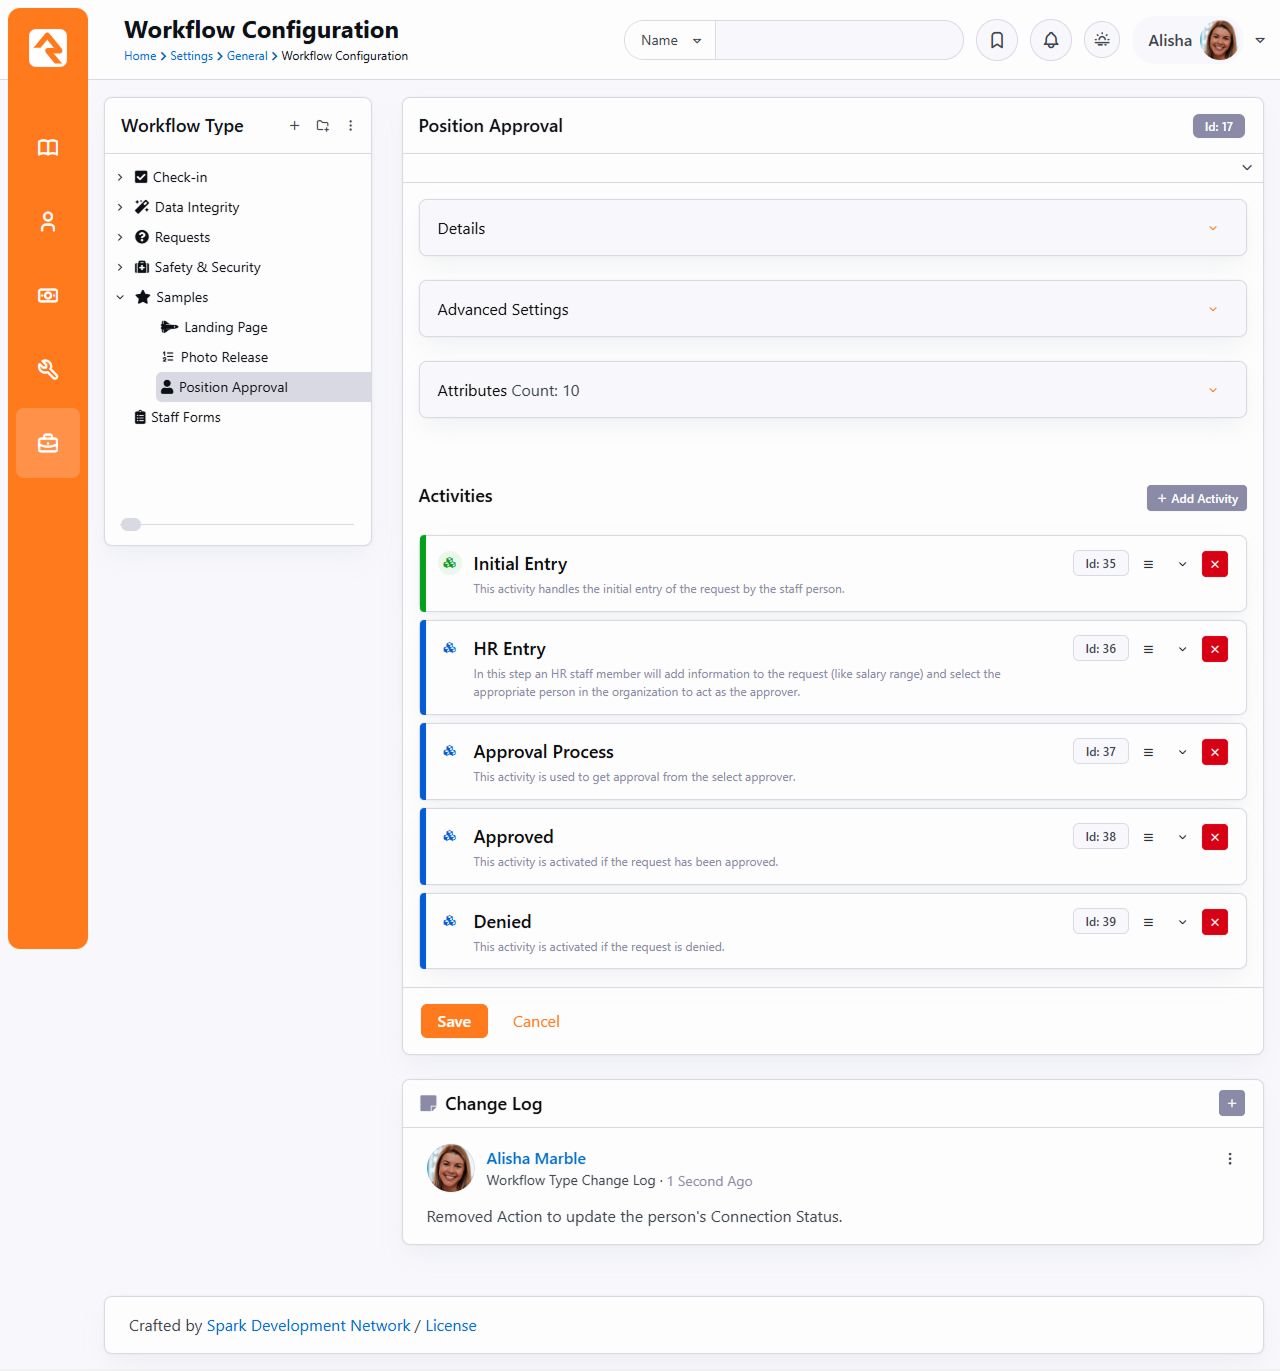
Viewing A Workflow Type
On the Workflow Configuration
detail screen, you can view important information about your workflow type.
Workflow Configuration
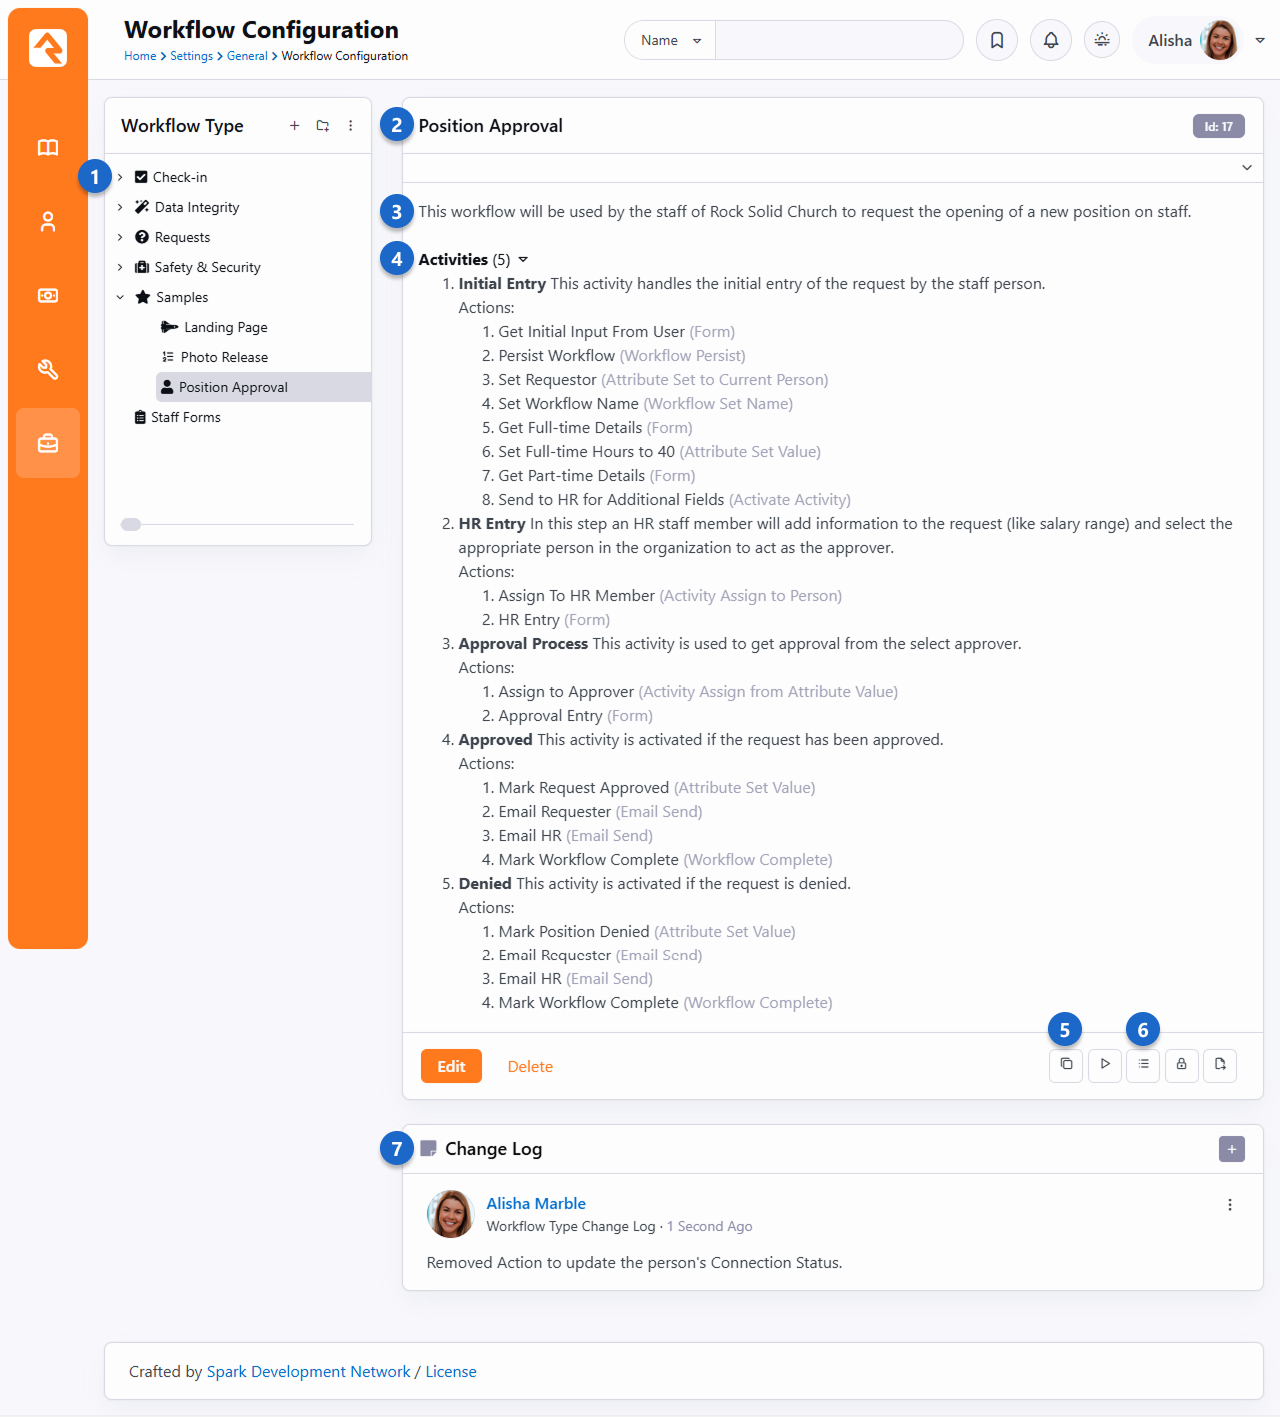
- 1 Workflow Type Navigation
- Shows workflow categories and the workflow types in each category. While you can
nest categories, it's best to keep your structure relatively flat.
- 2 Name
- The name of the workflow type.
- 3 Description
- The description of the workflow type. You should make this as detailed as possible since it
acts as documentation for your workflow type.
- 4 Activities
- This lists each of the activities configured in the workflow type. For each
activity it also lists their actions. This section is a form of auto-documentation
if you provide clear names and descriptions for your activities and actions.
- 5 Copy
- Many workflow types are similar. To help you create new workflow types that are
similar to ones you already use, Rock allows you to make a copy of an
existing workflow type to use as a starting point for creating a new one.
- 6 Action Buttons
- Here you can launch the workflow, view a list of workflow instances, edit security and
export the workflow type. Security will determine who is able to view a workflow as well as
manage (via the Edit
permission) a workflow type.
- 7 Change Log
- Workflow types can change over time and might be worked on by more than one person. Use the
Change Log to add notes
about what was changed by clicking the
button. Keeping a good change log will help your future self, as well as others, understand
what changes have been made and can be very valuable for troubleshooting.
Editing A Workflow Type
Clicking the Edit button takes you to the edit screen for that workflow type. This screen is made up of several sections, which are explained below.
Details
The first section is the Details section. Let's take a look at what it includes.
Workflow Type Details
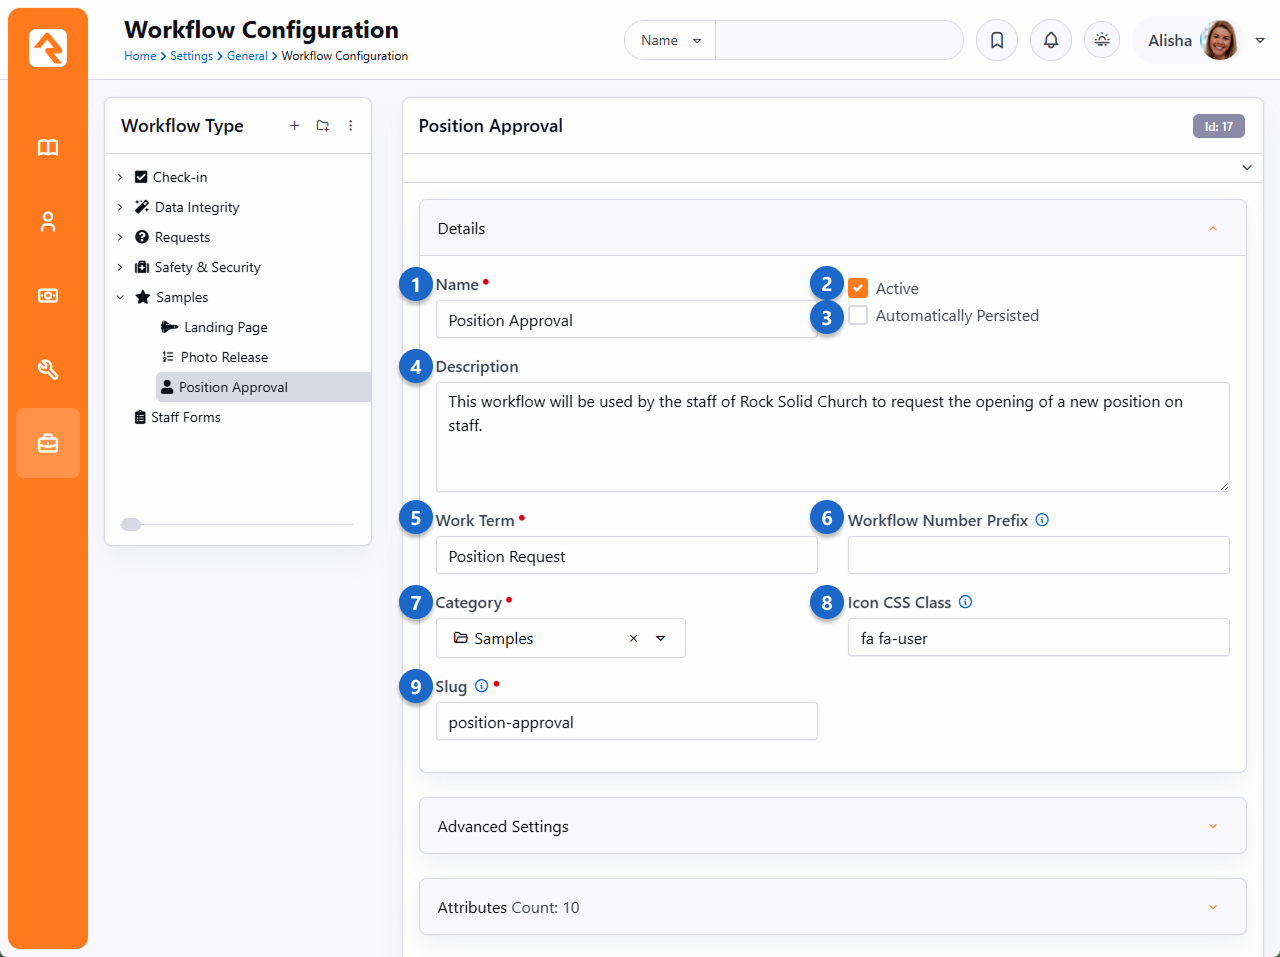
- 1 Name
- The name associated with the workflow type.
- 2 Active
- Determines if the workflow type is active. This is helpful if you'd like to prevent
new workflows from being created but would like to keep the workflow type around to view
previous workflow instances.
- 3 Automatically Persisted
- We’ll discuss persisted vs. non-persisted workflows in detail below. Just know this
is where you set the persistence type.
- 4 Description
- While you may be tempted to skip over the description, we highly recommend
that you enter a detailed description of your workflow covering when it should be
used and its basic functionality.
- 5 Work Term
- The term you will use to describe an instance of the workflow. For example,
an IT work request may use the term Request
while our inquiry example would use Inquiry.
- 6 Workflow Number Prefix
- While every workflow will have a unique system ID, Rock also generates a workflow instance ID for the type.
This makes for more logical and consistent IDs. The Workflow
Number Prefix allows you to optionally add an alpha-numeric prefix to the workflow instance ID. So instead of having
an ID of, say, 00001 you can have something like POS0001.
- 7 Category
- Workflow types are grouped into categories for organization. Workflow security is inherited from the Category's security settings, so pick carefully. If the workflow type needs different security though, you can override security settings on the type.
- 8 Icon CSS Class
- You can provide a CSS icon to help distinguish your workflow type from others.
By default, Rock supports the Font Awesome icon set.
These icons should be in the form fa fa-[icon name]
as pictured in the example.
- 9 Slug
- Unique identifier for this workflow type, often used in links.
Advanced Settings
The next section is the Advanced Settings section.
Workflow Advanced Settings
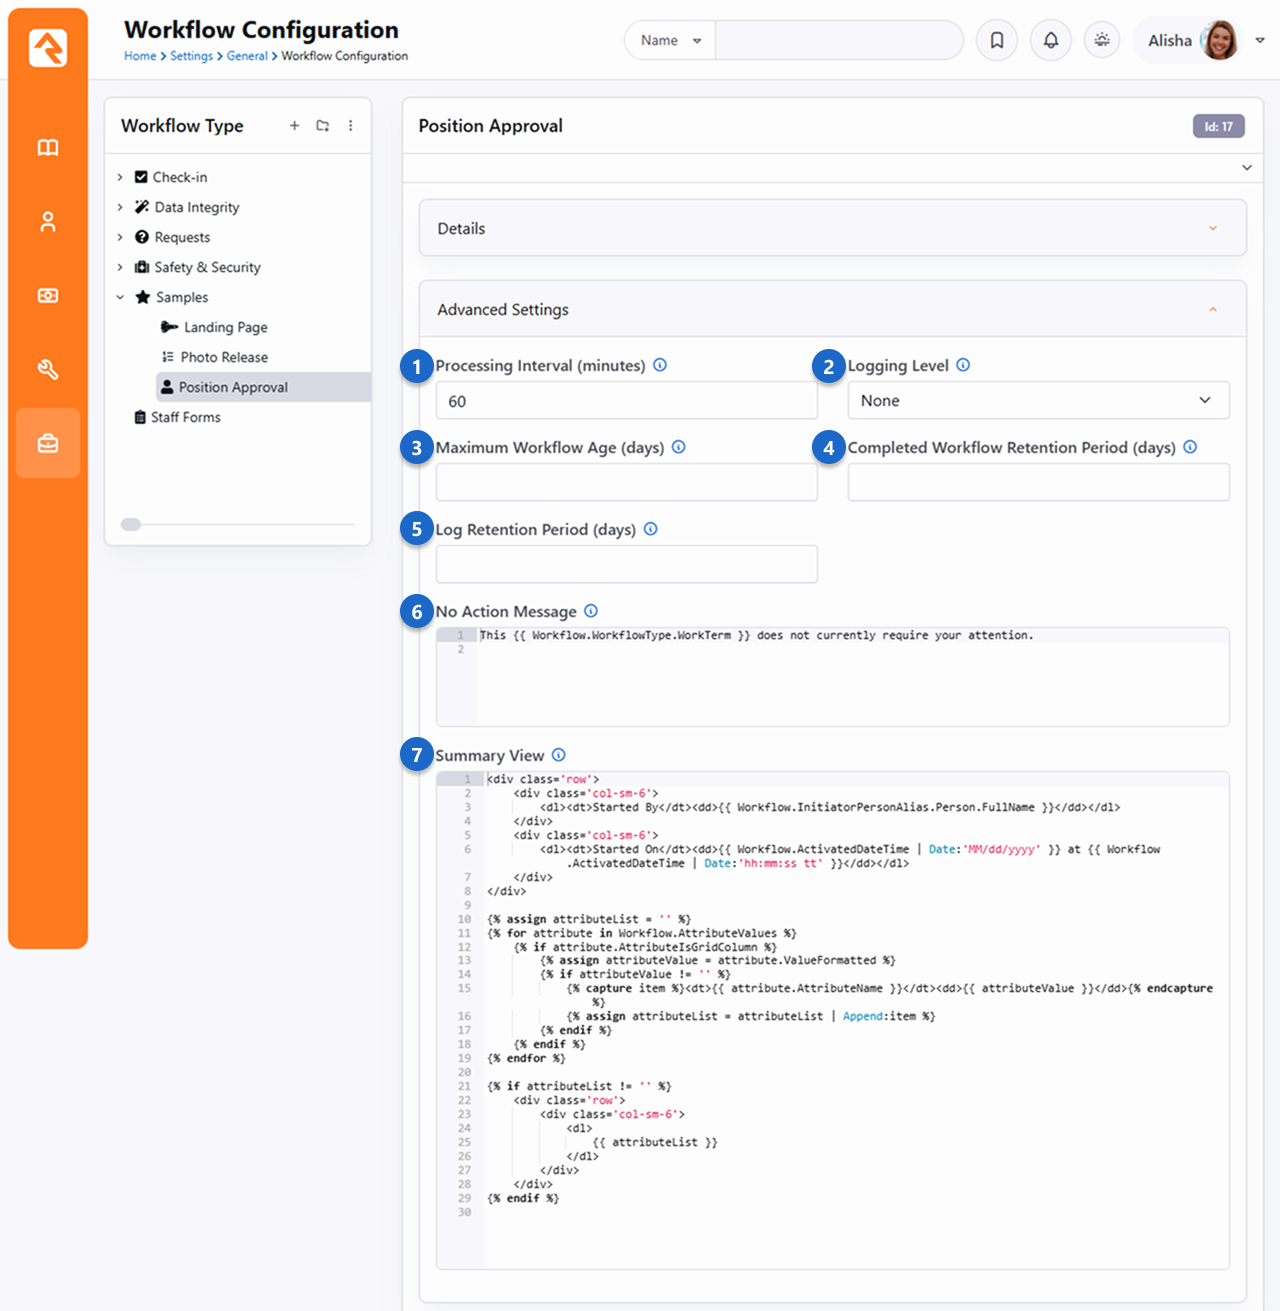
- 1 Processing Interval
- Persisted workflows that are still active are run on a routine basis to see if there
are any actions that can be completed. How often your workflow is run depends on this setting.
To reduce the overhead on your server, you'll want to set this interval wisely.
- 2 Logging Level
- Logging is used to help debug (find logic errors) in your workflows. You can set
the logging level to match the verboseness you need (None is nothing while Action
is pretty much everything).
- 3 Maximum Workflow Age
- For a variety of reasons, some workflows can hang around without ever being completed.
This setting lets you automatically complete workflows that are older than the number of
days provided, based on the date the workflow was created. Especially when used with the
Completed Workflow Retention Period
(see next item below) this can help keep your list of workflows clean and tidy.
- 4 Completed Workflow Retention Period
- This is where you can specify how many days you want to keep a completed workflow before it's
deleted. Over time your list of workflows will grow, including some workflows you'll only need for
a limited amount of time. By default, workflows are never deleted, so you might find your list
getting cluttered. Setting a value here allows you to routinely and automatically clean up your
workflows. If you never want the workflow to be removed, leave this field blank.
- 5 Log Retention Period
- This setting only applies if you've provided a
Logging Level value other than "None".
Because logs take up space, and because they're mostly used temporarily for debugging purposes, you probably
want to clean them out once they're no longer needed. Logs will be deleted if they are older than the time
period you provide here.
- 6 No Action Message
- You can customize the message that's displayed in scenarios where a workflow of this type is active
but does not have an active entry form. There's generally no need to make changes here.
- 7 Summary View
- This template is used to display the workflow Summary when
viewing workflow details. For the most part you shouldn't need to
make changes here, but keep in mind that any changes you do make will only apply to the workflow type
being edited.
Attributes
Next is the Attributes section.
Workflow Type Attributes
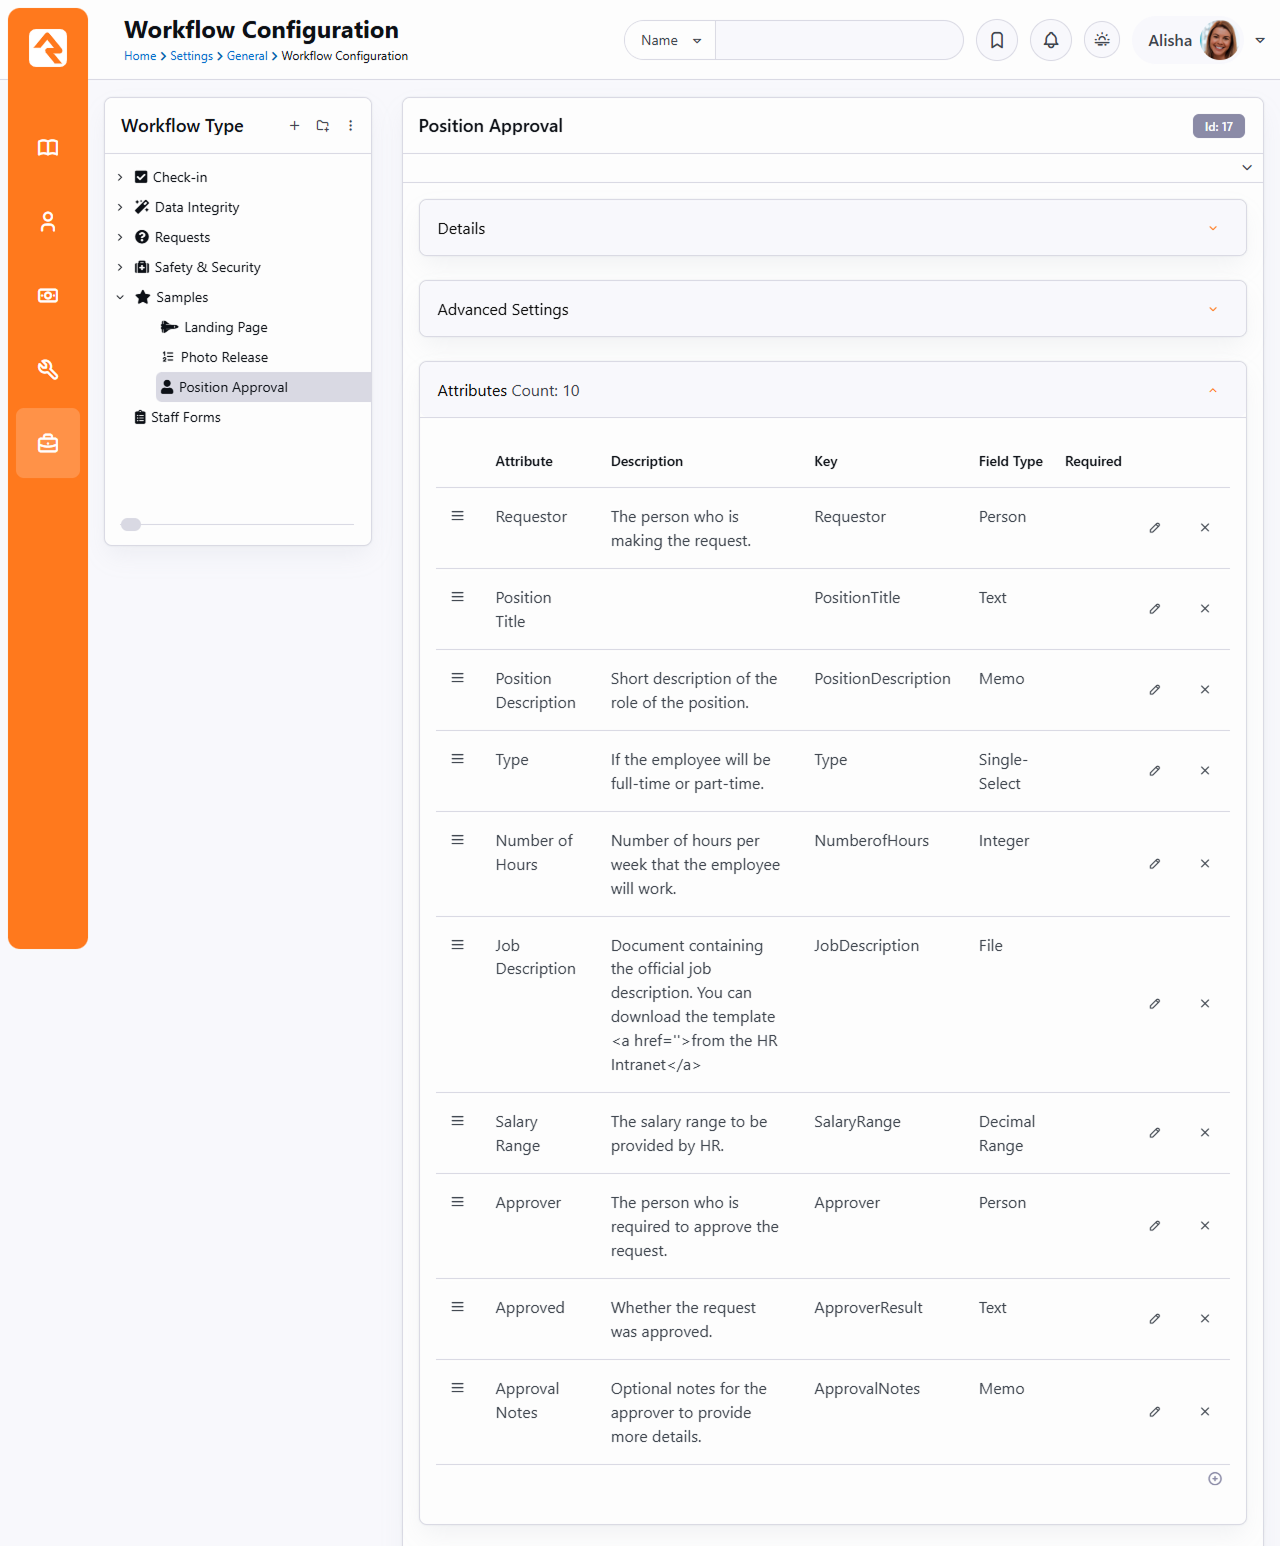
Attributes are the data elements your workflow needs to be able to process. In
this section you configure each of these elements and define the types of data
they will store (i.e., text, numbers, dates, people, groups, etc.)
While it might be tempting to rush and define your attributes quickly by
providing only a name and field type, it's wise to slow down and provide a good
description of how the attribute will be used in the workflow. Trust us, you'll
thank yourself later. Also, consider if a default value would make sense in
your workflow.
Save Time
Sometimes adding a good default value for your attribute can save steps in
your workflow as you will only need to set the value of an attribute if a
change is needed.
Activities/Actions
Finally, there is the Activities section.
Workflow Type Activities
Activities and actions are the meat and potatoes of workflows. They control
the flow logic that your workflow will use when it's processed. While we'll
be talking about activities and actions in detail later, know that this
is where you'll configure them for your workflow types.
As you build more complex workflows you might start to get confused about
which box is an activity and which is an action. Just remember activities
have a gear and lightning bolt () next to their titles
while actions have a single bolt ().
Workflow Import/Export
Sometimes a workflow you create is worth sharing with those outside of your organization to other
community members using Rock! You can do this by using the workflow export option.
Navigate to
Admin Tools > Power Tools > Workflow Import/Export.
Import/Export Details
Now we all know that workflows can be complex and very specific to your organization. In the event
that you have a workflow that isn’t so custom, this ability can be a game changer for those in the
Rock community. Below is a general overview of the Export/Import page.
Some workflows may not export correctly
Complex workflows may have issues being exported! Be sure to always double check your export
before sharing it. Feel free to use the Rock Demo site to test it out if you'd like!
Workflow Import/Export
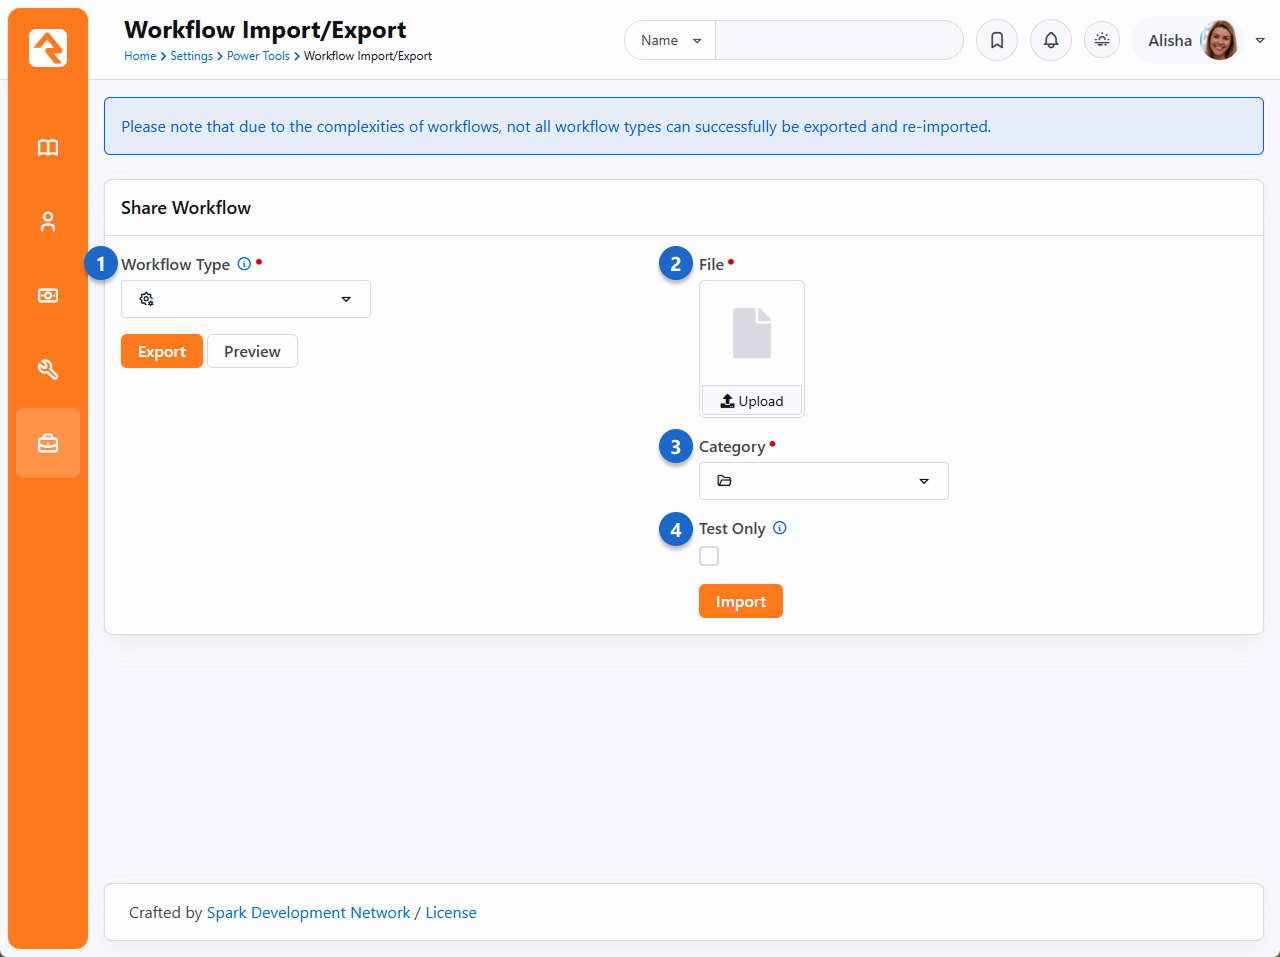
- 1 Workflow Type
- This dropdown will populate with all of the currently available workflows. Navigate through
the options to find yours to export.
- 2 File
- If you are the one receiving a workflow, click the upload button to find the .json file to
Import.
- 3 Category
- Choose the desired category the imported workflow will load to.
- 4 Test Only
- You can avoid any surprises that might come up during your import by first importing in
Test Only mode. This will run through the import process without actually importing
the workflow so you can spot issues in advance.
Activities
Now that we have taken a tour of the workflow configuration screen, let's start
talking turkey. Activities are groupings of actions that work together to complete
a unit of work. If you think of your workflow as a flow chart on paper, activities
would be the boxes (generally speaking) while the actions would be the logical
steps needed to execute the task.
There really is no right answer regarding how many activities a workflow should
have. Like a box of Lego® bricks, you can use different pieces in different ways and still
end up with the same output. The best way to get a feel for activities is
experience. Before we walk through building a sample workflow though, let’s look
at some of the basic configuration options for activities.
Activation
Activities won't run until they are activated by the workflow engine. There
are two ways that an activity is activated:
-
Start-up: You can configure certain activities
to be activated when a workflow starts.
-
Action Activation: If an activity is not activated at
start-up, then it must be activated by an action on an activity that was.
Simply defining an activity doesn't guarantee that it will ever be executed.
If it is not activated with the start of a workflow and no action ever
activates it, it will never run.
Activities Don't always Run
It's not uncommon for an activity to never run. In many workflows the flow
control logic you define might only run certain activities based on the input
provided.
Configuring Activities
When you add a new activity to a workflow type, you'll see a new blank activity
panel. The configuration options are shown below:
Activity Overview
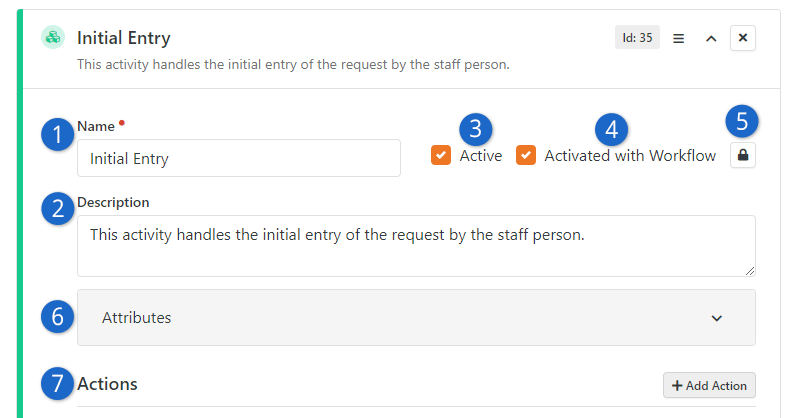
- 1 Name
- Be sure to give your activity a descriptive name. If this was a flow chart on paper,
the name would be the text in the box.
- 2 Description
- Don't cheat yourself by providing a short description. It's often helpful to
outline both the purpose of the activity and the flow logic that will be needed
to execute.
- 3 Active
- This tells the workflow if this activity is active in the configuration.
While this isn't used very often, it can be helpful if you need to temporally
disable an activity from running.
- 4 Activated With Workflow
- This defines whether the activity will be automatically activated at the beginning of a
workflow. If this option is enabled, the activity's icon and border will be shown in
green to help you quickly identify it as a startup activity.
- 5 Security
- Security on a workflow activity helps with activities that must interact with a person
(mainly through entry forms). More on entry forms can be found below. Note: The security icon
for an activity will not appear until after the workflow has been saved.
- 6 Attributes
- Activities can have their own attributes. When they're needed, they're
configured here. More on when to use activity attributes is discussed in the next section.
- 7 Actions
- This is where you'll define the actions that make up your activity. The order of the
actions is important because they will execute in the order you provide. For more details
see the Actions chapter below.
Activity Attributes
Like workflow attributes, activity attributes allow you to store the data
needed to execute your workflow. Many workflows can get by with using just
workflow attributes. But there will be times when a specific activity is run
more than once. If you'd like to keep track of data for each execution, you'll
need to define activity attributes. The data in these attributes is only
available within the specific activity instance.
As an example, say you had an activity that seeks approval for a purchase order.
As a part of the approval, you might want to allow the approver to enter notes
about their decision. You'd also like your workflow to allow the approval step
to be re-run until an approval is received (for instance the approver may deny
it at first, it goes back to the requester who edits it and then re-submits it
for approval). If the approval note was stored as a workflow attribute, it
would be overwritten each time the approval activity is run. When defined as
an activity attribute, each instance of the activity would have its own
instance of the note attribute.
Accessing Activity Attributes using Lava
The proper Lava to use when you're working with activity attributes will start
with "Activity" rather than "Workflow" as shown in the examples below:
{{ Activity | Attribute:'ApprovalNote' }}
{% assign approvalNote = Activity | Attribute:'ApprovalNote' %}
Assignment
Activities can be assigned to a specific person or group. While security
determines who's allowed to view or edit an activity, the assignment describes
who is responsible for completing it. Assignment only comes into play for
activities that must interact with a person (mainly through entry forms).
Assignments help workflows prompt the right people to enter the data that is
needed. We'll touch more on assignments in the
Working With Entry Forms chapter.
Actions
As previously mentioned, actions are the worker bees of workflows. They are broken down into categories to make them easier to find. Let's take a
look at the basic configuration settings of actions and then look at the actions
that come out of the box.
Action Order Is Important
Be careful to define your actions in the right order because that's the order in
which they'll execute.
Action Configuration
While each action type will have configuration settings unique to its purpose,
all actions do share some similar configuration settings. Let's look at these
common settings. They can be found by clicking on an activity in a workflow configuration.
Action Overview
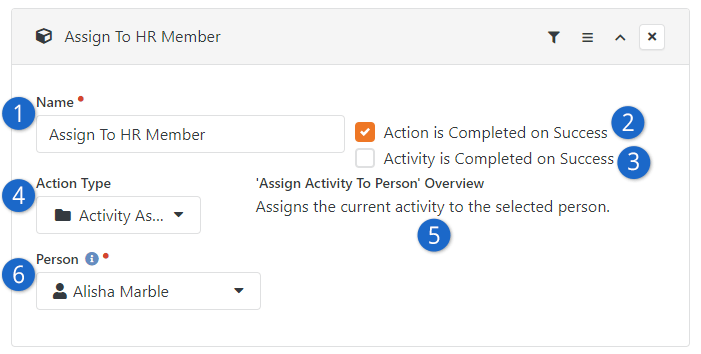
- 1 Name
- The name is used to help describe the task the action is performing within the activity.
- 2 Action Is Completed On Success
- This tells the workflow engine if the action should be marked as completed when it runs
successfully. For most actions you'll want to be sure this is set to
'True'. But there
may be times when you want an action to be performed every time the
workflow is processed.
- 3 Activity Is Completed On Success
- This setting tells the workflow engine to mark the entire activity as complete if
the action successfully runs. This has the effect of keeping all following
actions from running. If you are familiar with programming logic, this
is similar to a break statement.
- 4 Action Type
- This is where you configure what type of action you want to perform. There are many
different types of actions, each with their own function. We have each type of action
documented for you in the
Workflow Actions Documentation.
- 5 Assign Message
- The message that is displayed based on the Action Type selected.
- 6 Person Picker
- The person picker is here because of the selected action type. Different fields will appear
in this area depending on the type of action that's been chosen.
Action Filters
We learned about ways we can control the flow of actions inside an activity in the
previous section. Action Filters
provide us with another powerful way of controlling the flow logic of a workflow.
They allow you to only run an action if the value of an attribute meets a
criterion you define.
Action Filter Configuration
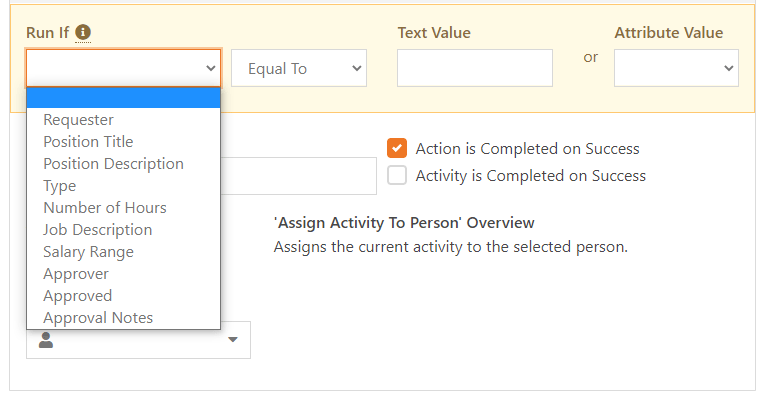
When an action has a filter configured, the filter icon will display in yellow to help
you know that a filter is present.
Action Filter Notation

Although most of the filter match criteria are self-explanatory, the
Regular Expression is possibly
unfamiliar to you. Simply put, a regular expression is a sequence of characters that define a
search pattern and using them you can achieve powerful text matching. For example, if you
wanted to match a prayer request text for the phrases "suicide", "SUICIDE", "kill himself",
"kill herself", or "kill myself" you could use a regular expression value of
(?i)(suicide|kill (h|m)(\S+)(\s*)self). You can find
a Microsoft Regular
Expression Quick Reference online and use a tool like
https://www.debuggex.com/ for testing your new creations.
Important
Knowing the text value of an attribute is key when setting up filters. For text attributes this is pretty straight forward. For
other types of attributes, you need to know more about their internals. For instance, a 'Boolean' attribute's text value would be
'True' or 'False' while a person attribute would be the GUID of the person alias. The full list of different
attribute field types can be found here.
Sometimes, a workflow action might not be able to finish its job.
This could happen because the "Run If" conditions needed to run
the action aren't met. To help your workflow run smoother in this
case, you may consider enabling the
Complete Action If Criteria Unmet
option. When you turn this on for a specific action, Rock will
automatically mark the action as "Completed" even if the conditions
aren't met. This way, you won't have to worry about unfinished
business.
Complete Action If Criteria Unmet
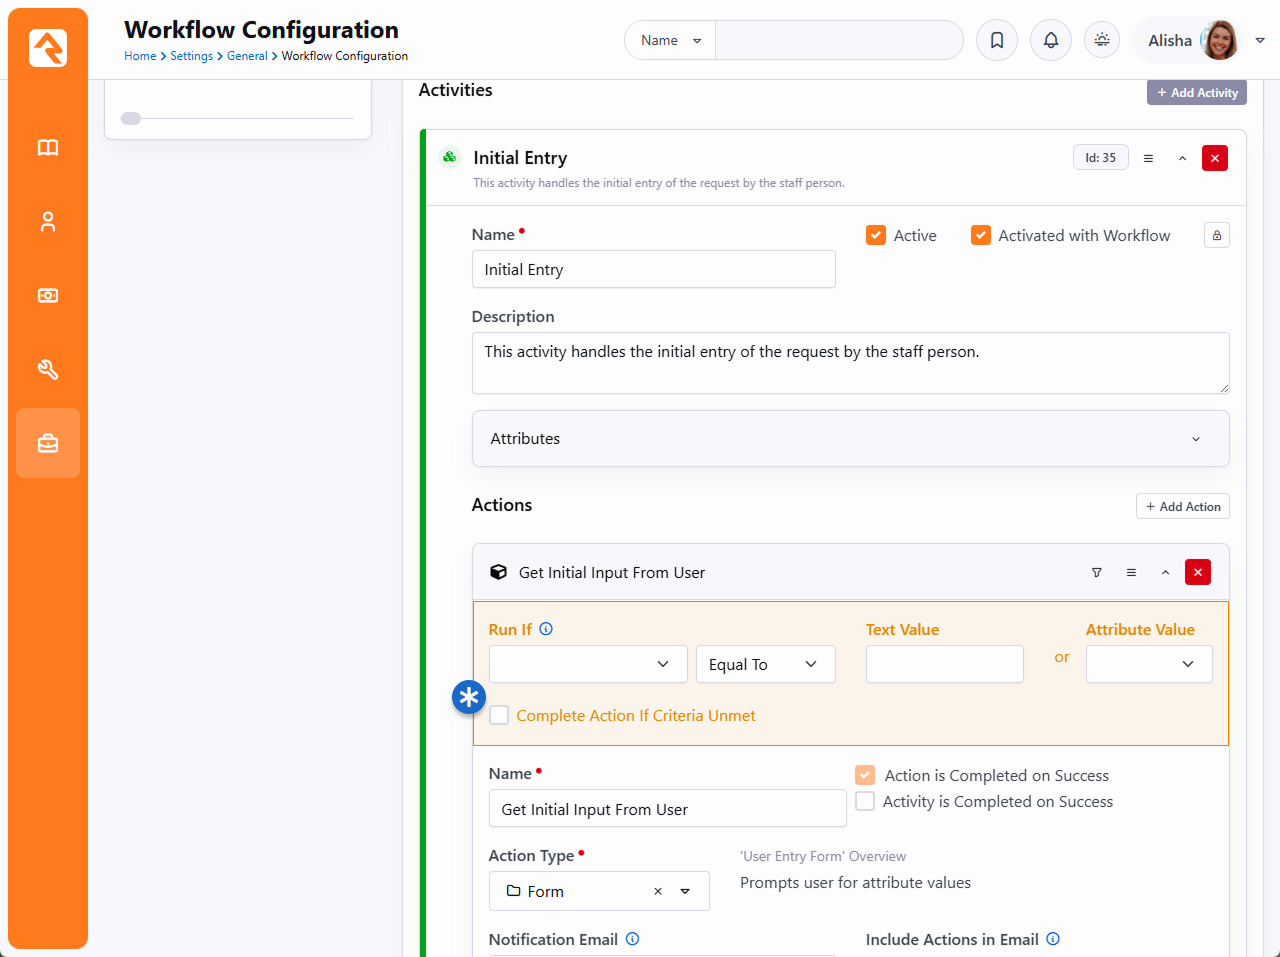
Note, when an action is completed this way, Rock will keep a
record of it in the workflow log. The log will show that
the action couldn't be finished but was marked as complete.
Default Action Types
For a listing of Rock's workflow actions, see the Workflow Actions Documentation.
There we outline a number of actions that come with Rock, providing tips on when and how to use them. Screenshots of the settings are also provided.
A Note About Check-in Actions
Many of Rock's workflow actions are specifically used for check-in workflows. We
won't be covering them in this manual since very few people will be
using them.
Launching Workflows
Once you have your workflow types configured, you're ready to start using them.
There are several ways you can launch a workflow. Each method is discussed in
detail below.
Workflow Entry Block
Many workflows will start with a person filling out a form. This is certainly the
case with workflows like IT requests, facility operations requests, HR approvals,
etc. There are a couple of ways you can launch these types of workflows.
Workflow Category Browser
Workflow Category Browser
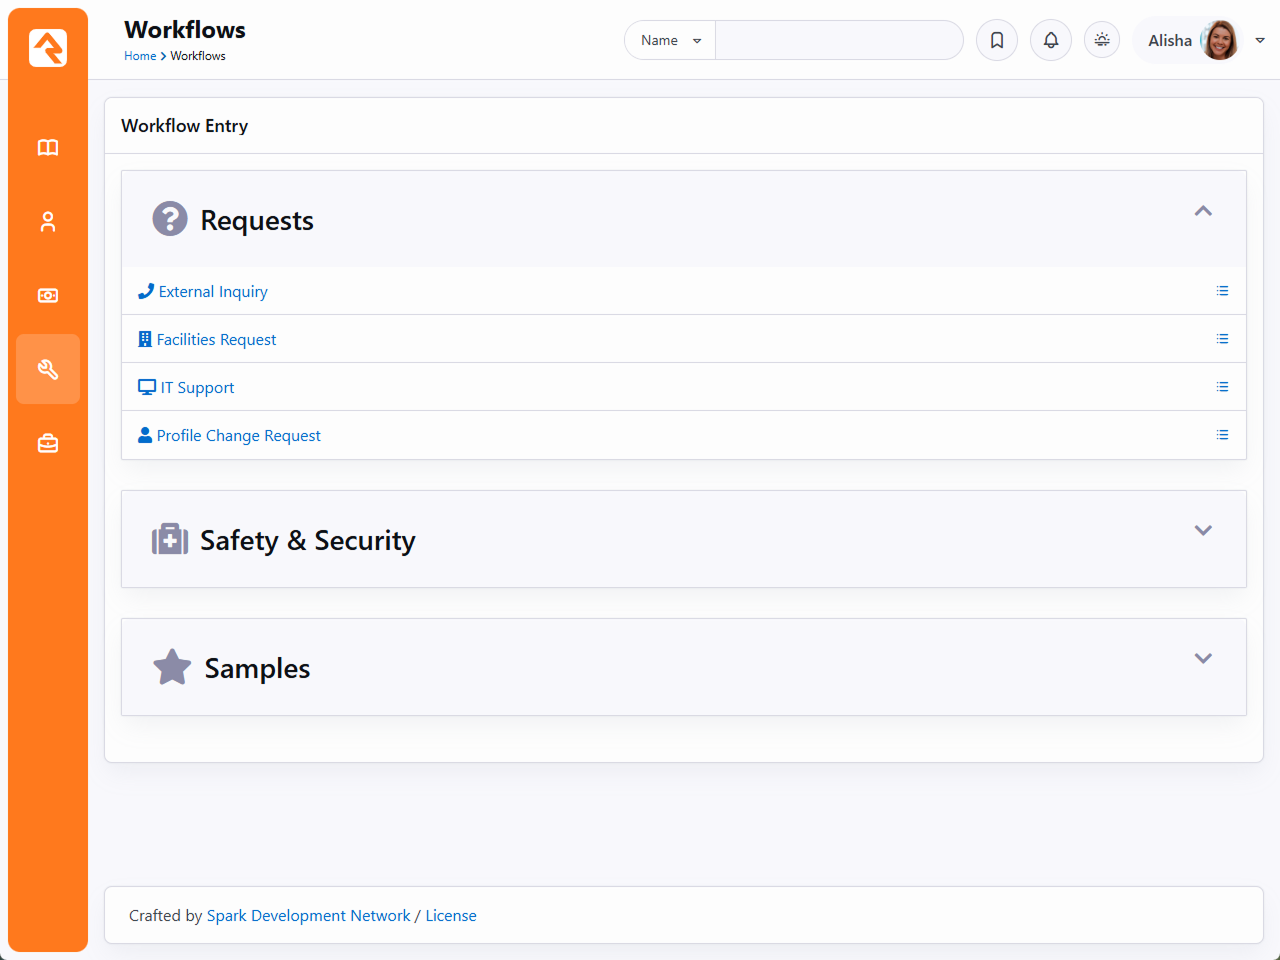
Rock ships with a workflow entry page under
Tools > Workflows.
This page displays a list of workflow categories with the ability to expand
the category to view its workflows. Clicking on a workflow will launch it
and show its first entry screen. You can configure which categories are
displayed by modifying the block's settings. Category and workflow security
will also be used to personalize the display to the specific rights of the
person viewing the page.
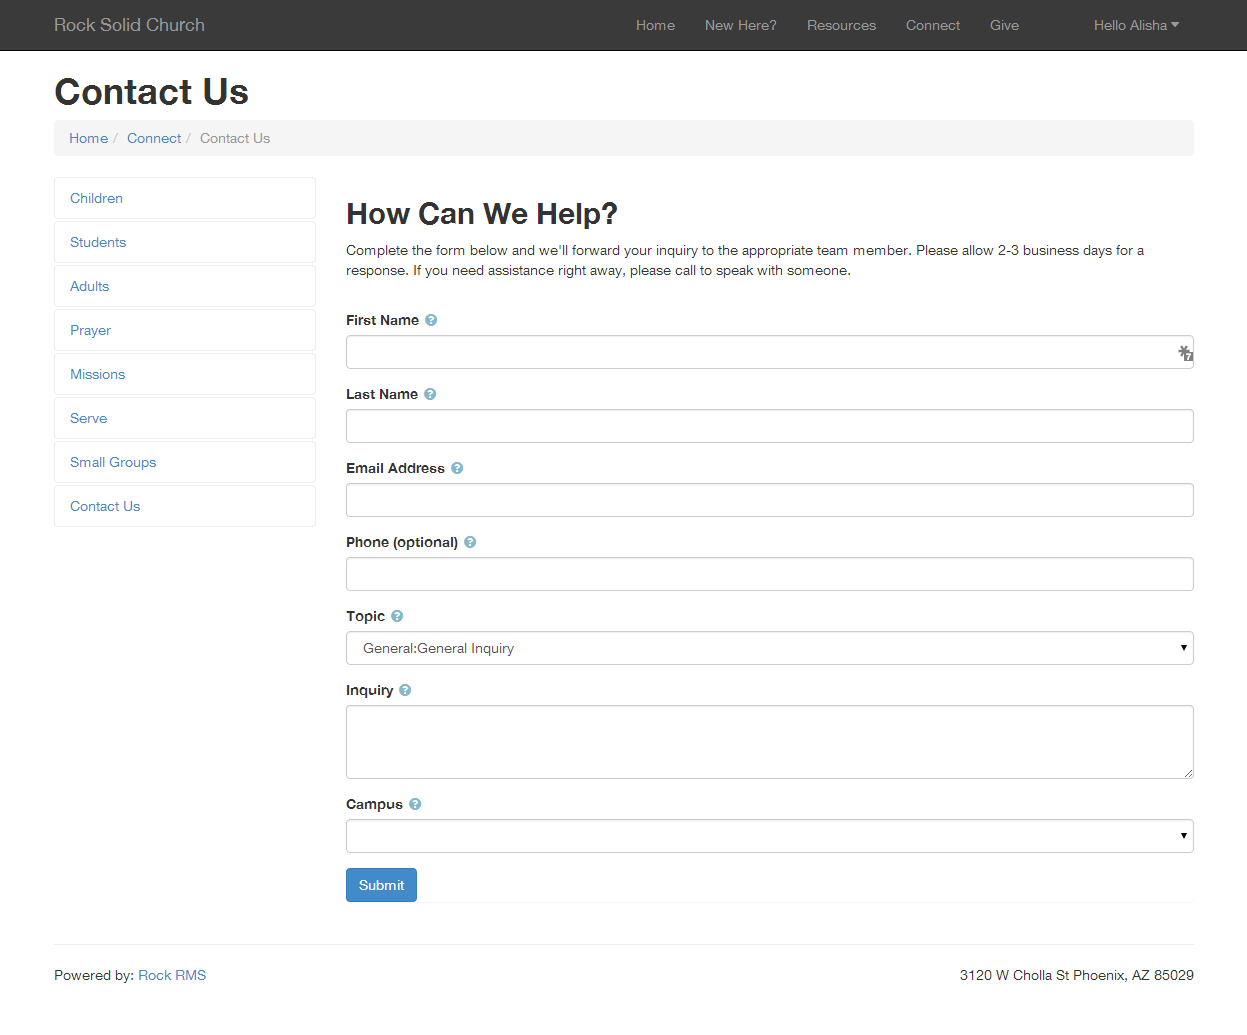
Direct Workflow Entry
There may be times when you'd like to place a specific page in the
navigation that takes you directly to a workflow entry screen. An example
of this is the Contact Us
page on the external website. This page has been configured with the
Workflow Entry
block. One of the block settings of this block type allows you to define a
specific workflow type to launch when the page loads. This is a great way
to include links to important workflows into your internal and external
sites. The magic of this technique is that the person doesn’t even know that
they are interacting with a workflow.
Workflow Entry
Workflow Entry Block Settings
Above we noted that you can configure the Workflow Entry block's settings
to set a specific workflow to launch when the block is accessed. Let's take
a closer look at that setting as well as the other block settings available
for Workflow Entry.
Workflow Entry Block Settings
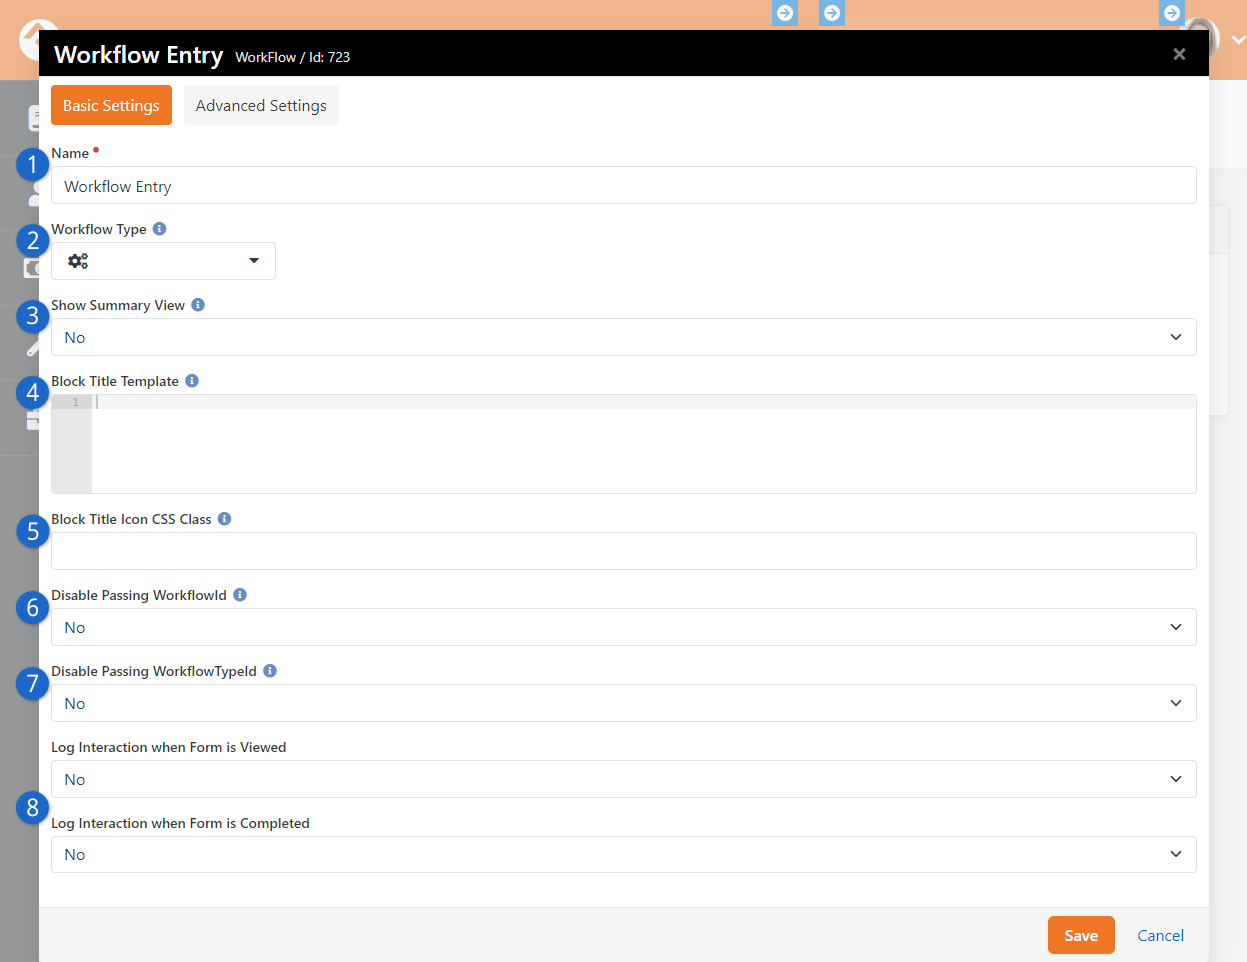
- 1 Name
- This is simply the name of the block, which you can customize if you wish.
- 2 Workflow Type
- Here is where you can specify a workflow type for the block. Whenever
the block is accessed, the workflow type you select will automatically launch
and you'll be brought to an entry form. This is how the
Contact Us example
described above is configured.
- 3 Show Summary View
- Most of the time you'll want to keep this set to "No". Enabling this will display
a summary of the workflow, showing who initiated it and when, instead of the messages
that typically display after the workflow has been submitted/completed.
- 4 Block Title Template
- You can customize the title of the block using the power of Lava. By default,
the Work Term
configured for the workflow type is displayed.
- 5 Block Title Icon CSS Class
- If you want to display a specific icon at the top of the block you can add it here.
Otherwise by default the icon associated with the workflow type will be used.
- 6 Disable Passing WorkflowId
- By default, a WorkflowId in the URL can be used to select the workflow that should
appear in this block. However, you can disable this, allowing only a workflow GUID to
be passed.
- 7 Disable Passing WorkflowTypeId
- This is similar to the above setting, but applies to Workflow Type Id. By default, a
WorkflowTypeId in the URL can be used to select the type of workflow being
launched from this block. You can disable this, allowing only a workflow type GUID to
be passed.
- 8 Log Interactions
- You can log an
interaction
when the person first views a workflow form, and when the last form is completed. Logging
interactions for both can give you insight into how long a form takes to fill out,
or how many people start the form but don't finish.
Person Profile Actions
Person Profile Actions
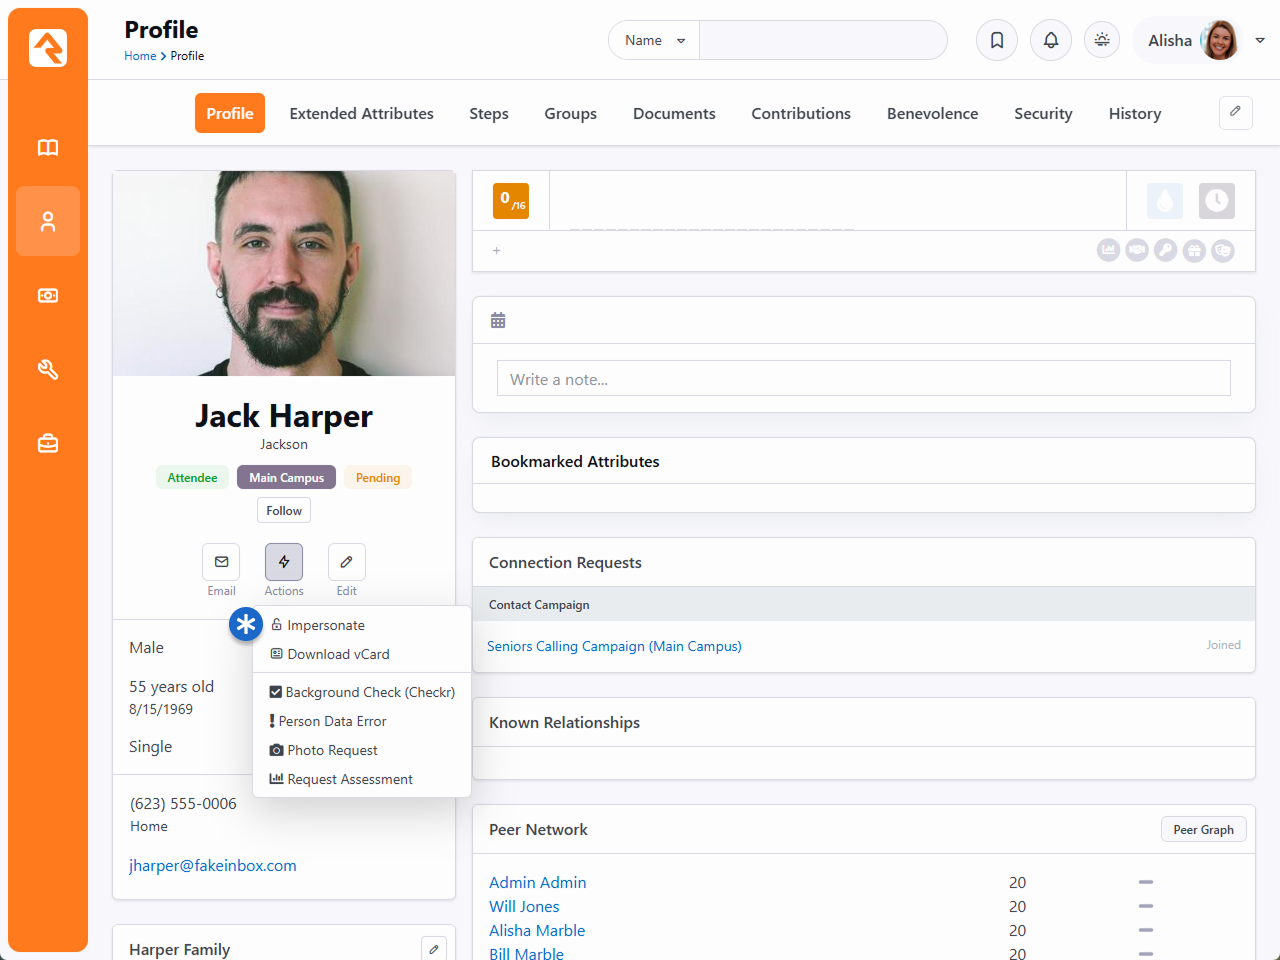
You may have noticed that there is a button on the
Person Profile
page labeled Actions.
On this menu there is an item entitled Person Data Error.
Clicking on this menu item launches a workflow that allows the person to report
any data integrity issues to the proper team. You can easily add your own
workflows to this list.
The first step is to create your new workflow. Be sure one of your first
actions uses the Set Attribute From Entity.
This takes the person whose record is being viewed and places them in a
workflow attribute (this attribute should be of type Person).
Your workflow can then add any processing logic from there.
Once your workflow is defined, you can add the workflow to the action menu.
This is done by editing the block settings back on the
Person Profile
page. There you'll see a setting for selecting workflows to add. Workflow
security will be considered when building the list so you can make sure that
only certain people are able to launch the workflow.
Entity Triggers
Have you ever thought: "Gee, I wish I could do something every time someone
saves a person in the database." Well, with Rock you can! Entity triggers can
be configured under Admin Tools > General Settings > Workflow Triggers.
Workflow Triggers
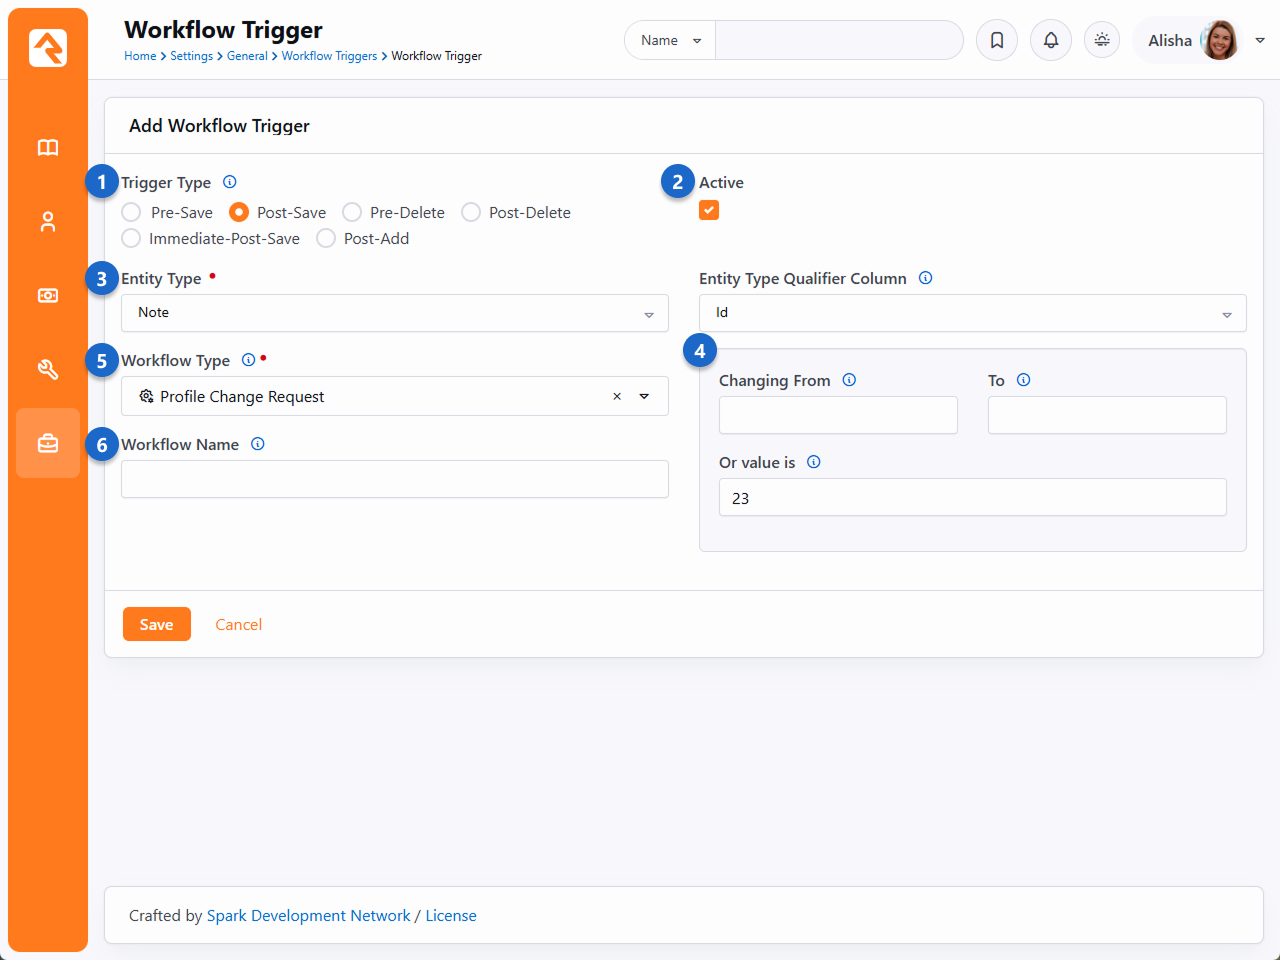
- 1 Trigger Type
- You must select when the trigger will be fired. See notes below on the
difference between pre and post events.
- 2 Active
- Determines if the workflow trigger is currently active. This is
helpful if you want to temporarily suspend the trigger but don't want to
delete it.
- 3 Entity Type
- Select the entity type you'd like to add the trigger to (e.g., Person, Group, etc.)
- 4 Entity Type Qualifier Column / Value (Optional)
- There are times when you will only want to run your trigger in certain
situations. For instance, you may want to run a post-save trigger when
groups of group type Serving Team
are saved. In this case you would set the Qualifier Column
to GroupTypeId
and the Qualifier Value
to 23
(the GroupTypeId for Serving Teams). These settings allow you to simplify
your workflows for specific use cases.
- 5 Workflow Type
- Select the workflow type you want to launch. Be sure that this
workflow saves the passed entity to an attribute so that it has access
to the value being saved or deleted.
- 6 Workflow Name
- This setting provides a workflow name for the workflows that are created.
Caution: Saving While Saving
Be careful not to set up a triggered workflow that updates the entity that is actively
being saved (for example, a pre-save or immediate-post-save trigger on a person that fires a
workflow to update a property on that person). This can cause a loop that creates an
out-of-memory condition which will make your server administrator pretty upset.
There are other related combinations that are also unsupported. Just because you
can doesn't mean you should.
Pre vs. Post Trigger Events
You might be wondering what the difference is between a pre and post event
trigger. There is a difference and it's pretty important that you select
the right type.
Pre triggers launch the workflow before the save or delete occurs. The
benefit of a pre trigger is that you can keep the save from occurring
through the logic of your workflow. If your workflow returns with an error
message, the save or delete will be aborted. Except in a few places, there
is no means for these error messages to bubble up for someone to see, so keep that
in mind when using pre triggers.
One downfall of pre triggers is that if they are initiated by someone
working in Rock, that person must wait for the workflow to launch and
complete before the save is completed. Because of this, you'll want to
be sure that your workflows are simple and quick.
Post triggers, on the other hand, can’t keep a save or delete from
occurring. By the time they launch, the save or delete has already been
done. These triggers are launched but Rock does not wait to hear back
from them before moving on. This keeps workflow performance quick.
You Can Have More Than One
You can have more than one trigger for each entity type. This saves you
from having to lodge all your logic in one workflow.
Use Post Triggers Whenever Possible
Because of their speed, try to use post triggers whenever possible.
Warning: Saved or Not Yet Saved
Even with an immediate-post-save trigger, if you try to fetch the triggered entity
from the database in your workflow, there is a possibility that its data has not
yet been written to the database.
If it's critical that you know the exact values of the entity at the moment the workflow
runs, you should capture the entity property in question with the
Attribute Set From Entity
action using {{ Entity.PROPERTYNAME }} or capture
the whole object into a text attribute using {{ Entity | ToJSON }}. You can
then safely refer to the correct value in subsequent actions.
Save the Entity First
When using the Attribute Set From Entity
action, you may be tempted to try to do more than it was designed to do. For example, if
the entity you are working with is a Group Member,
you might try to get the group's name using {{ Entity.Group.Name }}. Except
the ".Group" property is not guaranteed to be there -- only the .GroupId will be there.
In fact, even the {{ Entity }} will be gone after the initial activity.
Therefore, we recommend you always collect your Entity properties in your first few
actions, before doing anything else. And second, if you need other related items, you should
load them explicitly. So, to get that group name you can use
{{ Entity.GroupId | GroupById | Property: 'Name' }}
Launch Workflow from Grid
Have you ever wanted to run a workflow for each item on a grid? Perhaps you need to send every
person in a data view into an on-boarding process. Or maybe you want to send them an email
asking for them to complete a form. If you can write a workflow for it, you can launch
it right from a grid.
When you’re looking at a grid, all you have to do is click the
button
to launch a workflow for each item listed. Let’s look at an example using the
Group Viewer page
to launch workflows for the members of a group.
Launch Workflow From Grid - Group Viewer
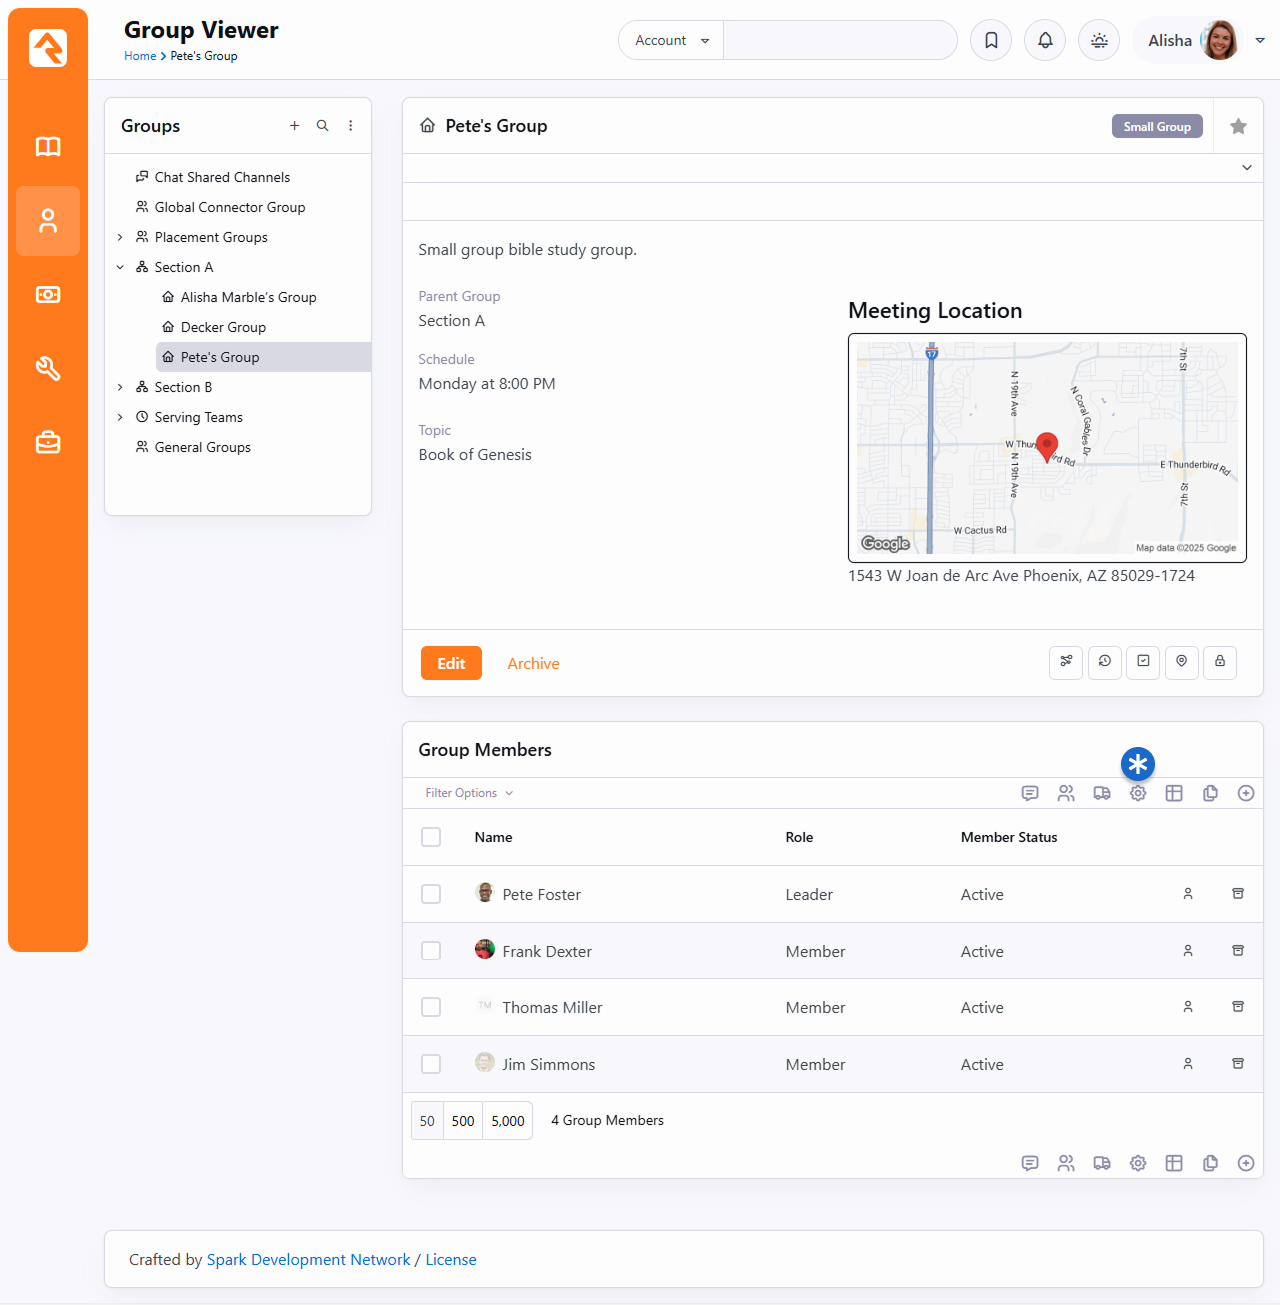
Clicking the
icon pictured above will take you to the Workflow Launch page pictured
below.
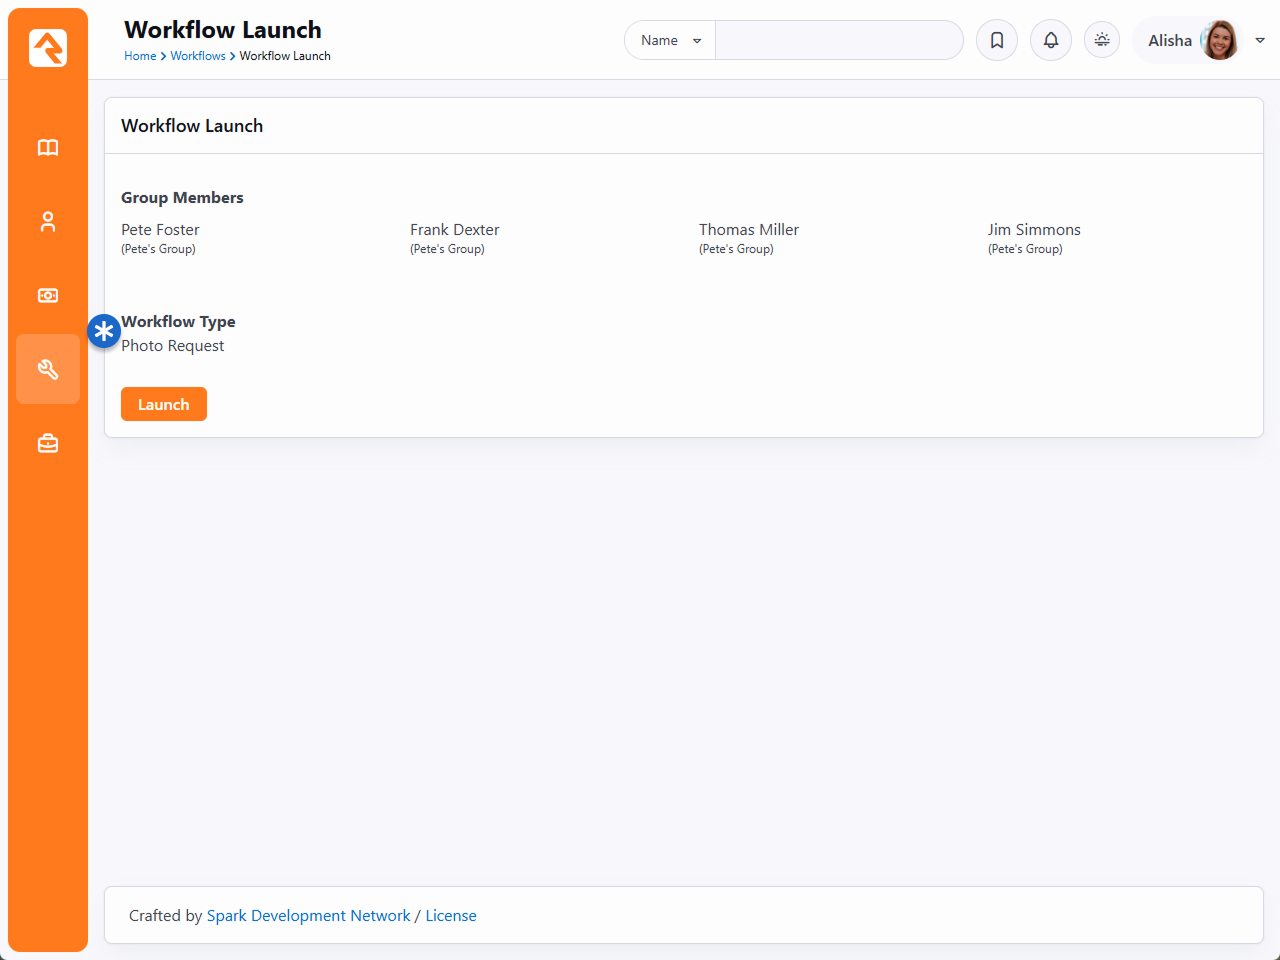
Launch From Grid - Launch Page
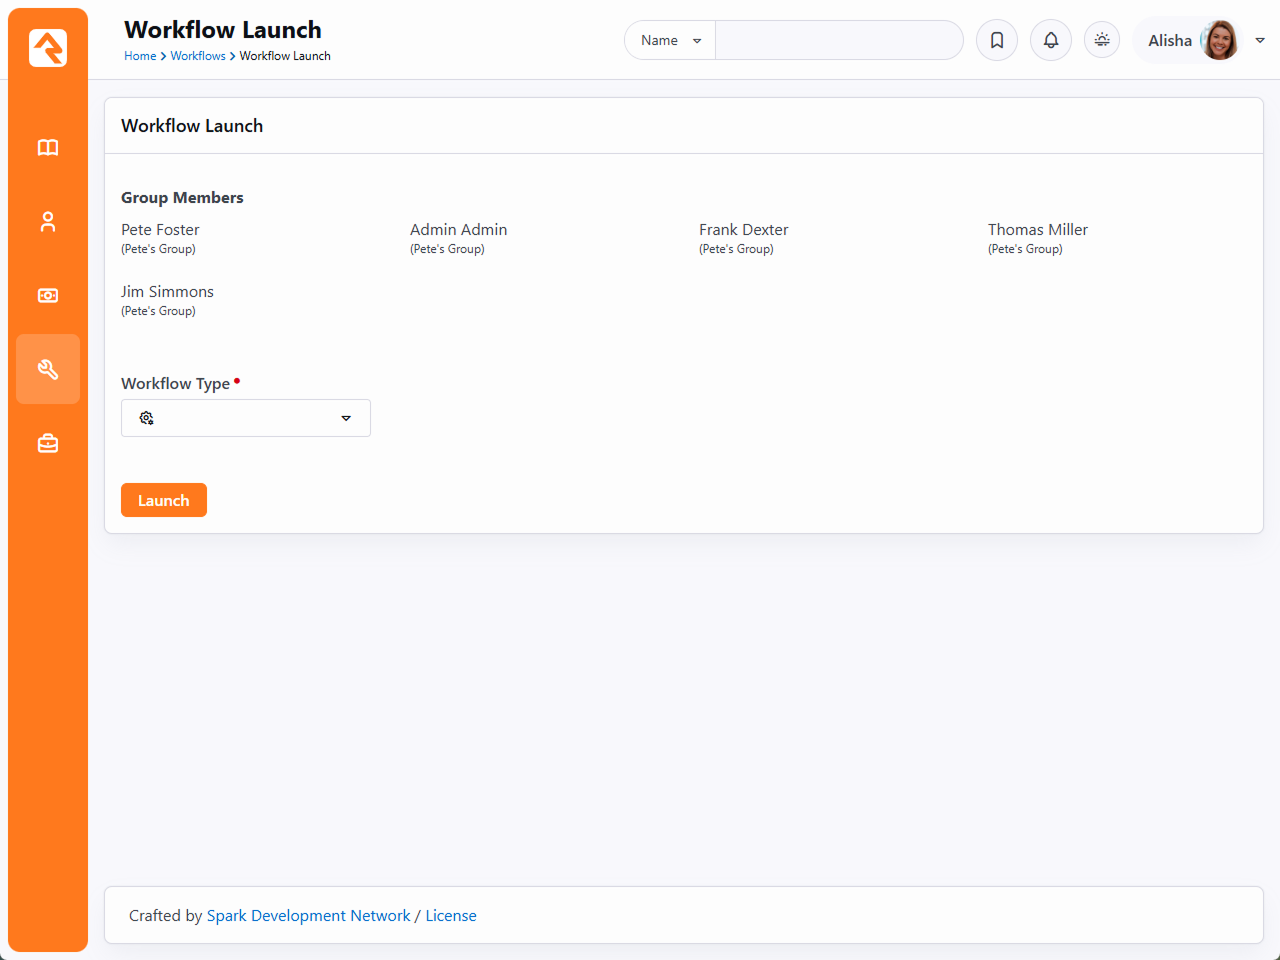
When you arrive at the Workflow Launch page you will see that each of the items (in this case,
group members) are listed at the top. This lets you check to make sure you have the correct
information and the right items.
Beneath the list of items, you’ll notice the
Workflow Type picker. Use
this to select the type of workflow to launch, then click the
Launch button. Keep in mind
that a new workflow will be launched for each item listed above the picker. In
our group member example, four new workflows will be launched. Also remember that the workflow
we're launching in this example is configured to work with group members (as opposed to
person records).
Launch From Grid - Workflow Launch Success
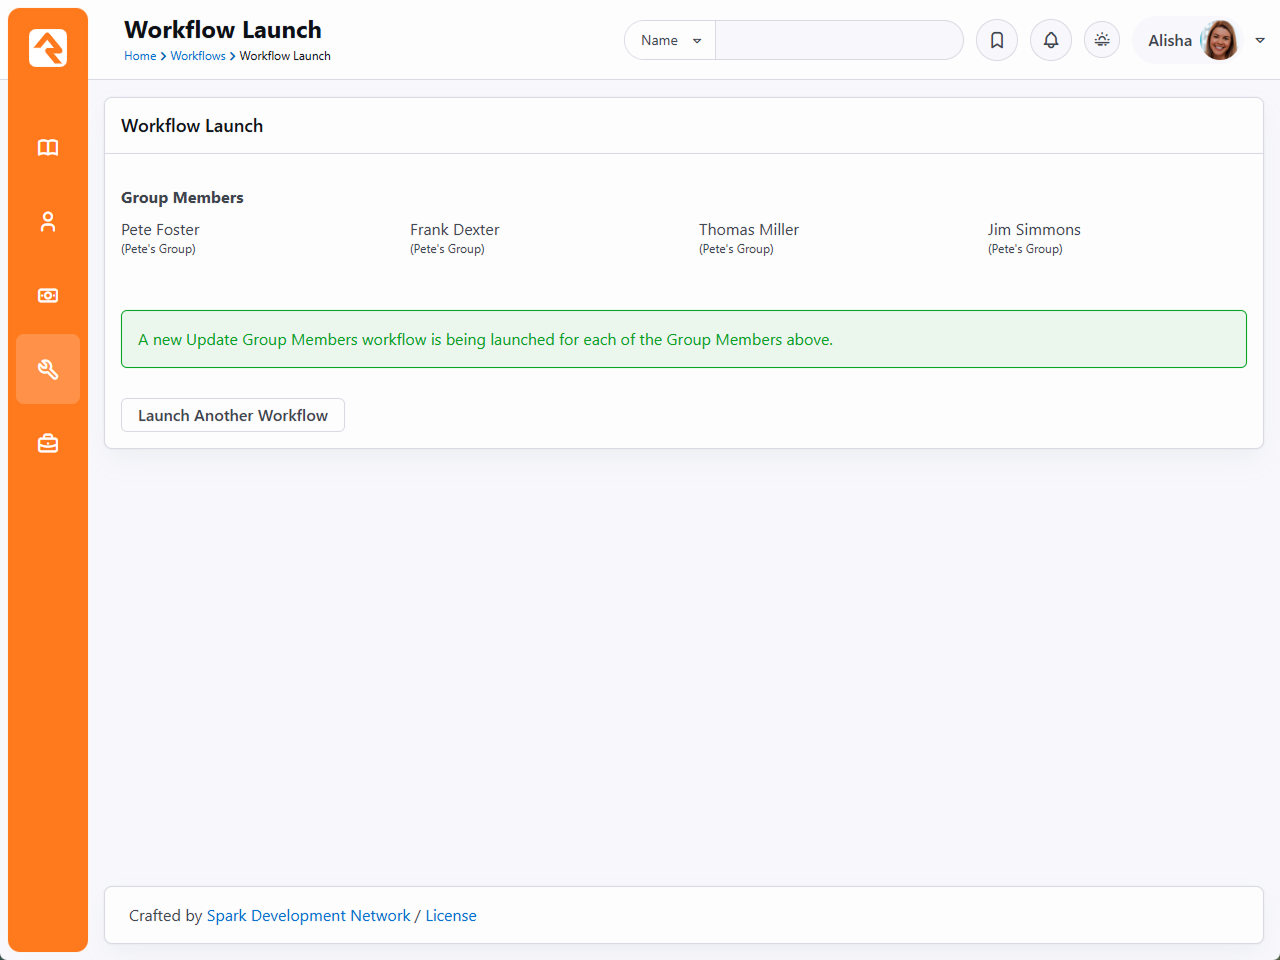
You’ll notice above that after clicking the
Launch
button, you can choose to
Launch Another Workflow
without leaving the page. This makes it easy to quickly launch multiple workflows for the same
set of items.
Extending Workflow Launches
Hopefully you’re already seeing tremendous power of launching workflows from grids. Now,
let’s look at how you can extend this feature even further.
In the above Group Viewer
example, we launched workflows for group members by clicking the
icon in the grid. This feature is enabled by default for grids in Rock, so you’ll see the
in other places and it will work the same way. But you might not
want all of your grids to allow workflow launches. Or you might want to force a specific
workflow to be launched instead of having a person choose from the picker. You can configure
all this, and more, using the options described below.
Disable Workflow Launcher
We'll start with the most basic setting. If you want to turn off the launcher for a
grid, all you have to do is access the
Custom Grid Options
in the grid’s block settings. Expand the
Custom Actions area
and set
Enable Workflow Launcher
to “No”.
Enable Workflow Launcher
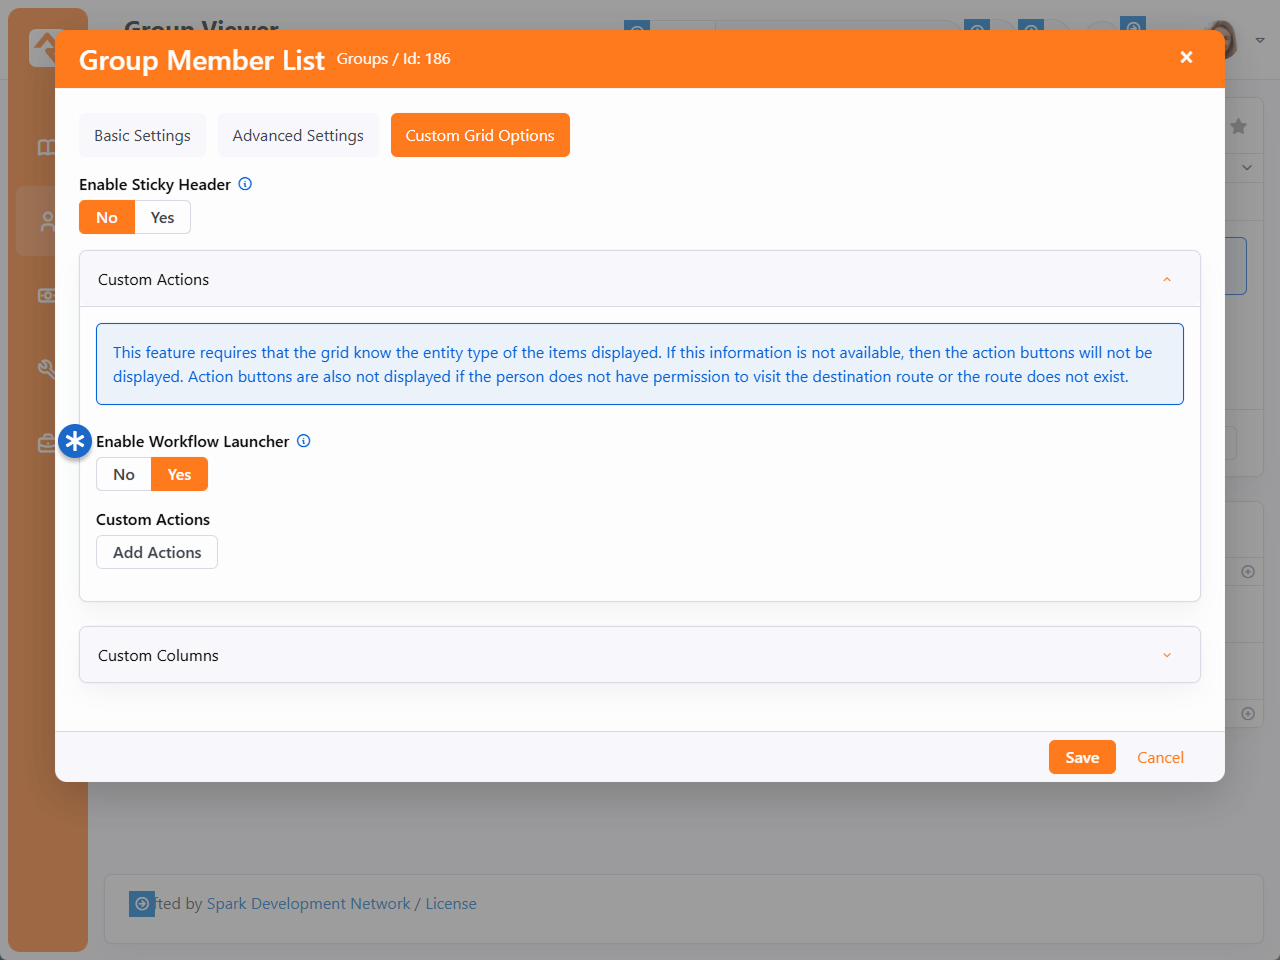
This setting only applies to the workflow launcher that ships with Rock, as described in
the above section. Custom actions (see
below) are not impacted by this setting, even if those
actions will launch a workflow.
Workflow Launch Block
The workflow launcher takes you to a page with a workflow launch block. This block is
the bridge that connects the items in the grid to the workflows you want to launch for
those items. Administrators can change the block settings to customize different aspects
of the process.
Launch From Grid - Block Settings
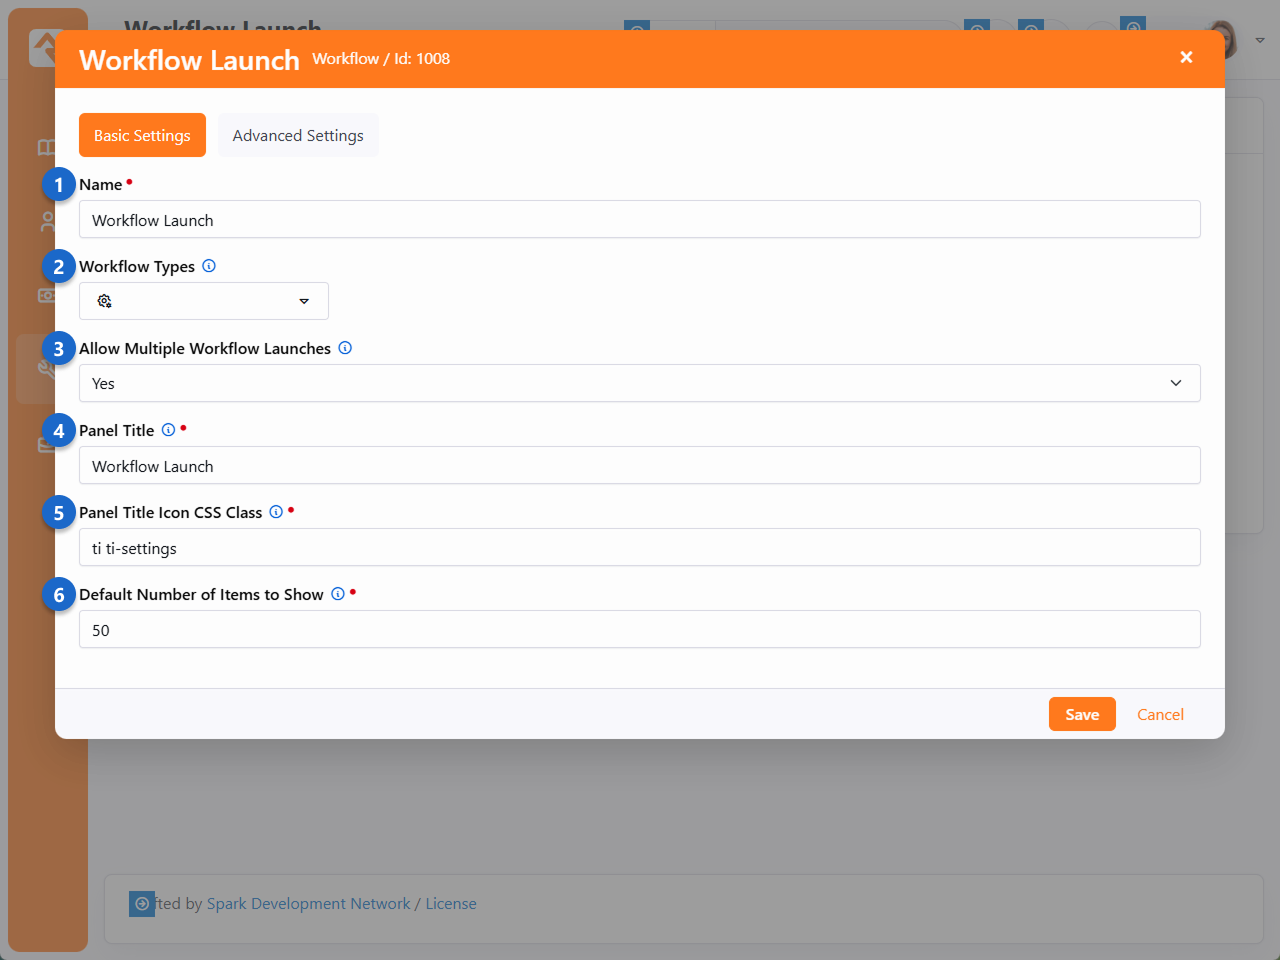
- 1 Name
- The name of the block can be changed here.
- 2 Workflow Types
- You can specify which workflow types are able to be launched by adding them
to this list. The Custom Actions section below
describes a different way to restrict the workflow types on this block, so be sure
to check that out before using this field.
- 3 Allow Multiple Workflow Launches
- If set to yes, this allows launching multiple different types of workflows
for the same set of selected items. After one is launched, the block will allow
the individual to select another type to be launched.
- 4 Panel Title
- The title that’s displayed in the block panel can be customized here.
- 5 Panel Title Icon CSS Class
- By default, the
icon is displayed, but you can
change it here.
- 6 Default Number of Items to Show
- This setting controls the number of items that will be shown on the launch
screen. If the number of items in the grid is higher than this number, a count
will be displayed showing how many aren’t visible.
The workflow launch block is programmed to look for a Workflow Type Id in the URL. If it
finds one, then the block will automatically lock the workflow picker to that workflow
type, and it can’t be changed by the person. This is like specifying a workflow type in
the block’s settings, except the block will dynamically change according to the query
string in the URL. We’ll show you what this looks like in the
Custom Action Routes section below.
Custom Actions
Now let’s talk about the doors that open with
Custom Actions.
Custom actions work like the workflow launcher example described above. An icon gets
added to the grid (like the
icon) and then a person can click
it to start your custom action. The key is that this isn’t limited to group members or
workflows. Custom actions can take items from any grid and use them wherever you need.
In the below example we'll take a look at adding custom actions to a data view results
grid.
Custom actions are added in the grid’s block settings, in the same
Custom Grid Options
area as the
Enable Workflow Launcher
setting described above. Click the
Add Actions button to
create a new custom action.
Grid Block Settings - Add Custom Action
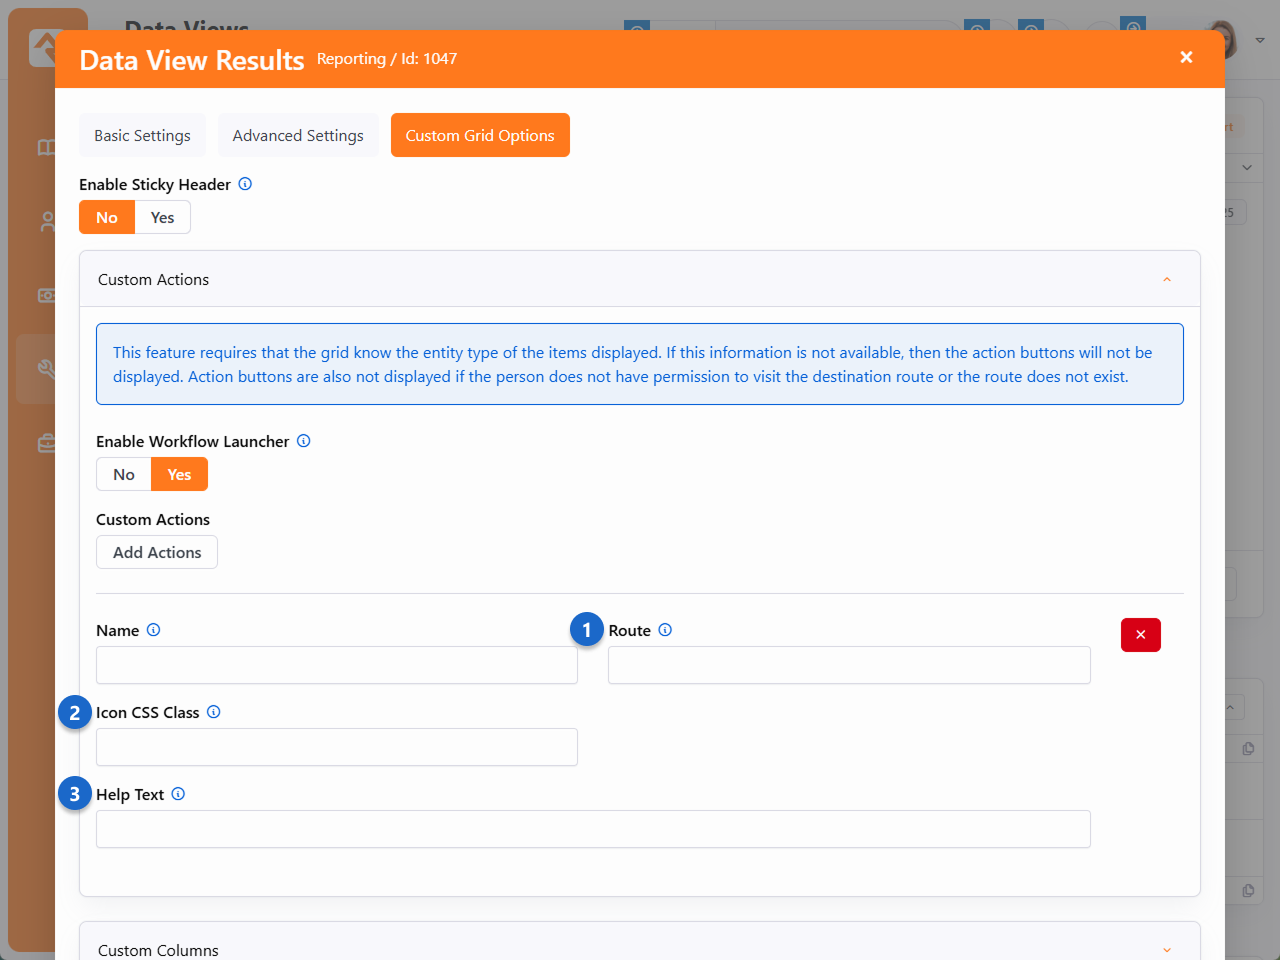
- 1 Route
- The route you provide drives your custom action. People will be taken to the
page provided when they initiate your custom action from the grid. If you want
to launch a workflow for each grid item, the route should point to a page with a
workflow launch block. We’ll talk more about this field below.
- 2 Icon CSS Class
- This is where you choose the icon that appears in the grid. People will
click this icon to initiate your custom action.
- 3 Help Text
- When a person hovers over the icon in the grid, this text will appear to
indicate what action will be taken.
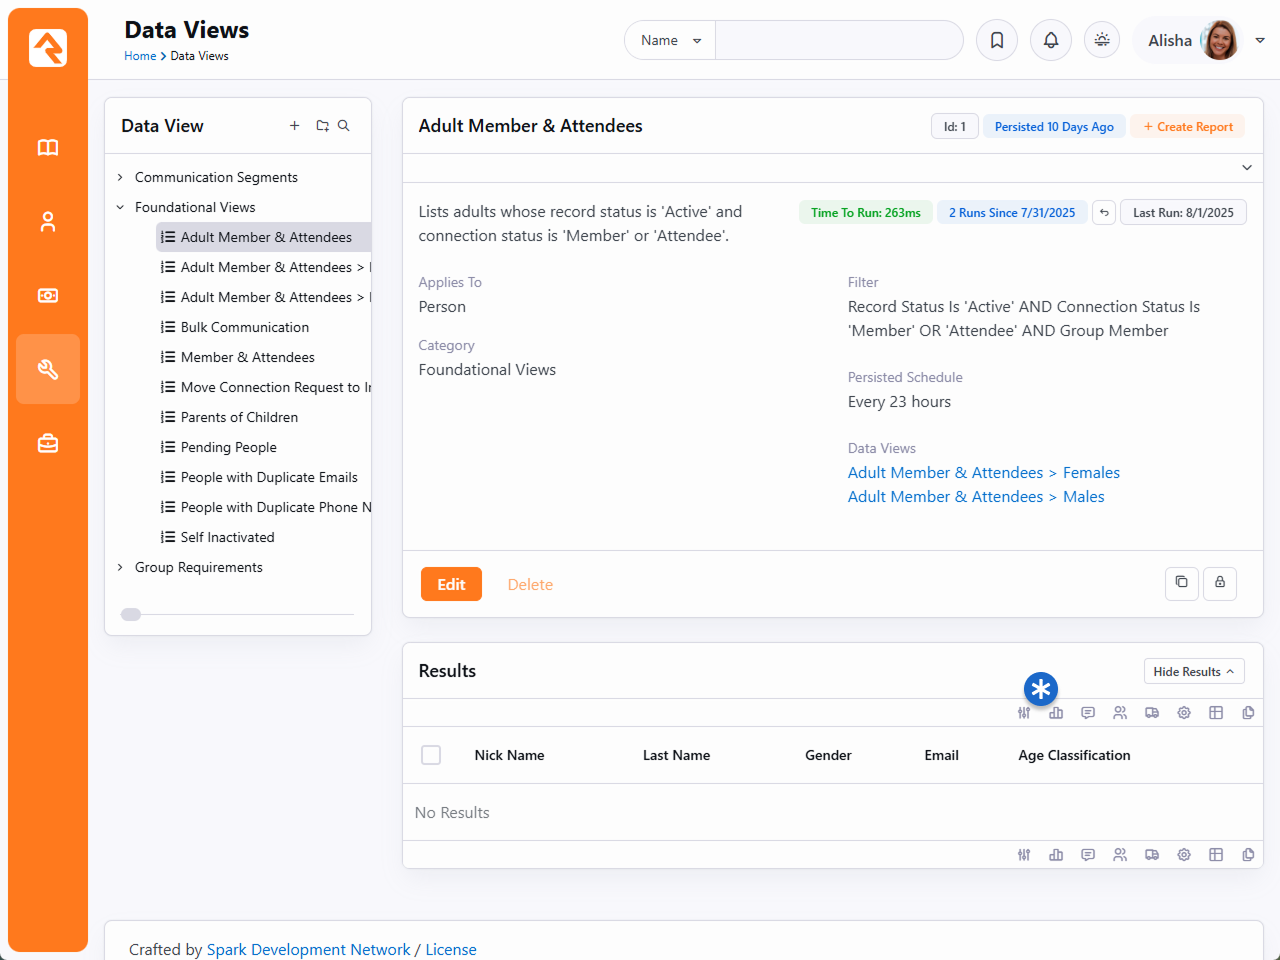
Using the configuration pictured above, the grid containing people from the
data view now has a new icon for the new action.
Data View Grid With Custom Action Icon

Custom Action Routes
As noted above, there’s more to the
Route configuration
than just taking the person to a different page. In the example configuration above, the
route is /page/630?WorkflowTypeId=16. Let’s break that down.
The first part of this action’s route takes the person to a new page, which is
/page/630 in this example. We’ve added a workflow launch block to that
page, so that’s all we need for this route to work for launching workflows. In this
case, a route of /page/630 would result in a custom action that’s very
similar, maybe identical, to the workflow launch process described in the prior section.
To take it a step further, don’t forget that the workflow launch block checks for a
workflow type in the URL. If it finds a workflow type, then it will lock the workflow
picker to that type. All you need to do is add a query string parameter in the format of
?WorkflowTypeId=xx to your route, and the block will automatically pick it
up.
Populating Workflow Attribute Values
The workflow launch block will take any of the parameters that are in the query
string and pass them into the workflow's matching attributes. So, if you have
a group attribute in your workflow, you can pass the group's Id by including
?GroupId=12 in the route.
The example route we used above has an added parameter of
?WorkflowTypeId=16. This tells the block to allow only the “Photo Request”
workflow type.
Workflow Launch Block - Locked Workflow Type
This custom action now provides a dedicated icon people can use to launch only “Photo
Request” workflows. Remember, the block itself hasn’t changed. It’s only locked to photo
requests in this case because of the route in our custom action.
Keeping that in mind, you can add new icons to launch different types of workflows using
the same target page and the same block. In addition to photo requests, you might add a
new custom action for assessment requests, giving you an icon for each on the grid as
pictured below.
Multiple Custom Actions
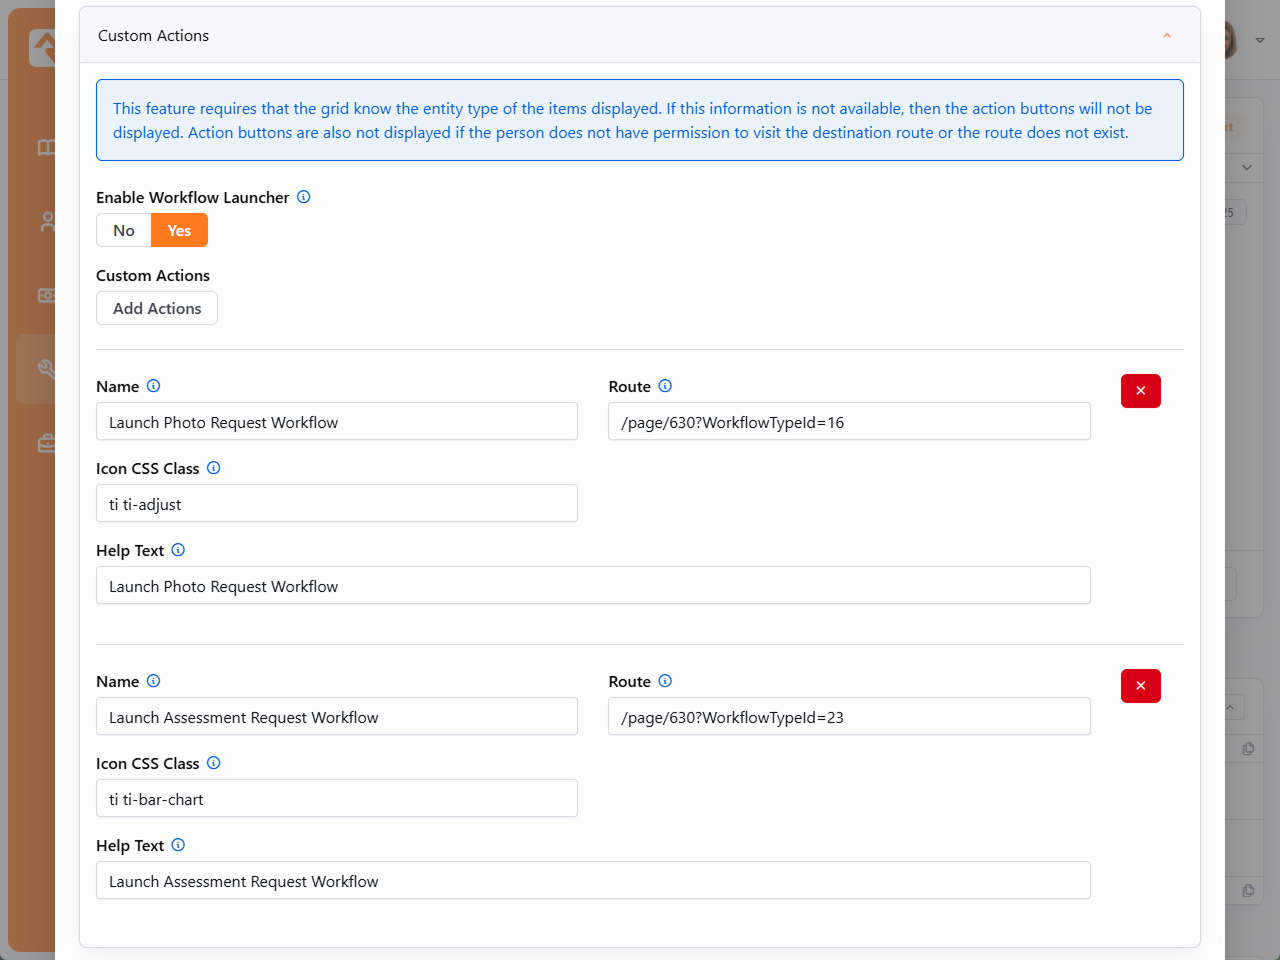
Note in the screenshot above that both routes point to the same page, and the same
workflow launch block. Adding the workflow type to the
Route means that the
icon will launch only photo requests, while the
icon will launch only assessment requests.
Multiple Custom Actions - Launch From Grid Icons
Working with Launched Workflows
In the above sections we’ve only been using workflow types that ship with Rock, launched
from Group Member
and Data View
grids. But you can use these features with other workflows, and with other grids.
When you’re building a workflow to launch from a grid, it’s important to know what types of
items, or entities, the grid contains. The examples in prior sections were working with
Group Member and
Person entities
because those are the types of entities contained in those grids. Other grids may have
different entities, like groups or financial transactions.
The key is knowing that the entity is passed from the grid to the workflow. That means the
grid needs to know the type of entity it’s working with, but it also means your workflow
needs to be designed to work with that type of entity. The best way to do that is to use the
Attribute Set from Entity
action, to capture each entity from the grid and assign it to a workflow attribute.
Attribute Set From Entity - Group Member
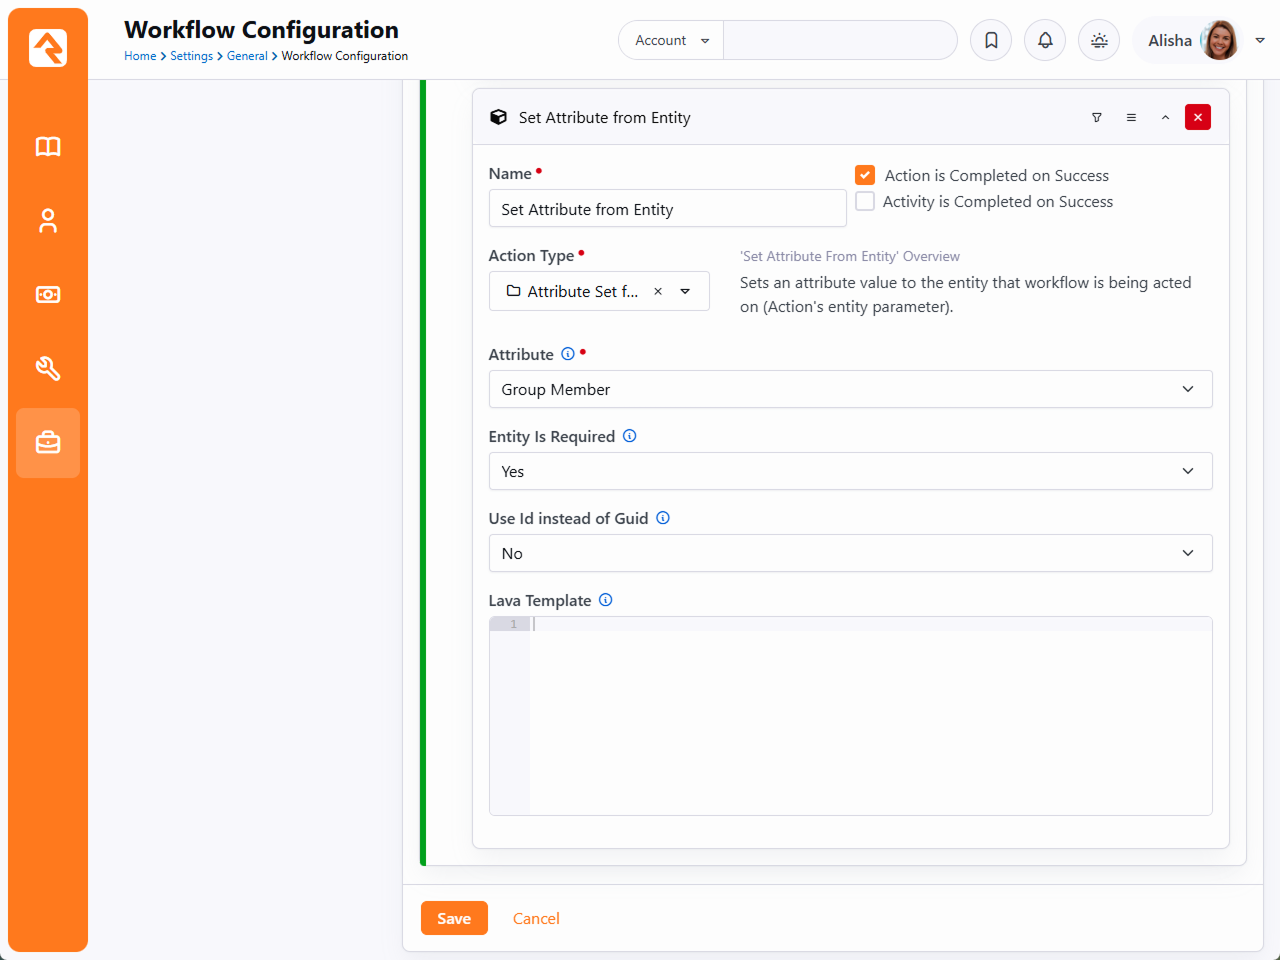
You can see above that the group member from the grid will be assigned to the workflow's
"Group Member" attribute. Now the entity can be referenced directly in the workflow, and you
can use it in other actions. Remember, a workflow is launched for each entity in the grid.
We're only processing a single group member in this workflow, not the set of group members.
Lifecycle Of A Workflow
Now that you're up to speed on how a workflow is launched you might be wondering
how a workflow executes from there. Understanding the life cycle of a workflow is a
key to building activities and actions that flow the way you expect them to.
When a workflow is launched, the workflow engine completes the following steps:
-
Activates each of the activities that are configured to be
Activated with Workflow.
-
Proceeds to each newly activated activity in the order it was
defined and runs its actions. If one of the actions does not complete
successfully, it stops running the activity's actions. If they all complete,
or if one of the actions is configured with
Activity is Completed on Success,
the activity is marked completed.
Now that a workflow is active, and not yet complete, the engine will attempt to
re-run it on the interval defined by the workflow type using the following steps:
-
All uncompleted actions on an activity will be run in the order they are defined.
-
If the running of these actions has completed, the activity will be marked complete.
The active workflow will continue to be executed on the polling frequency until
the workflow is marked complete.
Looking Under The Hood
You might be wondering what keeps the workflow engine running on the interval
schedule. Rock has a system job called
Process Workflows
that is set to run every 10 minutes. This job can
be viewed (but not edited) under Admin Tools > System Settings > Jobs Administration.
Because this job only runs every 10 minutes, setting your workflow processing
interval to less than 10 minutes will have no effect.
Be Aware of System Performance
While it might seem nice to have your workflows execute on a short processing
interval, it could impact system performance if you have a lot of active workflows
to run. Consider using a processing interval that best fits the need of your
workflow type.
Auto Closing Workflows
Have you ever wanted to give up on something? Well, this could be the case with certain
types of workflows. In situations where it's no longer sensible to continue running
a workflow, you now have an option to clear the slate. The Complete Workflows
job can be added in the
Jobs Administration screen.
You can configure it to run against one or more
workflow types that are older than a certain number of minutes. Alternatively, if you leave
the Expiration Age
setting empty, it will complete all workflows when the job is run. This can be useful if you
schedule the job to run at certain times of the year. You can also provide a custom
Close Status (such as 'Expired')
to know at a glance why the workflow was completed when you are reviewing them at a later date.
Working With Entry Forms
Workflow entry forms are one of the most exciting features of Rock's workflow engine. They allow
workflows to interact with people in some powerful ways. With them, you can create mini-applications
that once required a dedicated developer to produce.
The backbone of form entry is the Form
action. This is what presents the form to the person. Let's unpack its usage a little more and see what its capabilities are.
Form Action
To help us understand this action better, let’s go back to the simple
HR Position Request
example from earlier, specifically the first entry form that Ted used to start the request.
Below is a screenshot of the entry form action used in that workflow.
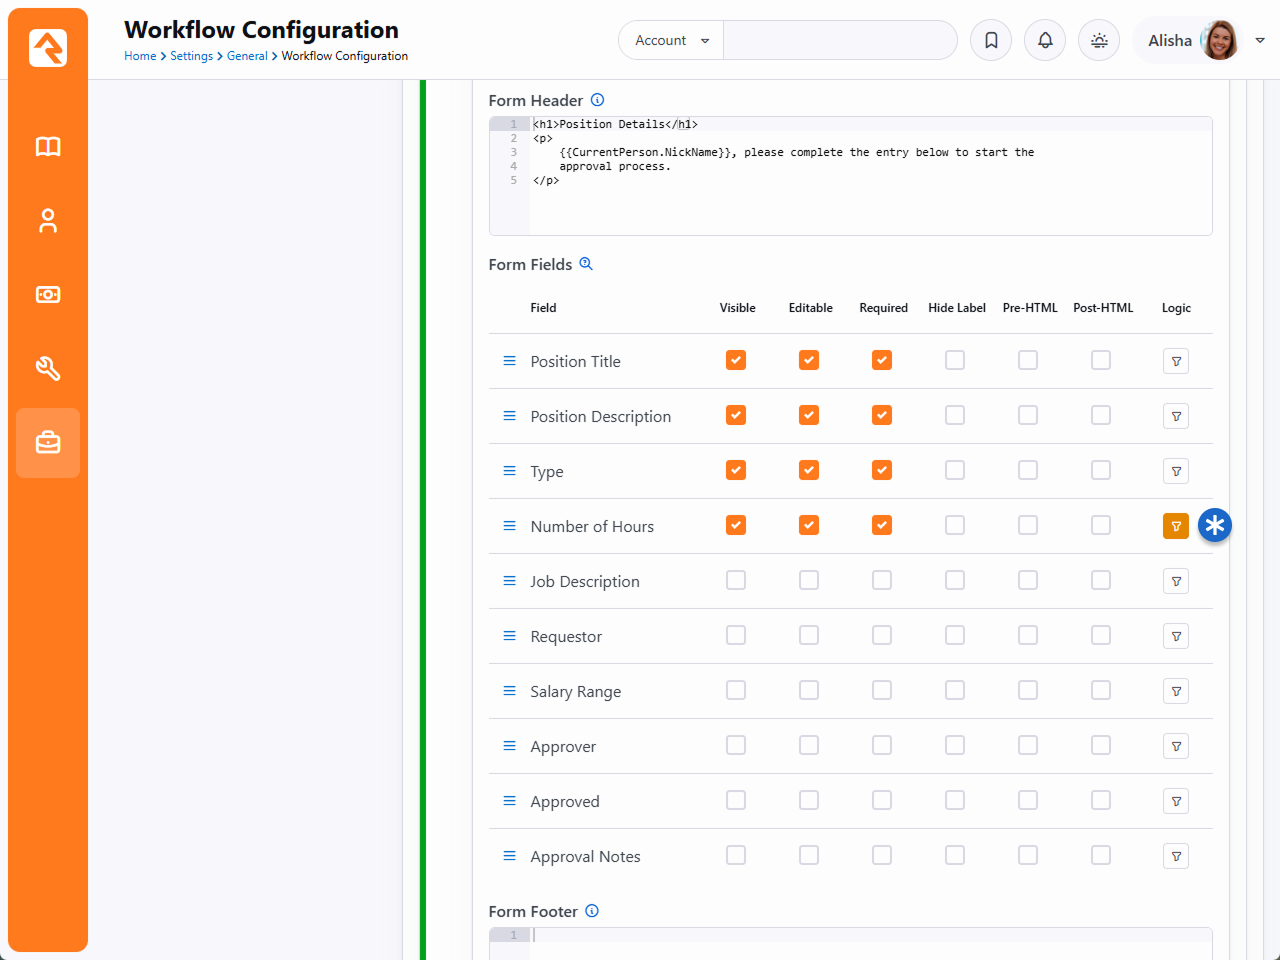
Form Entry Sample
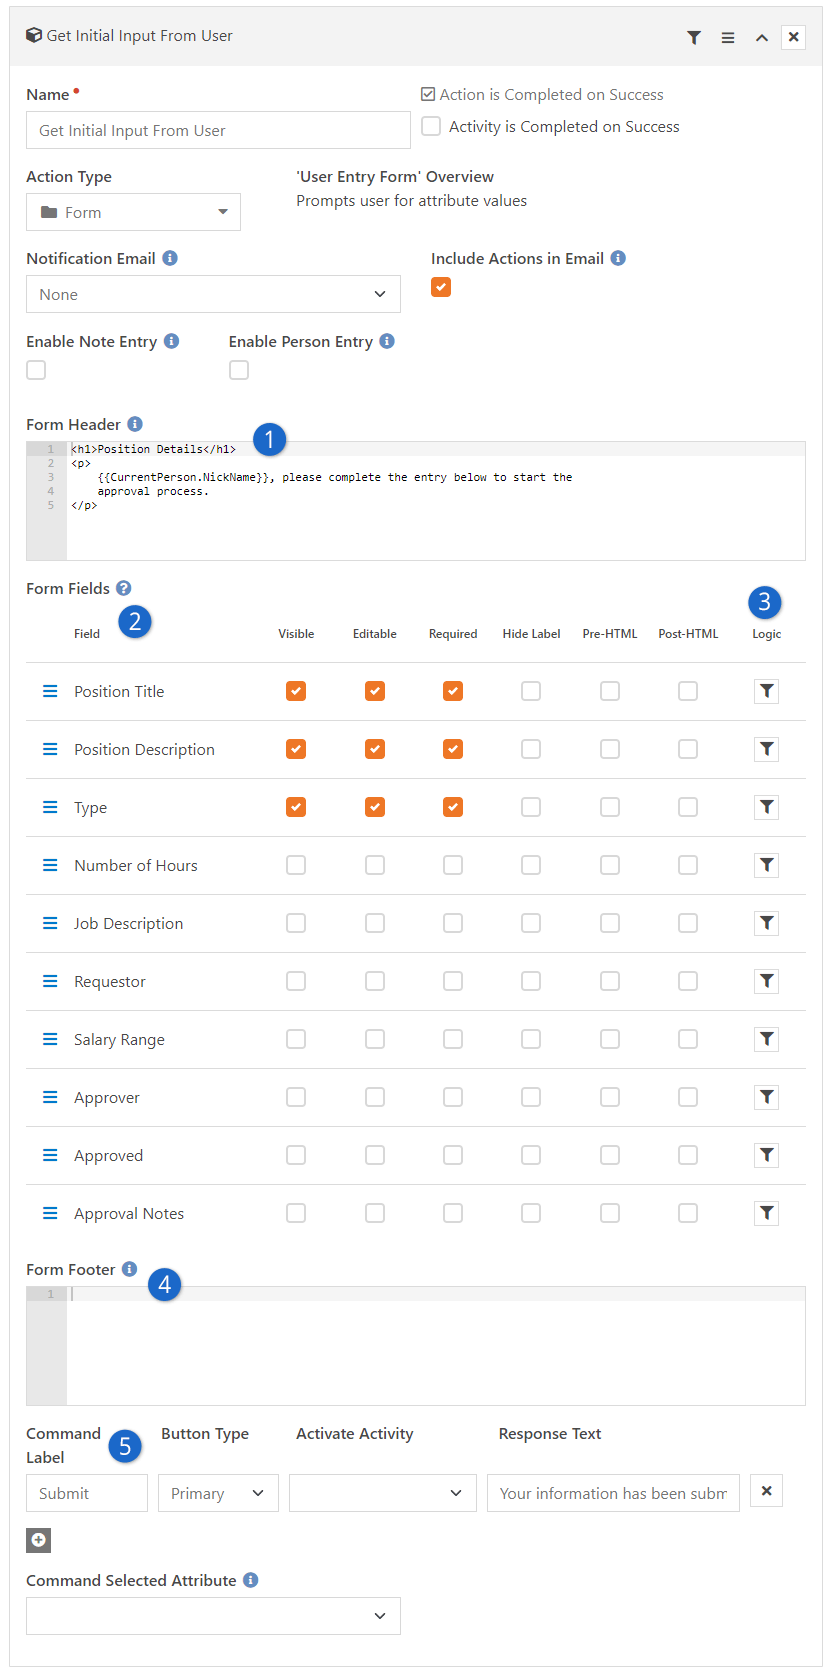
- 1Purpose
- The Form Header
is a great place to introduce the purpose of your form and any background knowledge that
might be needed. As someone who uses Rock, we know you won’t make the mistake of writing a dry
and impersonalized message. Instead, we're sure you'll remember to use Lava merge
fields like
{{ CurrentPerson.NickName }}
to make your form feel personalized. That's just how you roll...
- 2Attributes
- Next, you'll pick which Workflow / Activity attributes you want the person to complete.
For each, you can select whether the fields are: Visible, Editable and/or Required.
- 3Logic
- You can click the button next to any of the form fields
to apply conditional logic. This allows you to configure this field to show or hide based
on the value of other fields. For more
details see the Conditional Logic section below.
- 4Form Footer
- The footer text is a great place to add information about what will happen next in the process.
- 5Commands
- Finally, you can add different Commands
to the form. These commands cause the entry form to be submitted and different parts of
the workflow to be activated. We'll talk more about commands next.
Entry Form Commands
Commands allow people filling out the form to execute different logic based on their selections. For instance, on
an approval entry you might add two commands of Approve
or Deny. Depending
on which command is selected, different activities and/or actions can be run. There
are two different ways commands can trigger logic. Let’s consider both in detail.
Commands That Launch Activities
You can have your commands activate new activities when they are selected. You do
this by selecting the activity using the Activate Activity
property of the command. When selected, the command will activate the selected activity.
Commands That Set Attributes
Sometimes you may not want to launch a new activity based on a command. Instead, you can use actions
within the same activity to process any next steps. In these cases, simply leave the
Activate Activity
field empty. When empty, the next action in the current activity will be executed when
the entry form is completed. You can even have the command that was executed entered
into a workflow attribute using the
Command Selected Attribute. This is helpful when multiple commands are available, and
you'd like to know which one was selected.
When To Launch New Activities
You might be wondering when you should launch new activities and when you should not.
The choice is really up to you. But here are a couple of thoughts to help you drive your decision:
-
In approval forms it's common for each option to launch a new activity. This
allows the decision-making logic to be clearly separated into different activities.
-
If you're using form chaining (more info below) based on a person's input, you may elect not to use new activities.
Entry Form Chaining
In our sample HR workflow, you'll remember that the initial entry form asked if the position was
full-time or part-time. Depending on the person's selection, they were taken to a new entry form
based on their input. This is a feature called entry form chaining. When the command on the
first form is executed, the workflow is activated and processed. If any action in the workflow
assigns a new entry form action for the current person, its form will be shown. This is a
very powerful feature because it allows you to build complex interactions with the person.
Let's look at how the sample position request form was configured for chaining.
Entry Form Chaining
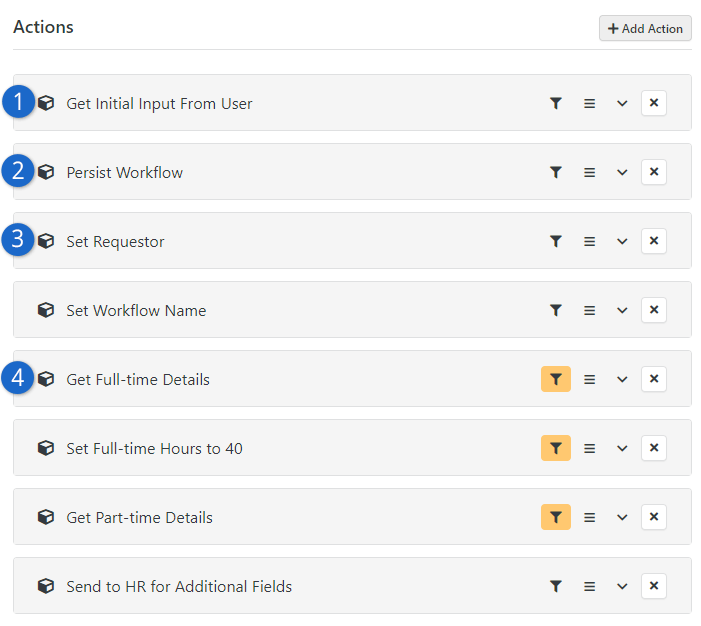
- 1Entry Form
- Our initial entry form, which included the attribute of
Full-time or Part-time.
- 2Non-persisted
- The workflow was initially configured to be non-persisted. This was to keep
the workflow from being saved in the database in the case of a person who clicked
on the form but then left. Now that the person has entered information and executed
a command, we will persist it.
- 3Requester
- Next, we set the requester for the workflow and also provide a workflow name.
- 4Second Entry Form
- Now we're ready to show the second entry form, depending on their input.
Each of these entry forms is configured with action filters that limit them
to only be run if the position type is either
full-time
or part-time.
As you can see here, using action filters with entry forms can be very powerful.
Instead of using action filters, we could have launched separate activities to get the details
for each position type, one for full-time and one for part-time. In this case though,
the action filters seemed a better option.
Emailing From the Entry Form
In many cases you'll want to email an individual to let them know that a workflow needs
their entry before continuing. While you're welcome to configure the
Email Send
action to do this, there is a short-cut built into the
Entry Form action.
Entry Form Email
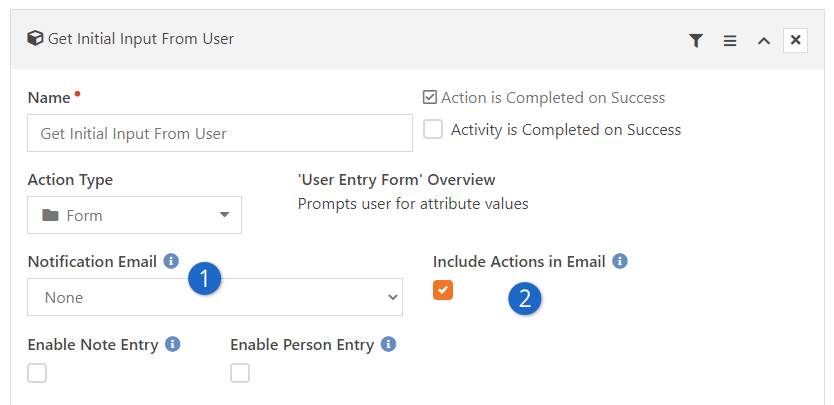
- 1Notification Email
- You can select a pre-configured email template to use for the email.
- 2Include Actions in Email
- You can also select whether the commands you've configured should be
included in the email. This allows the recipient to execute various
commands right from their email client.
Workflow Email Templates
The default communication template that ships with Rock will list the values of all of
the workflow attributes selected on the entry form in the email. If this is not what you'd like,
you can either create your own email using the
Email Send
action, or you can create a new template. This new template can be created under
Admin Tools > Communications > System Communications.
In order for the template to be displayed on this list, it must be added to the
Workflow category.
Commands In The Default Email Template
As we mentioned above, the default email template will list all of the attributes selected
for the entry form. Also, if there are no required fields for the form, it will add buttons for each command.
If an entry field is required, the commands won't be shown.
See our Communicating With Rock
guide for more information on system communications and communications in general.
Buttons
Buttons on entry forms have several capabilities. Learning to extend them can help you build even more power into
your workflows.
Button Types
You'll notice that Rock ships with several different button types. These provide the basic styles for the buttons.
You can define new types under Admin Tools > General Settings
> Defined Types > Button HTML. When you define a button, you must provide mark-up for both a normal webpage and
an HTML email.
Cancel Buttons
All buttons on a form will cause 'validation' to occur. This is a fancy term for checking that all the required fields are
provided for. Sometimes though you want to provide a cancel button. Having to fill out all of the required fields just to
cancel can be annoying. To keep the validation from occurring simply use the
Cancel button type or change the {{ ButtonClick }}
merge field to be "return true;".
Using Person Entry
Often, one of primary reasons for using the Form action is to collect information about the person who is filling out the
form. For instance, you might want their name, email address and phone number. This kind of information is requested so often
that Rock has a feature to automate adding these kinds of questions to your form. As if that weren’t enough, this feature will
also create a record in Rock if the person doesn’t already have one. If the person is in Rock, this will find their record and
it can be used to update their information.
Unlike other items on your form, you don’t need to create workflow attributes for these questions. As described below, all you
need to do is Enable Person Entry and pick what you want to
ask the person for. Let’s take a look.
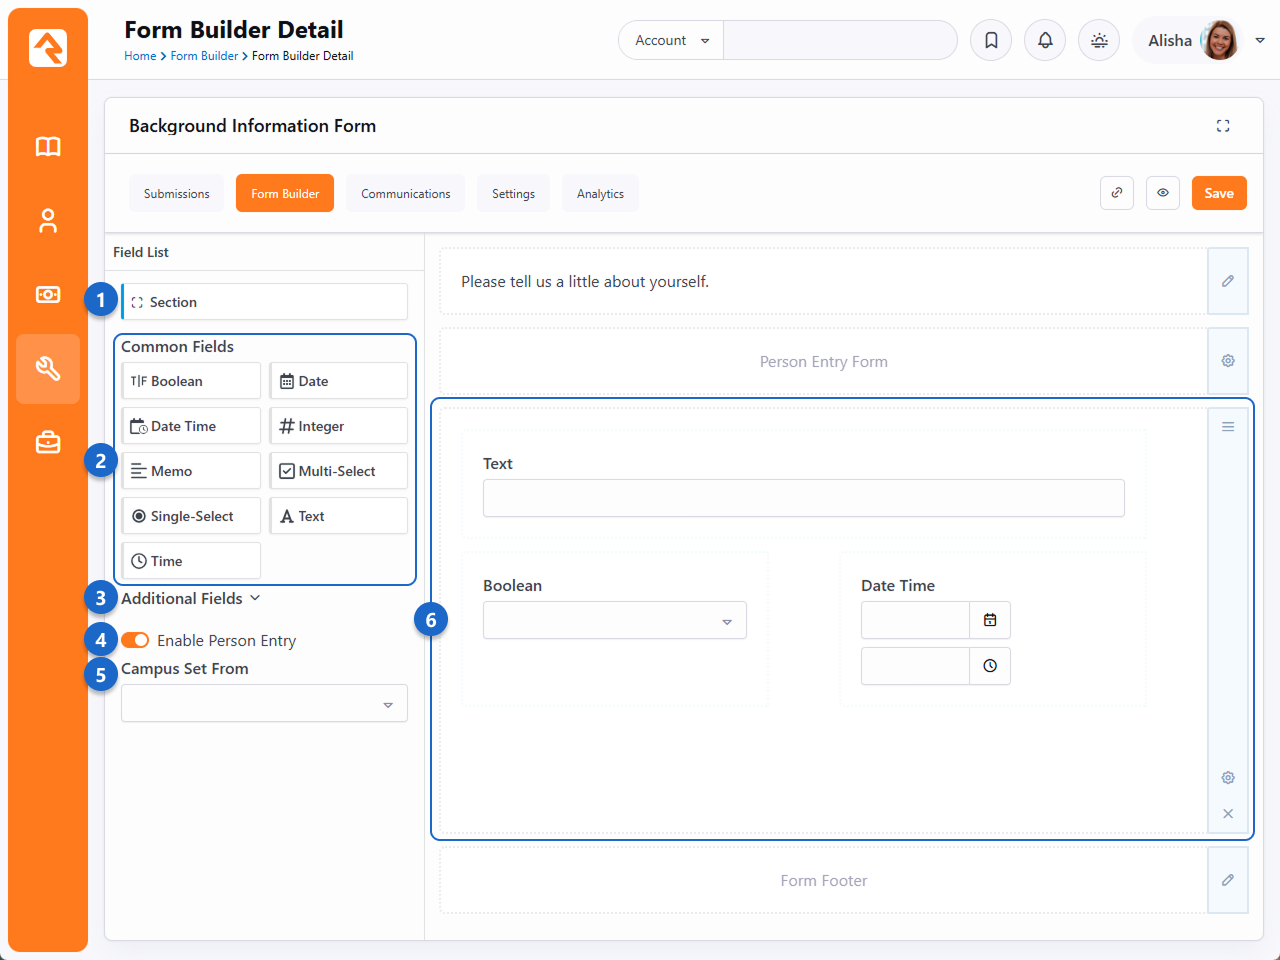
Person Entry Configuration
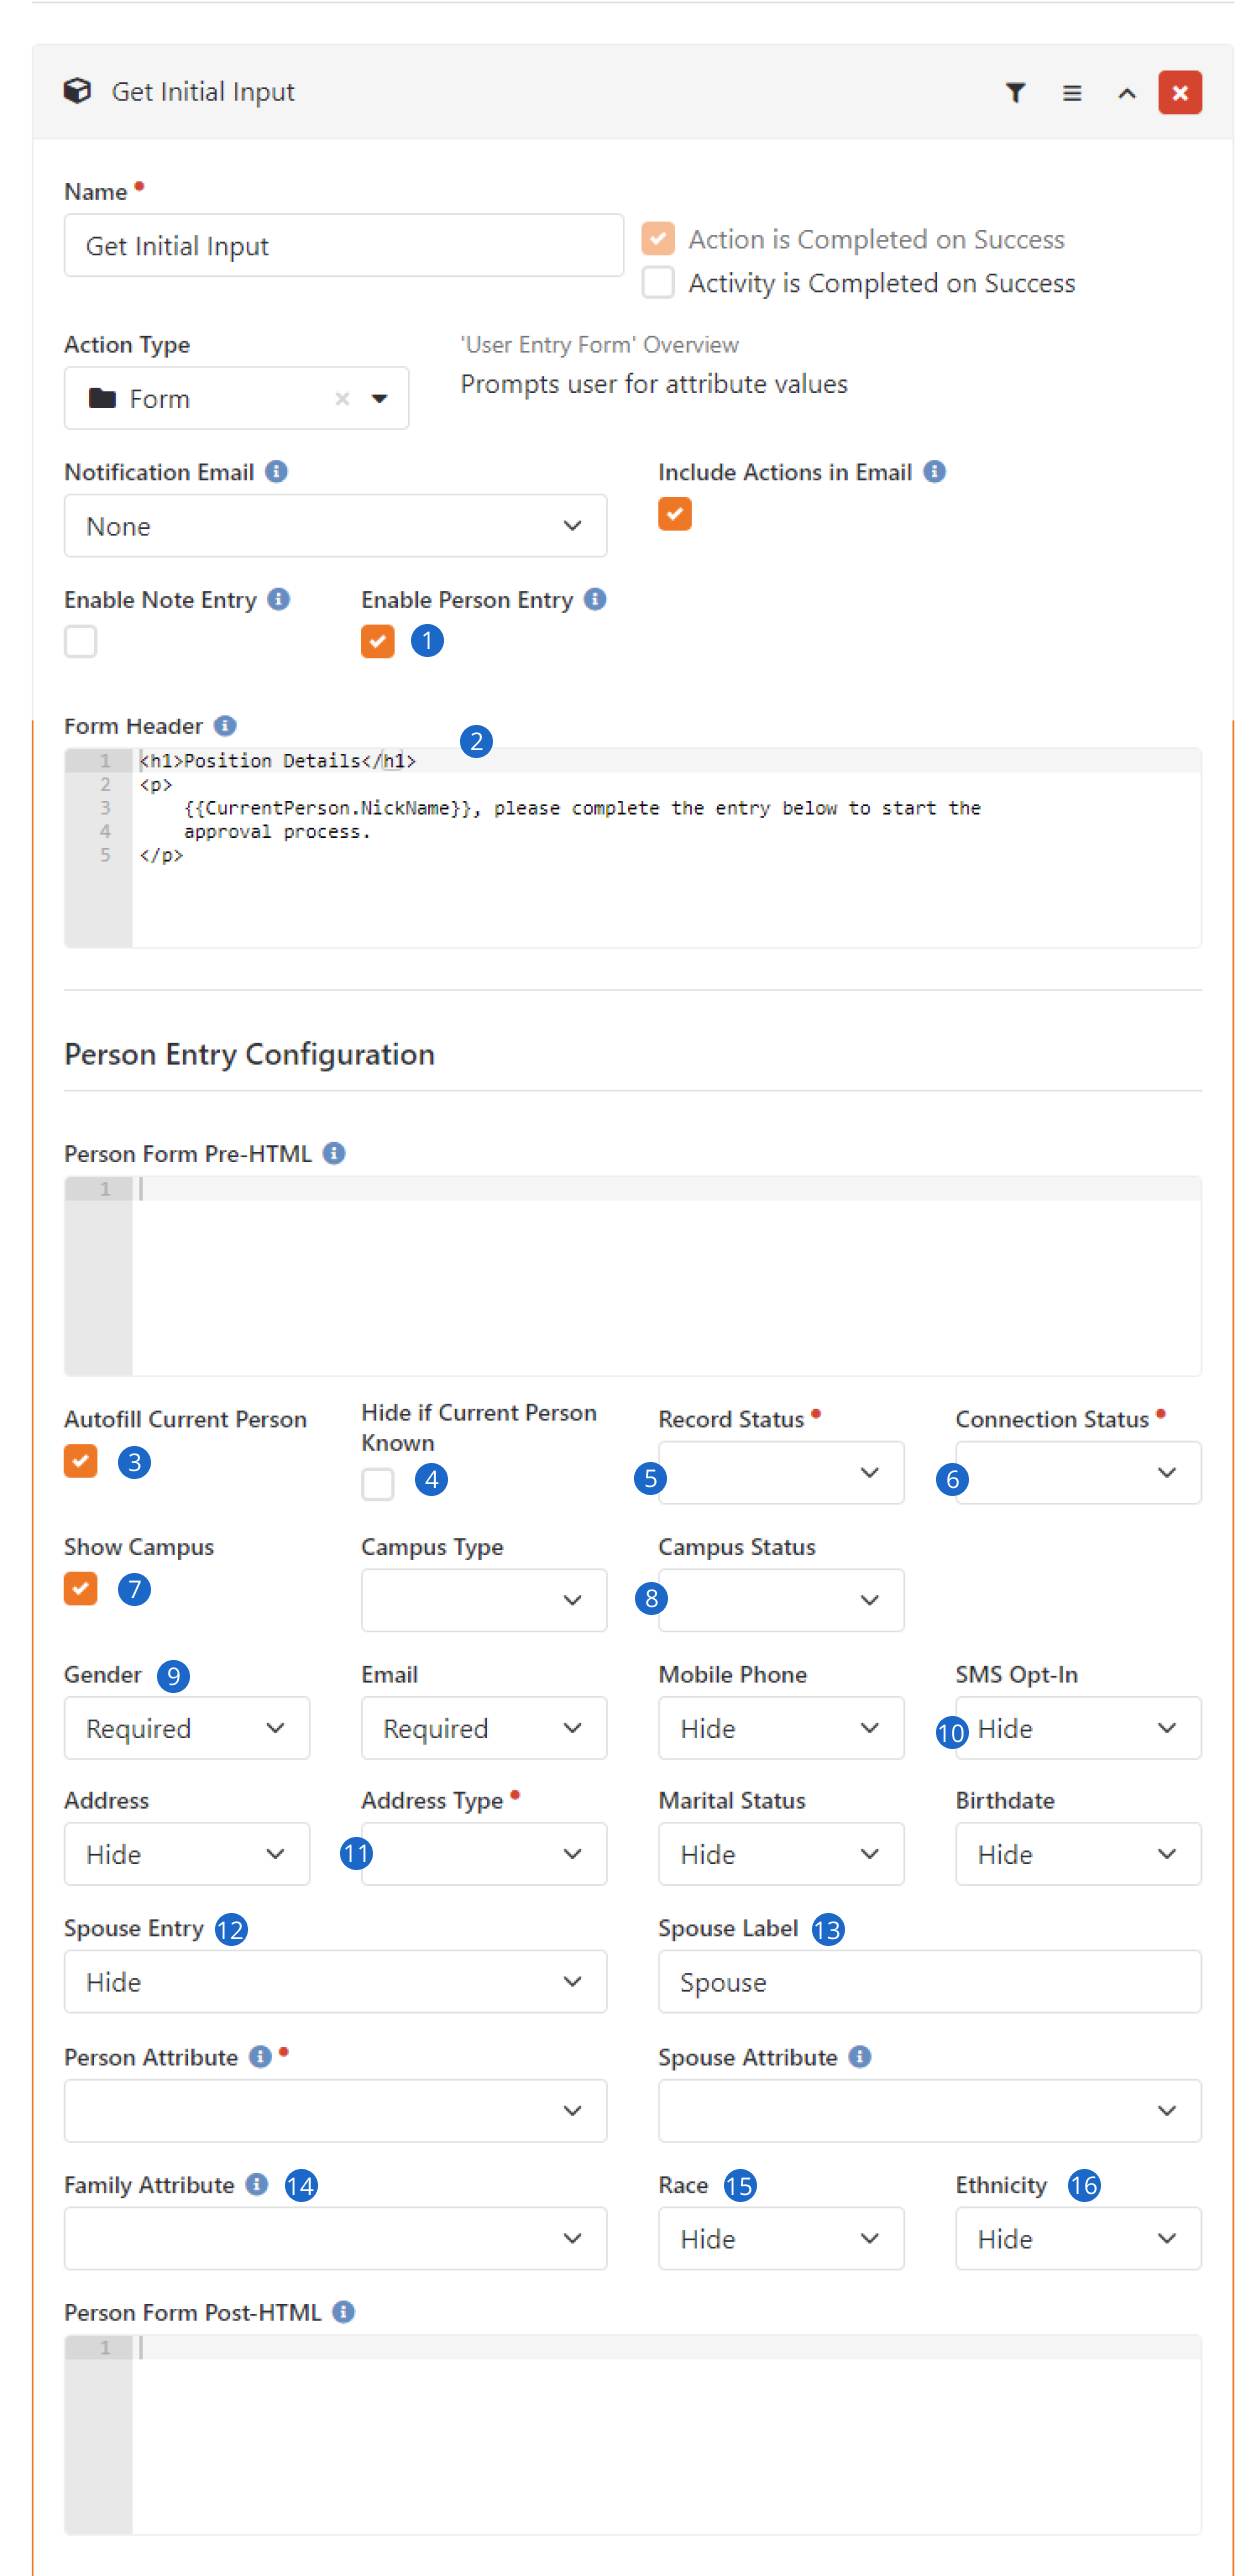
- 1Enable Person Entry
- The rest of the fields described here will only appear if
Enable Person Entry
has been selected. If your form doesn’t need to ask for a person’s information, then
this should remain disabled.
- 2Person Form HTML
- Just like the Form Header
and Form Footer,
you can add HTML to the top (Pre-HTML) and bottom (Post-HTML) of the Person Entry fields.
This is a great way to visually separate these questions from other items on the form.
- 3Autofill Current Person
- If Rock knows who the person is (e.g., because they’re logged in), selecting this
option will automatically fill in the Person Entry fields for them. That means the person
filling out the form doesn’t have to give you information you already have. This is also a great
way to fill in gaps in your data. For instance, if Rock has an email address for the person
but not a phone number, then the person’s email address will be filled in for them, but they’ll
still need to enter a phone number manually.
- 4Hide if Current Person Known
- Selecting this option can help simplify your form by hiding all the Person Entry fields
if Rock already knows who the person is. However, it also means that the person loses the
opportunity to update their information. Either way, keep in mind that selecting this option
doesn’t always mean the Person Entry fields will be hidden. For instance, if you set the
Address field to be
Required, and if the person
doesn’t have an address in Rock, then the Person Entry fields will still be shown. This ensures
the Required information can
be collected.
- 5Record Status
- Like the Connection Status,
you can choose what Record Status
a new person should have. This only applies to new records that are created.
- 6Connection Status
- The person filling out the form may be new to Rock. In that case, the
Connection Status you select
here will be applied to the person’s record when it’s created.
- 7Show Campus
- If selected, a Campus field will be available on the form. The campus field will be
required and can be changed by the person.
- 8Campus Type/Status
- If you have Show Campus
enabled, you can use these fields to restrict which campuses are available for selection
by the person filling out the form. For instance, you might use these to limit the options
to Physical campuses
that are Open.
- 9Person Entry Fields
- This is where you get to select which Person Entry fields you want on your form. For
instance, if you don’t want the person’s Address, then you can
Hide that field entirely.
You can also choose to make each field either
Required or
Optional based on your
needs.
- 10SMS Opt-In
- Allows the Registrant to permit or deny permission to be contacted via text messages at
their mobile number. The Options for this field are Hide, Optional or Required.
- 11Address Type
- Only one Address Type will
appear on the form, and this is where you’ll select which one it should be. If the
Address field is set to
“Hide” then this setting won’t be referenced.
- 12Spouse Entry
- Enabling this option will provide a duplicate set of Person Entry fields on the form
for the person’s spouse. If “Optional” is selected, then the person will be given a
Show Spouse checkbox
on the form that they can click to show these additional fields. If “Required” is selected,
then the spouse fields will always be shown on the form. Except for the First Name and Last
Name, which are always required, the Person Entry fields for Spouse respect the Hide, Optional
or Required settings of each other field. In other words, you can set
Spouse Entry to be “Required”
but the other fields for things like Email or Birthdate will still be hidden, optional or
required according to your setup.
- 13Spouse Label
- Sometimes it will make more sense to say “husband” or “wife” instead of “spouse”. You
can change what "Spouse" is called on the form by providing a different label here. Just keep
in mind that the spouse fields are only intended for spouses, regardless of what you call them.
Changing the Spouse Label to
“Child” doesn’t mean the form is now collecting information on the person’s child. If you want
the person to provide information for anyone other than their spouse, you’ll have to add those
fields to your form outside of the Person Entry Configuration area by adding workflow
attributes.
- 14Person, Spouse and Family Attributes
- You can store the person, their spouse and/or their family in a workflow attribute using
these fields. The Person
and Spouse attributes should
be of type “Person”, while the Family
attribute would be of type “Group”. Storing this information in workflow attributes lets you easily
reference the people or family later in the workflow. This works for both new records and for
existing records that are matched according to the information provided in the form.
- 15Race
- You can choose to collect a person's race, which describes their physical traits and
characteristics.
- 16Ethnicity
- You can also choose to collect a person's ethnicity, which is a cultural identifier.
Person Entry Matching Logic
Below are a few notes on how person matching will work in certain circumstances. For the most
part things will work as you expect, but there are a couple of scenarios to be aware of.
Spouse Matching
When the person fills out the
Person Entry fields for
themselves and their spouse, Rock will attempt to match both people to existing records in
the system. If it finds a match for both people, but if those two people aren't in the same
Family, then a new record will be created for the Spouse. This new record will be added to
the Family of the person filling out the form.
Autofill Name Changes
There is some special logic that occurs if
AutoFill Current Person
is enabled, but the Name fields are changed when the form is being filled out. If the person
that was used to auto-fill the fields changes the First Name or Last Name, then Rock assumes
they mean they mean to create or match a new person. If this happens, this matched or new
person won't be added to the current person's family.
For instance, let's say Ted Decker is logged in and filling out a form with
AutoFill Current Person
enabled. Ted's information, including first and last name, will automatically be populated.
But what happens if Ted changes the name to fill out the form for someone else? There are
different scenarios as described below.
- Scenario 1: If Ted changes the Name fields to his son's name, Noah
Decker, then Rock will check to see if there's enough data to make a match to the
existing Noah Decker. However, a match to the existing Noah Decker would need to match
Noah's email and/or cell phone too, so a new Noah Decker record could easily be created.
- Scenario 2: If Ted changes the Name fields to NewBaby Decker, he might
be thinking he is adding his new baby to the family. Instead, the same logic described
above will be used, where Rock will try to match the person or create a new person.
In this case, NewBaby Decker will probably be a new person in a new family.
- Scenario 3: If Ted changes the Name fields to Bob Smith (Ted's
neighbor), Rock will do the same thing as described above. A new person in a new family
will be created unless a matching person record is found. In this case, Rock is doing
what Ted probably expects to happen.
Security Exceptions
Don't forget that person matching may be suspended due to Account Protection Profile
considerations. It's possible a new record will be created for this reason,
even if the person has an existing record. See the
Admin Hero Guide
for details.
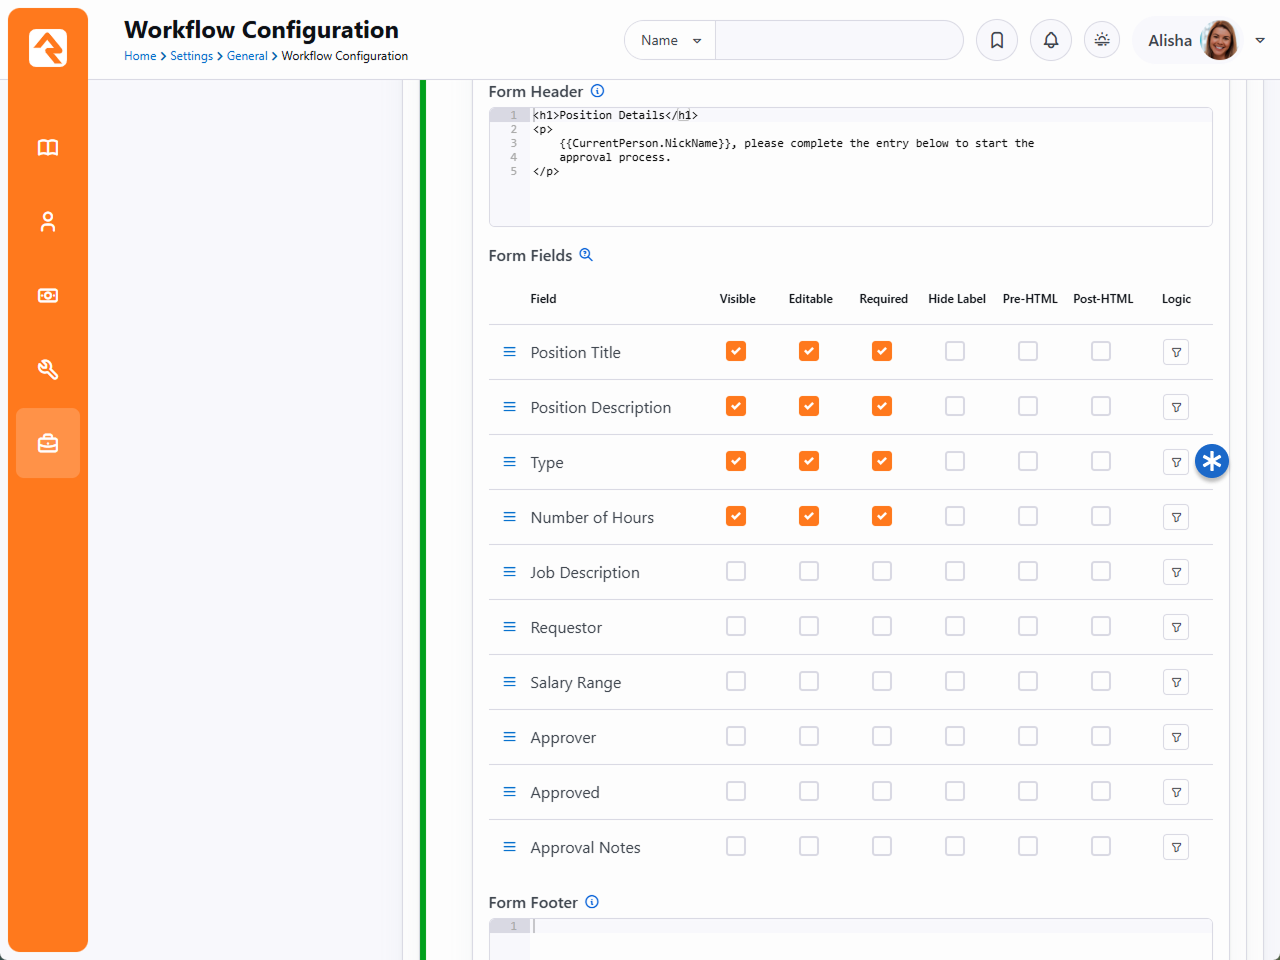
Conditional Logic
Each of your form's fields can have conditional logic applied. This lets you show or hide the
field based on how the person answers other questions in the form. Let's take a look at how this
can work in the Position Approval example workflow we've been using.
Let's say we only want the Number of Hours field to appear for the person if the
position Type is "Part-Time". All we need to do is click the
icon for Number of Hours to add this condition.
Add Condition to Field
In the screen that pops up, you'll need to click
Add Criteria
to start adding the logic for your condition. You have several options available.
Adding Criteria
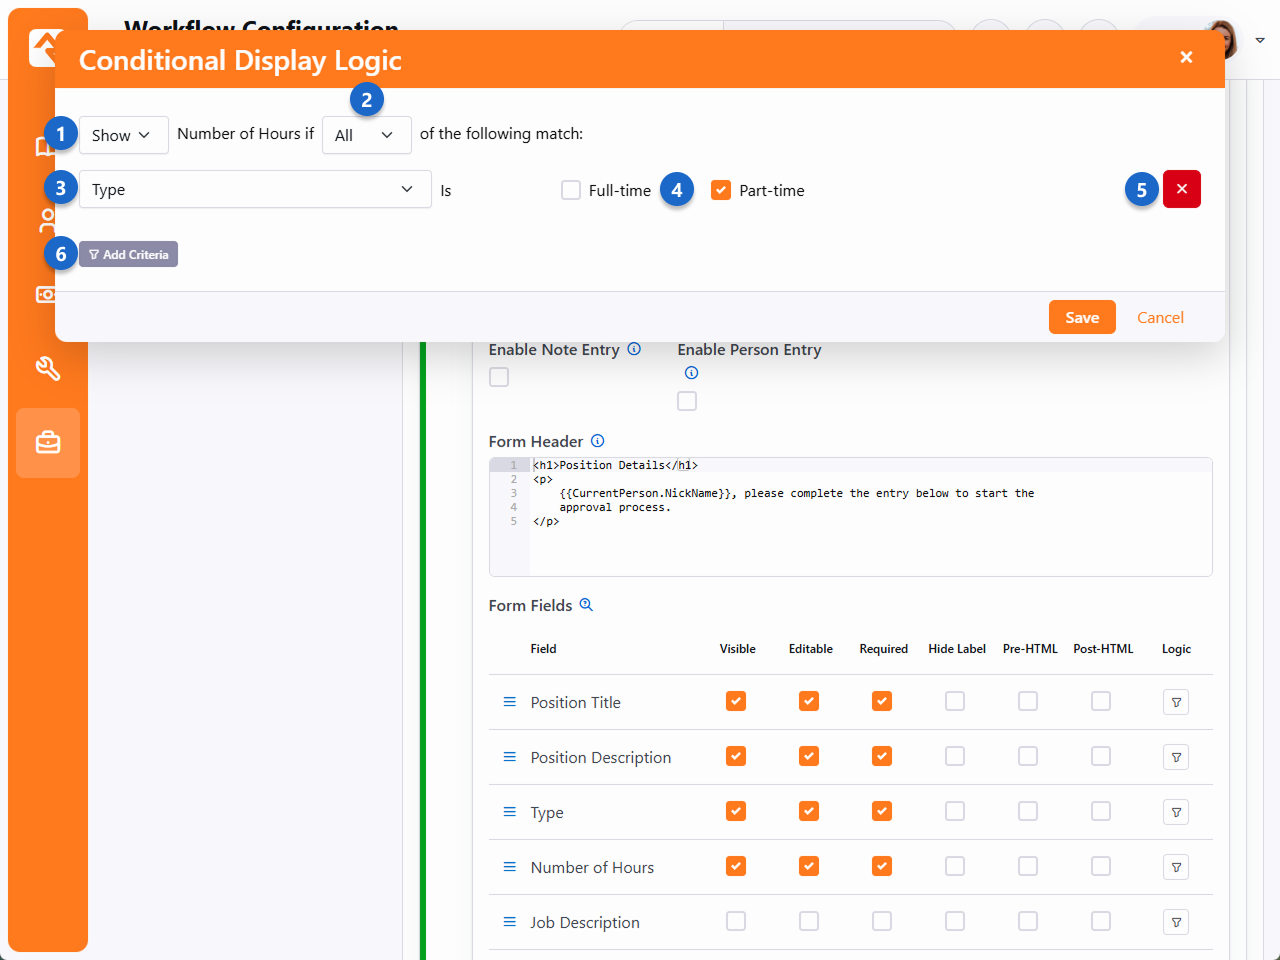
- 1 Show/Hide
- You can choose to either
Show or
Hide the field when
the criteria you provide are met. By default, this is set to
Show, which means
the field will be hidden unless the condition is satisfied.
- 2 All/Any
- You can have multiple criteria for your condition. This field determines if
All of the criteria
need to be met, or if
Any one of them can
be met, for the condition to be satisfied.
- 3 Entry Form Fields
- This drop-down contains a list of the other fields on your form. This is how you
indicate that an answer to one field has an effect on the field you're working with.
In this example we're checking the Type field to determine whether or not to show
the Number of Hours field. Only fields within the current form are available for
adding criteria.
- 4 Field Criteria
- What you see here will change depending on the entry form field you picked. This is
where you define which answers should satisfy the criteria. In this example we only
want the Number of Hours field to appear if the Type is Part-time. Here we see
checkboxes because the Type field is a single-select attribute.
- 5 Delete
- Click the button to delete a single criteria row from
the condition.
- 6 Add Criteria
- You can add as many criteria as needed by clicking this button. You may want to have
more than one criterion in cases where a person's answers to multiple fields should
determine whether or not this field is shown.
When a logical condition has been added to an entry form field, the
will turn orange as pictured below. Now the Number of Hours field will only be shown to the
person filling out the form if they selected Part-time as the position Type.
Added Condition to Field
Limitations on Conditional Fields
While every field can have conditional logic applied, you may notice that not every
field in your form can be used as criteria within your conditions.
Only fields that use a control which is text, list, checkbox, person
picker, or date pickers can be used as criteria. In other words, if you don’t see the
field you're looking for when setting up conditions then that field type can’t be used.
Adding Form Fields
Now that you're familiar with the different parts of the form you're ready to start adding
fields. Fields are pieces of input that the person filling out the
form is asked to provide. Fields are added to the form by clicking them from the left of the
page and dragging them into a section on the right. For instance, you might add a
Boolean field if you want
the person to answer a simple Yes/No question. You might add a
Text or
Memo field if you want the
person to provide a typed answer to a question. There are many field options for gathering
different types of data from the person. Let's look at adding some fields to a form.
Adding Form Fields
- 1 Section
- This is how you add new sections to your form, giving you new areas to add fields
to.
- 2 Common Fields
- As the name implies, these are the fields that you'll probably use most often. If you've
ever worked with attributes before then you've probably seen some of these fields in
use. Each field has its own settings, which we'll talk about a little later.
- 3 Additional Fields
- Click here to expand the Additional Fields list. These fields can be added to your form
just like the Common Fields, but they're hidden initially simply because they're used
less often.
- 4 Enable Person Entry
- Here you can enable or disable the Person Entry form. It's likely that you'll want this
enabled most of the time to identify the person who is filling out the form.
- 5 Campus Set From
- You have three options for setting the campus.
- Current Person: Use the campus of the current person who is
logged in while using the form.
- Workflow Person: Use the campus associated with the Person
attribute.
- Query String: Use the campus from the
Campus query
string parameter, which could be the campus Id or Guid.
- 6 Form Fields
- This is where the fields from the left get placed onto your form, into a section.
After a field has been placed you can (and should) adjust its configuration, which we'll
cover below.
Adjusting Field Settings
There are many types of fields you can add to your form, and each of them has unique
settings that are specific to the field. For instance, if you use a
Single-Select then
you'll need to provide a list of values that the person can choose from. We won't cover
every possible field and its configuration in this document, but there are elements that
all fields on your form share.
Field Configuration
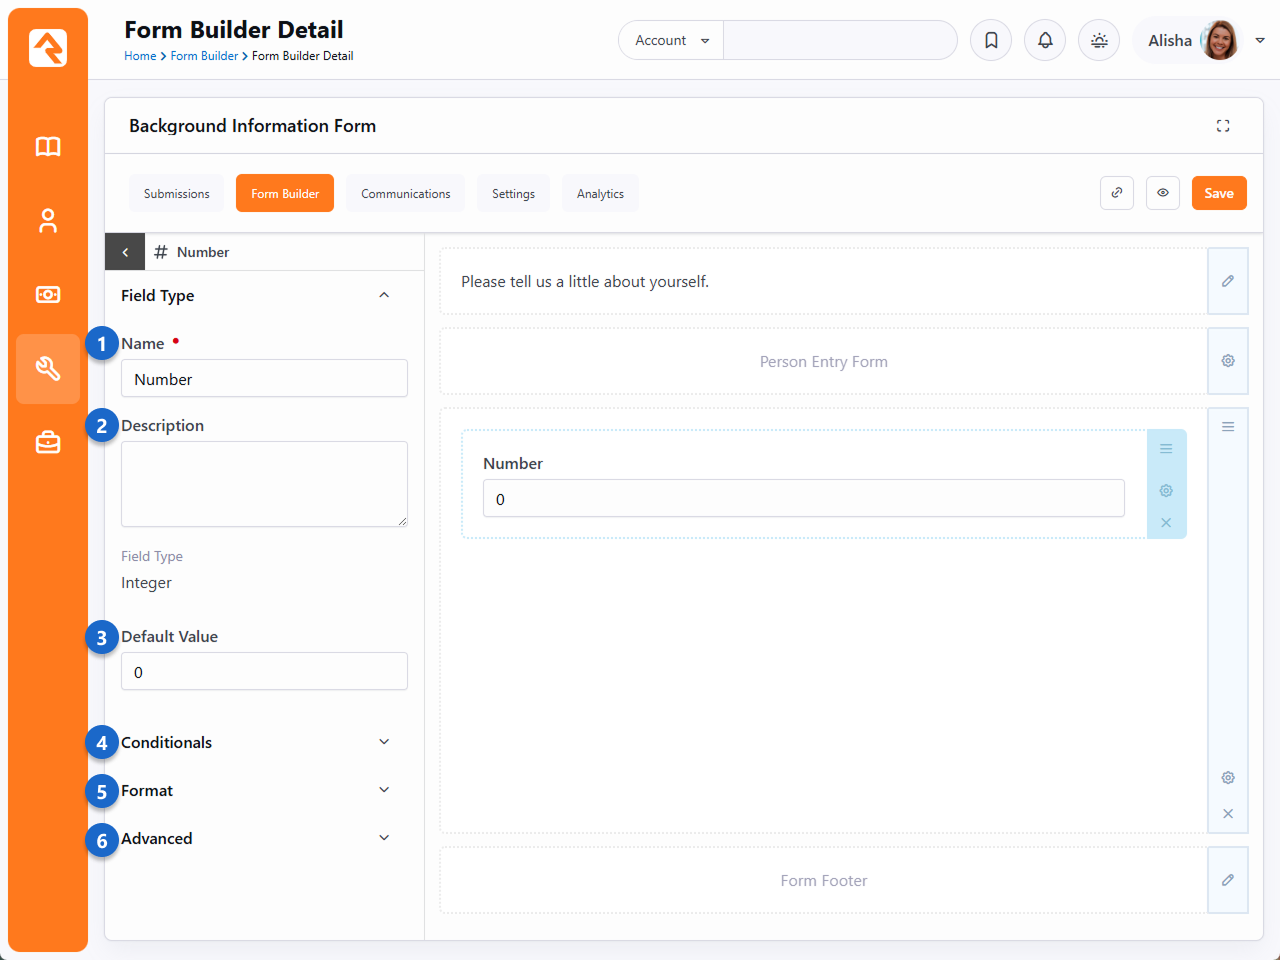
- 1 Name
- The Name of the field appears on the form and is visible to the person. More often
than not you'll want to change the name of the field to make it relevant to what
you're asking the person for.
- 2 Description
- If you add a Description, it will create a tooltip icon
() next to the field name. The person filling out
the form can hover their mouse over the icon to see the description you've
added. This is a great way to provide instructions or clarification for the
person filling out the form.
- 3 Unique Properties
- This area will change depending on the field. Some fields have multiple configurable
properties, while others will simply have an optional Default Value.
- 4 Conditionals
- You can add logic to the field so that it is shown or hidden depending on the
person's answers to other questions on the form. For instance, you might only want
to show a Baptism Date field if the person indicates they have been baptized.
- 5 Format
- The
Column Span
setting lets you control the width of the field on the form. Reducing the width
of multiple fields lets you display those fields horizontally rather than
vertically. You might also use this so that narrow fields (like Date or Integer)
don't take up the full width of the form.
Here you can also indicate whether the field should be
Required, and
you can choose to hide the field's label (i.e., Name).
- 6 Advanced
- If needed, you can adjust the field's Key value. This can be important when you're
using the field in other workflow actions. Here you can also choose to
Show on Results Grid,
which will display the value of the field in the Workflow List when viewing
submissions.
Let's pause for a moment to talk a little bit more about the
Column Span setting
referenced above. The width of your form is broken up into 12 equal sized columns. So,
adding a field that is 12 columns wide means that the field will be the full width of
the form. If you want multiple fields on the same line/row, you can reduce the
widths of the fields. For instance, a field that is six columns wide can be on the same
line as another field that is six columns wide. In that case both fields would be half the
width of the form. Or you could have four fields that are each three columns wide,
allowing all four fields to be on the same line. The key is remembering you have 12
columns total to work with.
Navigating the Form Builder
Each form has settings that are broken down into five areas. These areas can be accessed by
clicking the corresponding tab near the top of the page when editing a form, or by clicking on
an area when viewing the list of forms under
Tools > Form Builder. So far,
we've only been focusing on one of those areas, the Form Builder itself. Now let's take a look
at some of the other features and functions that are available in the other areas.
Submissions
This is where you'll find a filterable list of the form's submissions. Clicking on one of
the rows will bring you to the
Workflow Detail page for that
submission. The grid actions let you do powerful things, like launch a workflow for each
submission.
Submissions
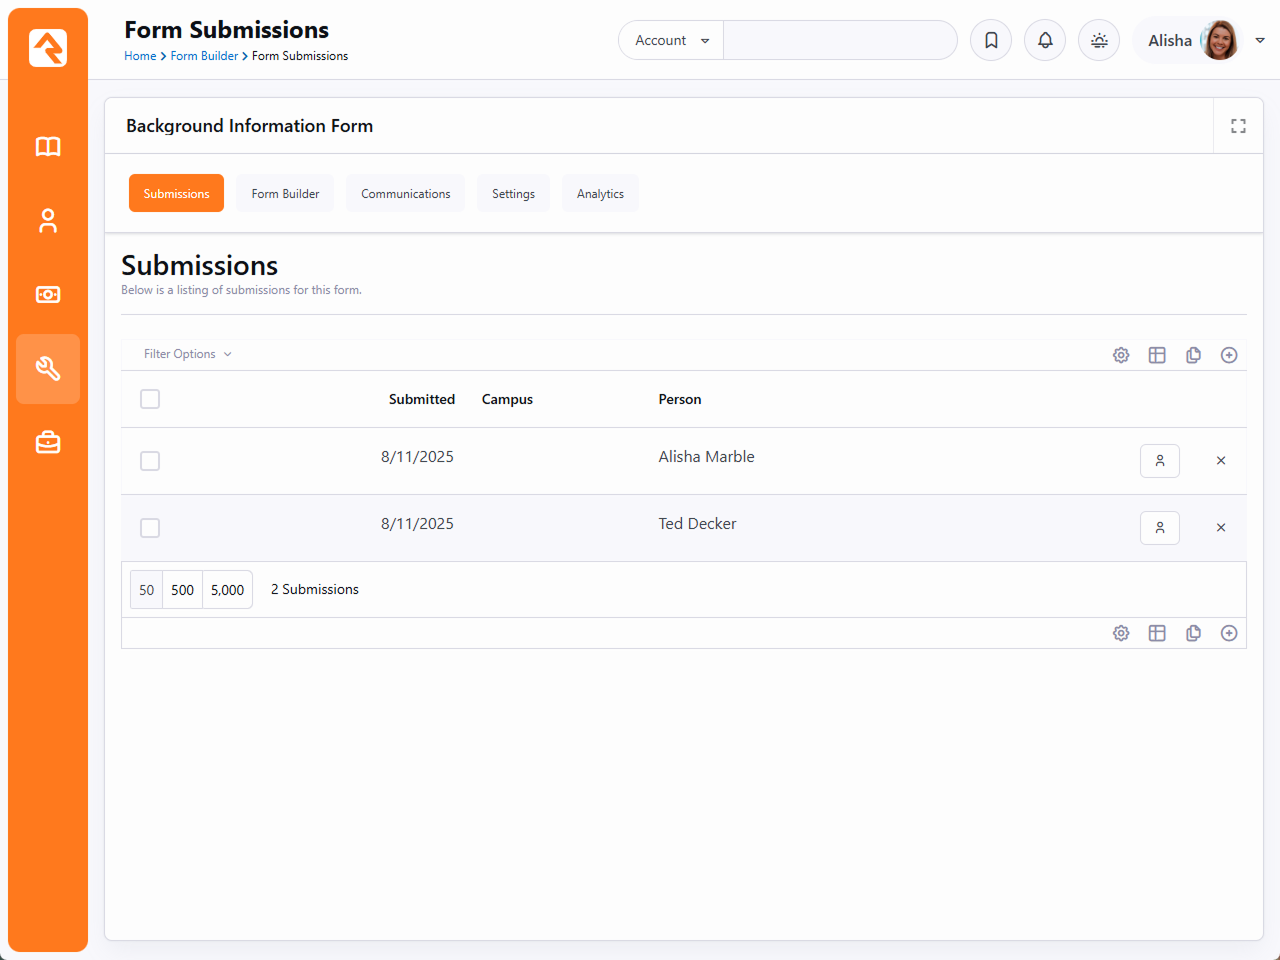
Settings
The settings area is divided into two parts,
General Settings and
Completion Settings.
You won't make changes here very often, but you should be familiar with some of the options
available to you.
Settings
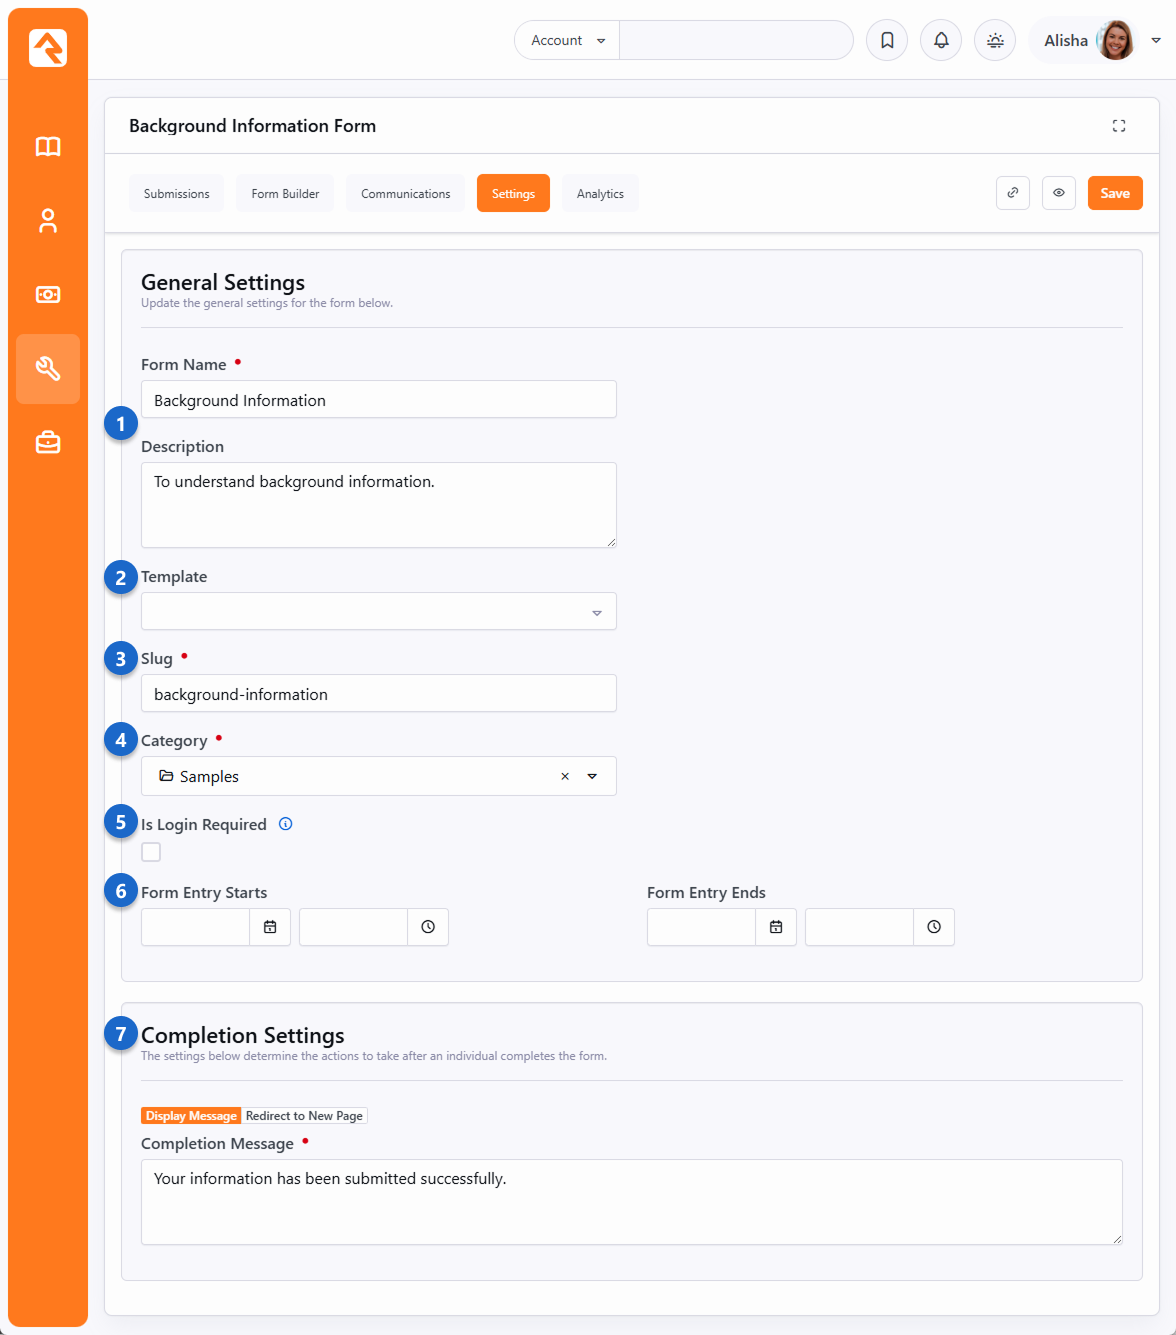
- 1 Name/Description
- Here you can edit the name and description of your form. These are initially set
when the form is first created. Don't skimp on these fields, as a clear name and
description can help you and others identify exactly what this form is for.
- 2 Template
- If you built your form from a template, then the name of the template will appear
here. You can apply a template to a form that was created without one, but best
practice is to initially create the form using the template. You may need to refresh
the form for changes to the template to apply. For more details see the
Form Builder Templates section below.
- 3 Slug
- Unique identifier for this workflow type, often used in links.
- 4 Category
- You can change the category for this form by selecting one from this field. By
default, it will be the category that was selected when the form was initially
created.
- 5 Is Login Required
- Enable this if the person must be logged in to complete the form.
- 6 Form Entry Starts/Ends
- People will not be able to access the form outside of the date range provided
here. The start date is inclusive, so setting this to January 1st would allow people
to access the form on January 1st. The end date is not inclusive, so providing an
end date of December 31st means people won't be able to access it after December
30th.
- 7 Completion Settings
- When the person submits the form, you have two options for what happens next. You
can provide a message that will be shown to the person on the screen, or you can
redirect the person to the URL provided.
Analytics
The Analytics page lets you
see, for a selected timeframe, how many times the form has been viewed and how many times it
has been submitted. There is also a
Conversion Rate
indicator, showing the percentage of people who viewed the form and then proceeded to
complete it.
Analytics
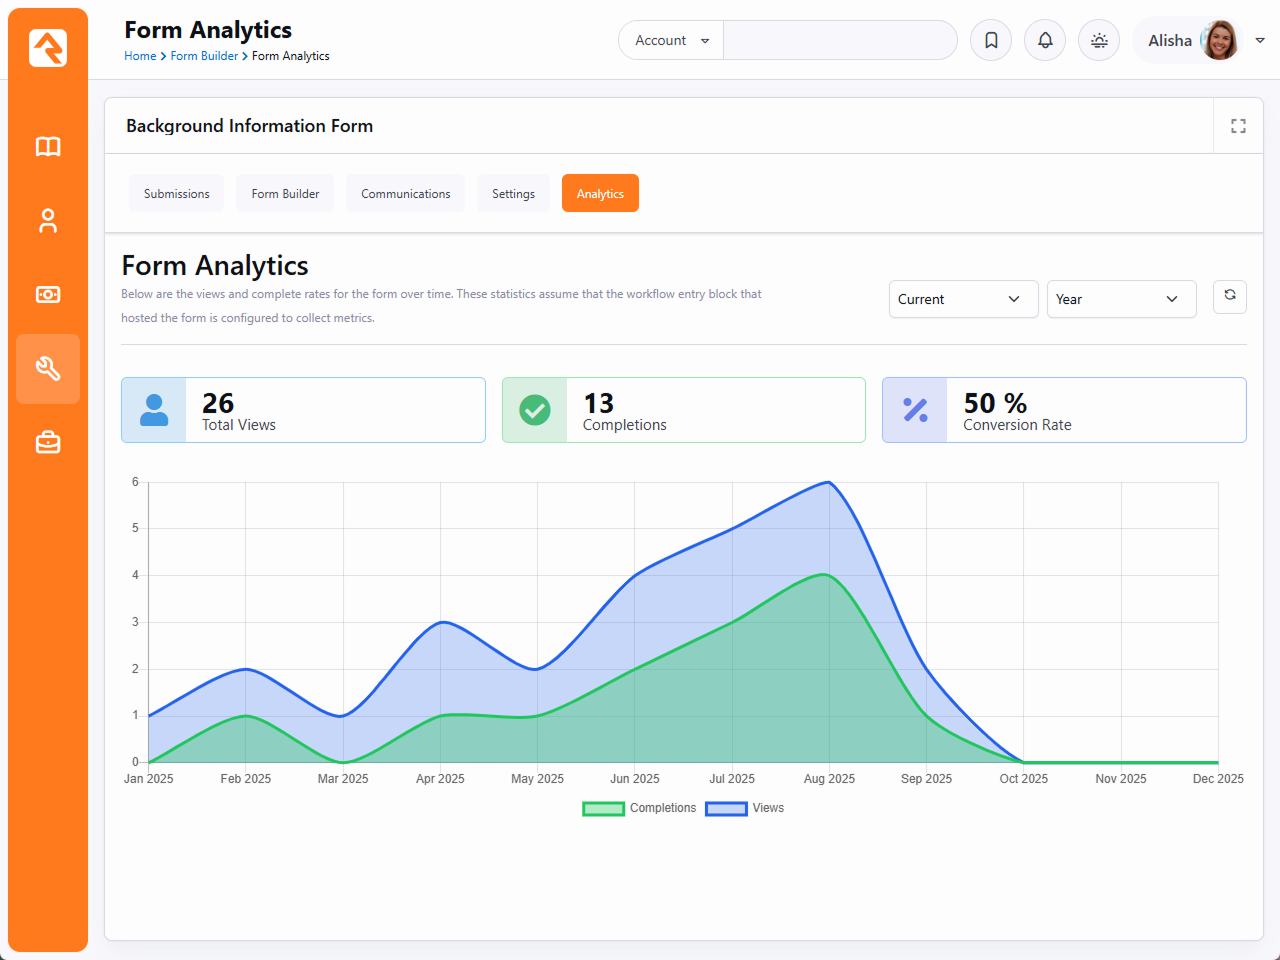
As noted near the top of the block, these statistics are only collected if the Workflow
Entry block hosting the form is configured a certain way. Within the Workflow Entry block's
settings, you'll need to enable
Log Interaction when Form is Viewed
and
Log Interaction when Form is Completed
to gather these statistics.
Form Links
Forms are only effective if people can find them—and Rock makes that simple. You can quickly share a form by clicking the icon and selecting Copy Link. You even have the option to choose which page to share from.
Form Sharing
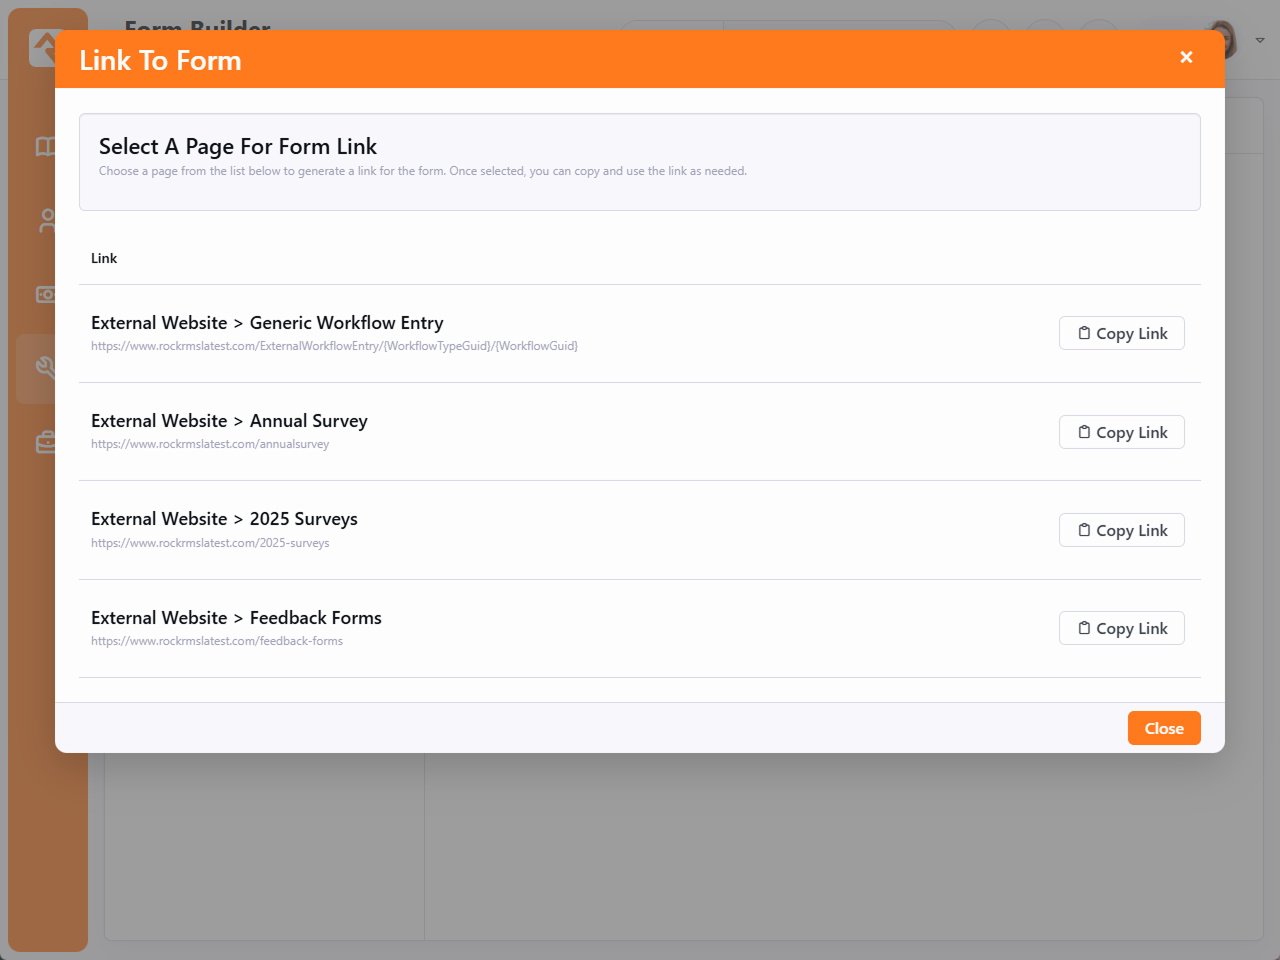
Enable Form Sharing
If you don’t see a link to the page where you placed a Workflow Entry block, the block might not be set up for sharing. To generate a shareable link, make sure Enable for Form Sharing is turned on in the Workflow Entry block settings.
Form Builder Templates
Often, you'll have multiple forms that share similar configurations. For instance, you might want
a consistent header across several forms, or you might want all of your forms to include
specific Person Entry fields. That's where Form Templates come in, saving you time by letting
you create a template and then apply that template to your forms. On top of that, the settings
you define in your template can't be changed by a person editing the form, so you can rest
assured that your template configuration will be applied exactly as intended.
To create or edit form templates, navigate to
Admin Tools > General Settings > Form Builder Templates.
Pictured below is an example template showing the different options you have. These are the
same settings, and have the same functions, as the form settings described in previous
sections above.
Form Template
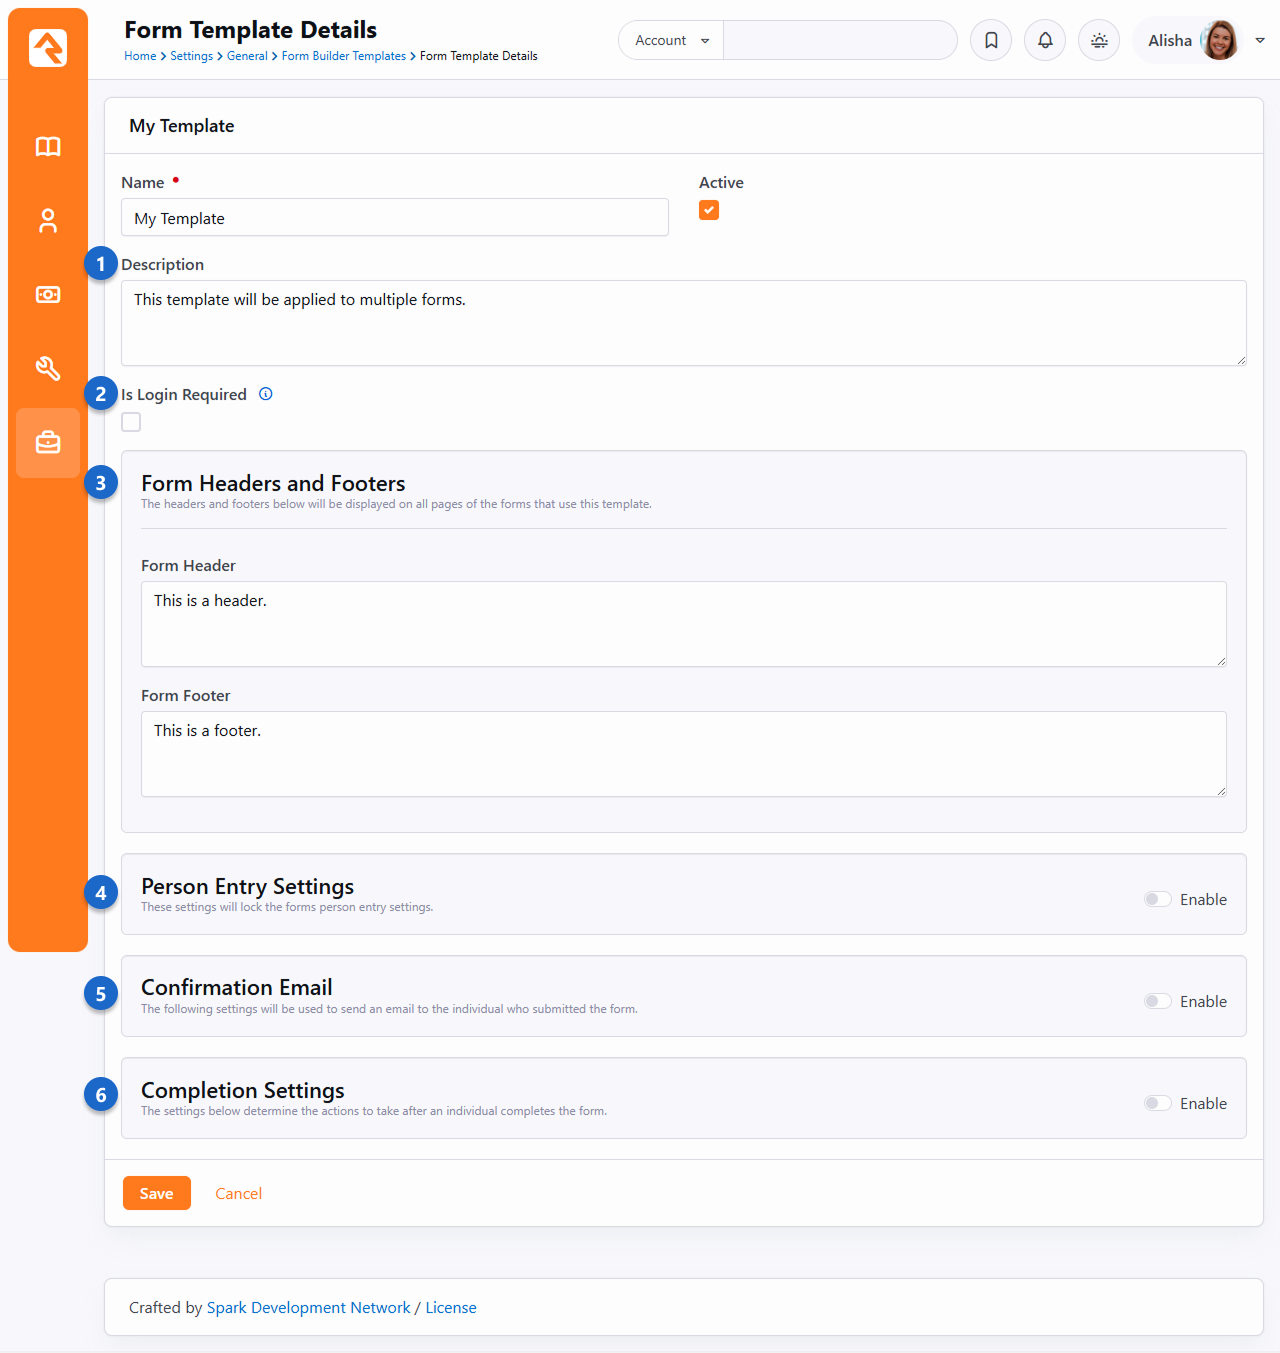
- 1 Name/Description
- Be sure to provide a good name and description. When selecting a template to use for
a form, only the template's name is visible.
- 2 Is Login Required
- Enable this if all forms using this template should require a login.
- 3 Form Headers and Footers
- Adding these to your template is a great way to ensure a consistent look across
forms. While the headers and footers provided on the template cannot be modified when
editing the form, the form will have additional editable header and footer areas that
can be edited.
- 4 Person Entry Settings
- Typically, you'll want to gather information about the person filling out the form, so
it makes sense to set up Person Entry at the template level. This also ensures the
same data is being collected across forms.
- 5 Confirmation Email
- You can define settings for the confirmation email at the template level, ensuring
that people who complete the forms get a consistent confirmation message. Like other
template settings, the Confirmation Email can't be changed on the form itself, but
you'll still be able to configure the Notification Email.
- 6 Completion Settings
- This is another area where you can ensure a consistent experience when a form is
submitted. The same options that are available on the form are available here,
allowing you to either display a message or redirect the person to a new page.
Managing Workflow Instances
Not all workflows run and complete immediately. In fact, most take several hours or
days to complete as they wait for input from people or other external events to
occur. There are several blocks to help you manage workflows and see them to
completion.
Managing Workflows
Manage Workflow Link
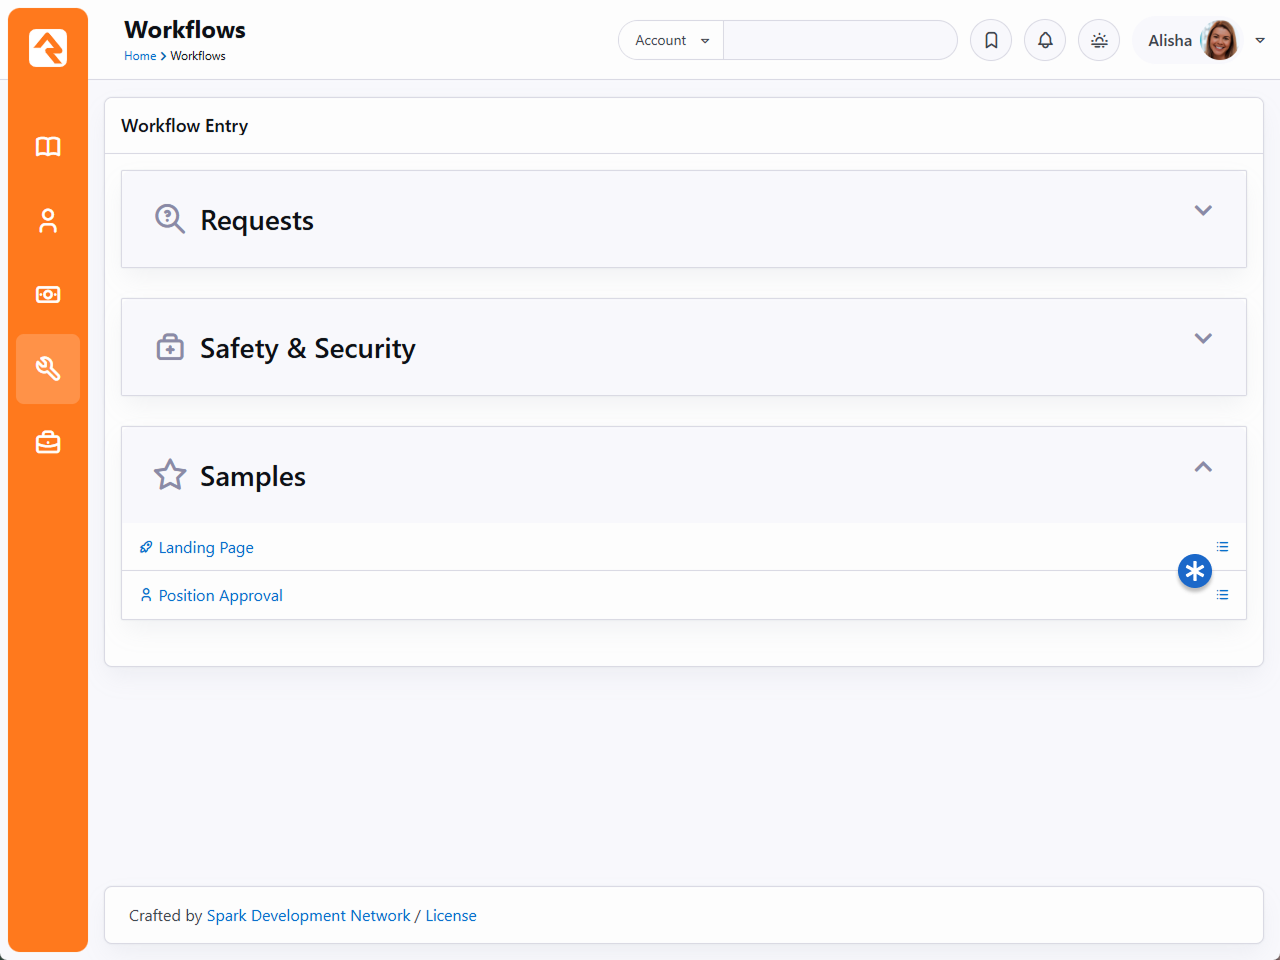
On the workflow entry screens you may have noticed a
Manage
link to the right of the workflow name. You’ll only see this link if you
have Edit
access to the workflow type.
Clicking this link will take you to a grid of all the workflows for this
workflow type. This grid allows you to filter the workflows by several
different criteria including:
-
Workflow Name
-
Initiator
-
Status Text
-
Activation Date (the date it was launched)
-
Completion Date
-
State (is it currently active or completed)
Clicking on a workflow will show you its details.
Manage Workflow
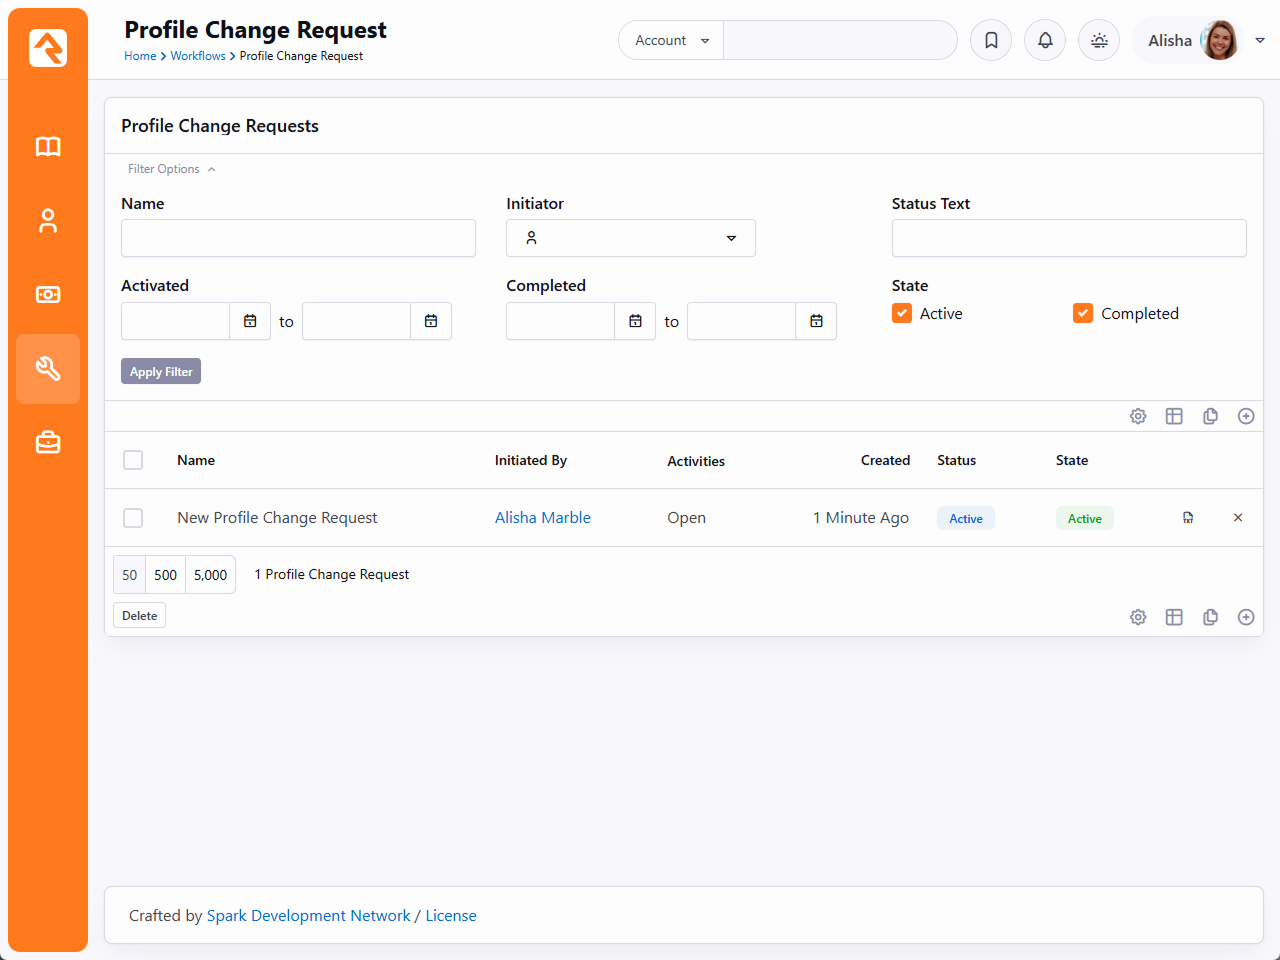
You might have noticed the
Delete
button near the bottom of the grid in the screen pictured above. You can
select one or more workflows from the list and use this button to delete
them all at once. Keep in mind that because deleting workflows can take
some time, the delete is performed in the background.
Viewing Workflow Details
After clicking a workflow from the grid above you’ll see the details of the
workflow instance. From here you can see the state of all of the workflow
attributes as well as all the activities that are in process or have completed.
Workflow Details View
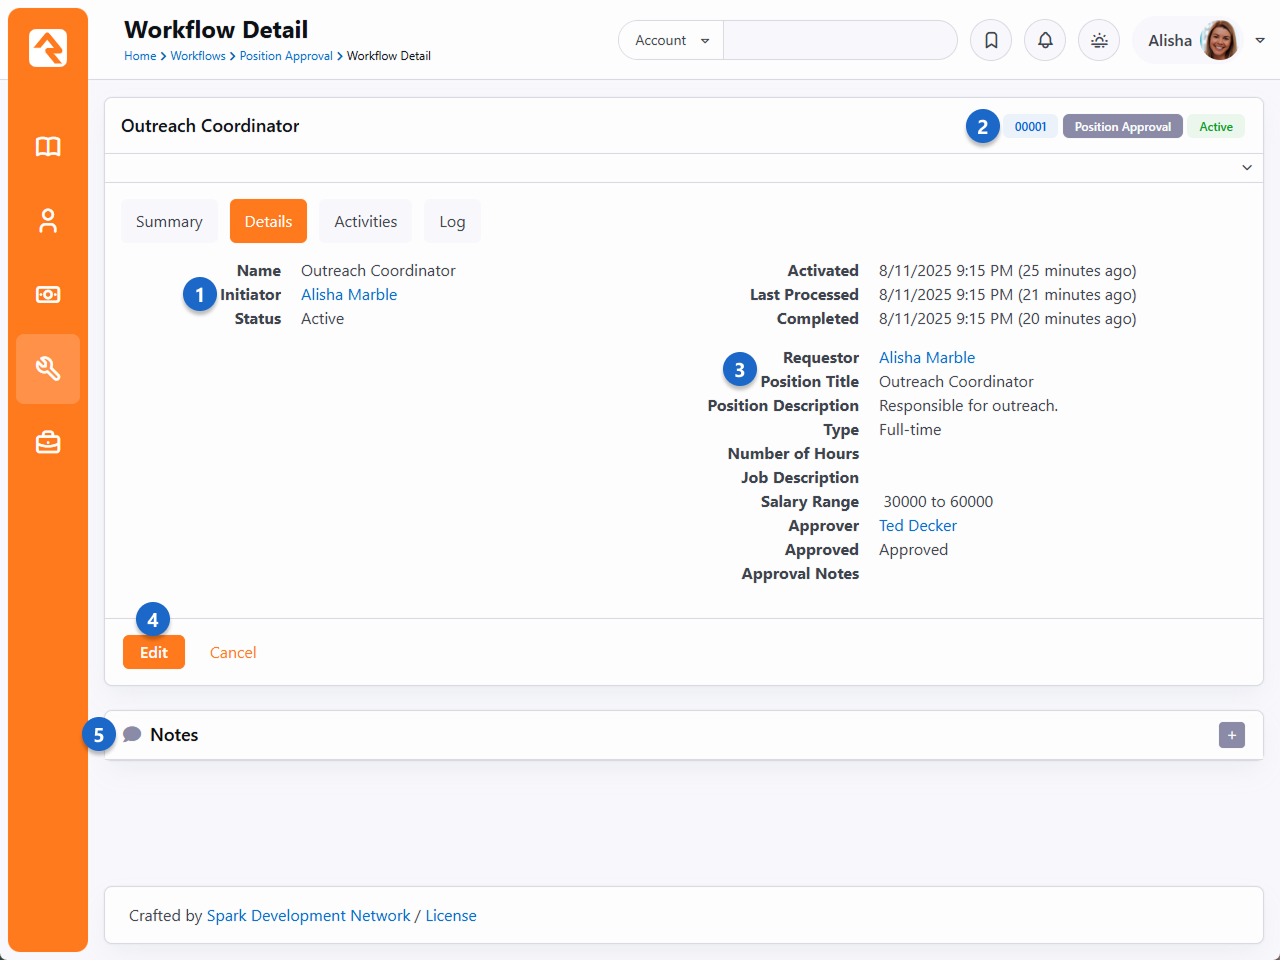
- 1 Workflow Summary
- This area shows the name, initiator and the activation date and time. These values can be updated
in the edit mode.
- 2 Workflow Status
- The header also includes the workflow type and status of the current workflow.
- 3 Workflow Attributes
- Next you will see a listing of all of the workflow attributes and their values. In edit mode you can
change any of these attributes.
- 4 Edit Button
- The edit button allows you to change any of the properties, attributes or activities of the workflow.
- 5 Notes
- See notes specific to this workflow.
Editing Workflow Details
Viewing the workflow details page gives you a clear view about the status of a
specific workflow with the ability to edit any of its settings. Let's take a tour around this page showing each feature.
Details Tab
The details tab gives you an overview of the state of the workflow.
Workflow Details Edit
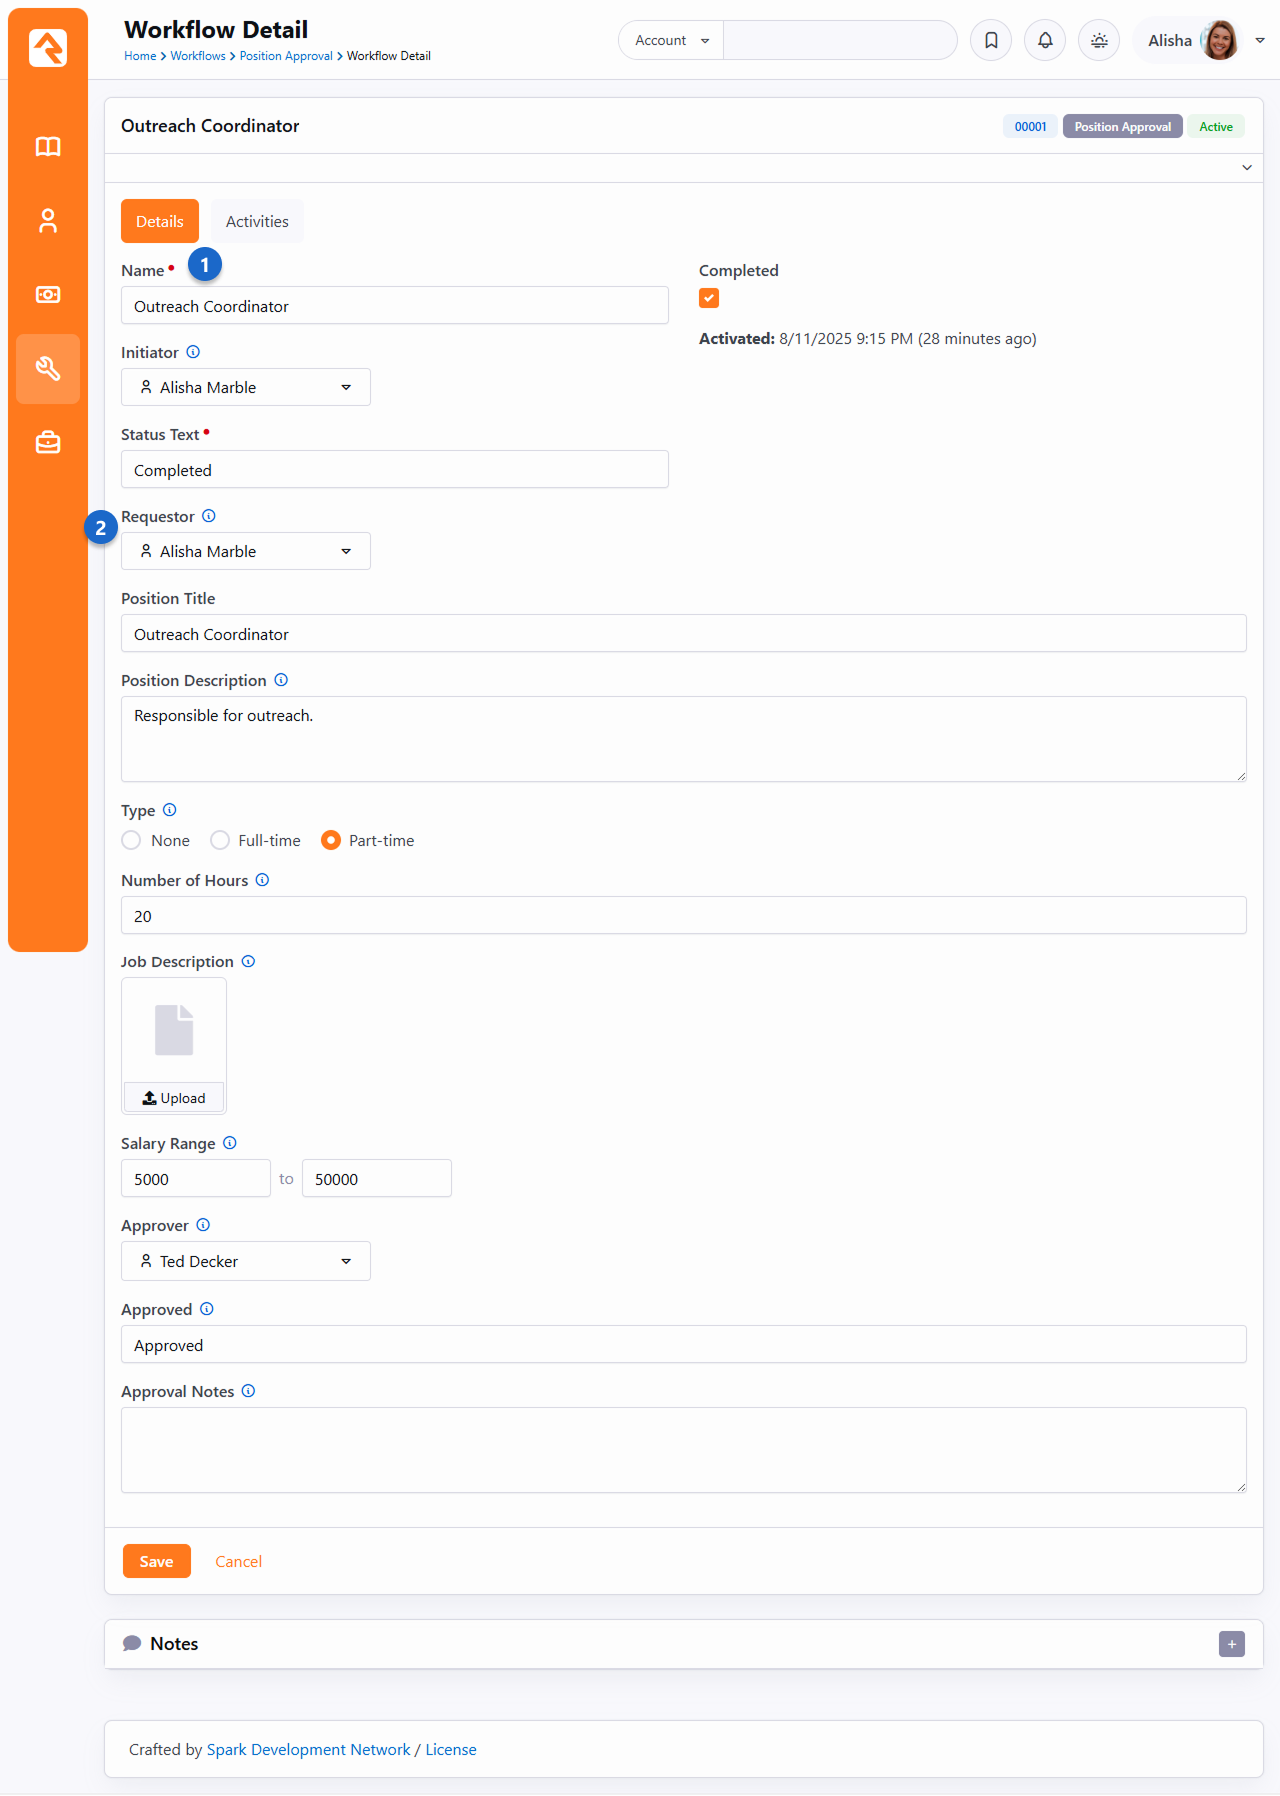
- 1 Workflow Summary
- This area shows the name, initiator and the activation date and time. These values can now be updated
in the edit mode.
- 2 Workflow Attributes
- Next you will see a listing of all of the workflow attributes with the ability to edit their values
if needed.
Activities Tab
The activities tab shows a listing of each activity that was activated
through the life cycle of the workflow.
Workflow Details Edit
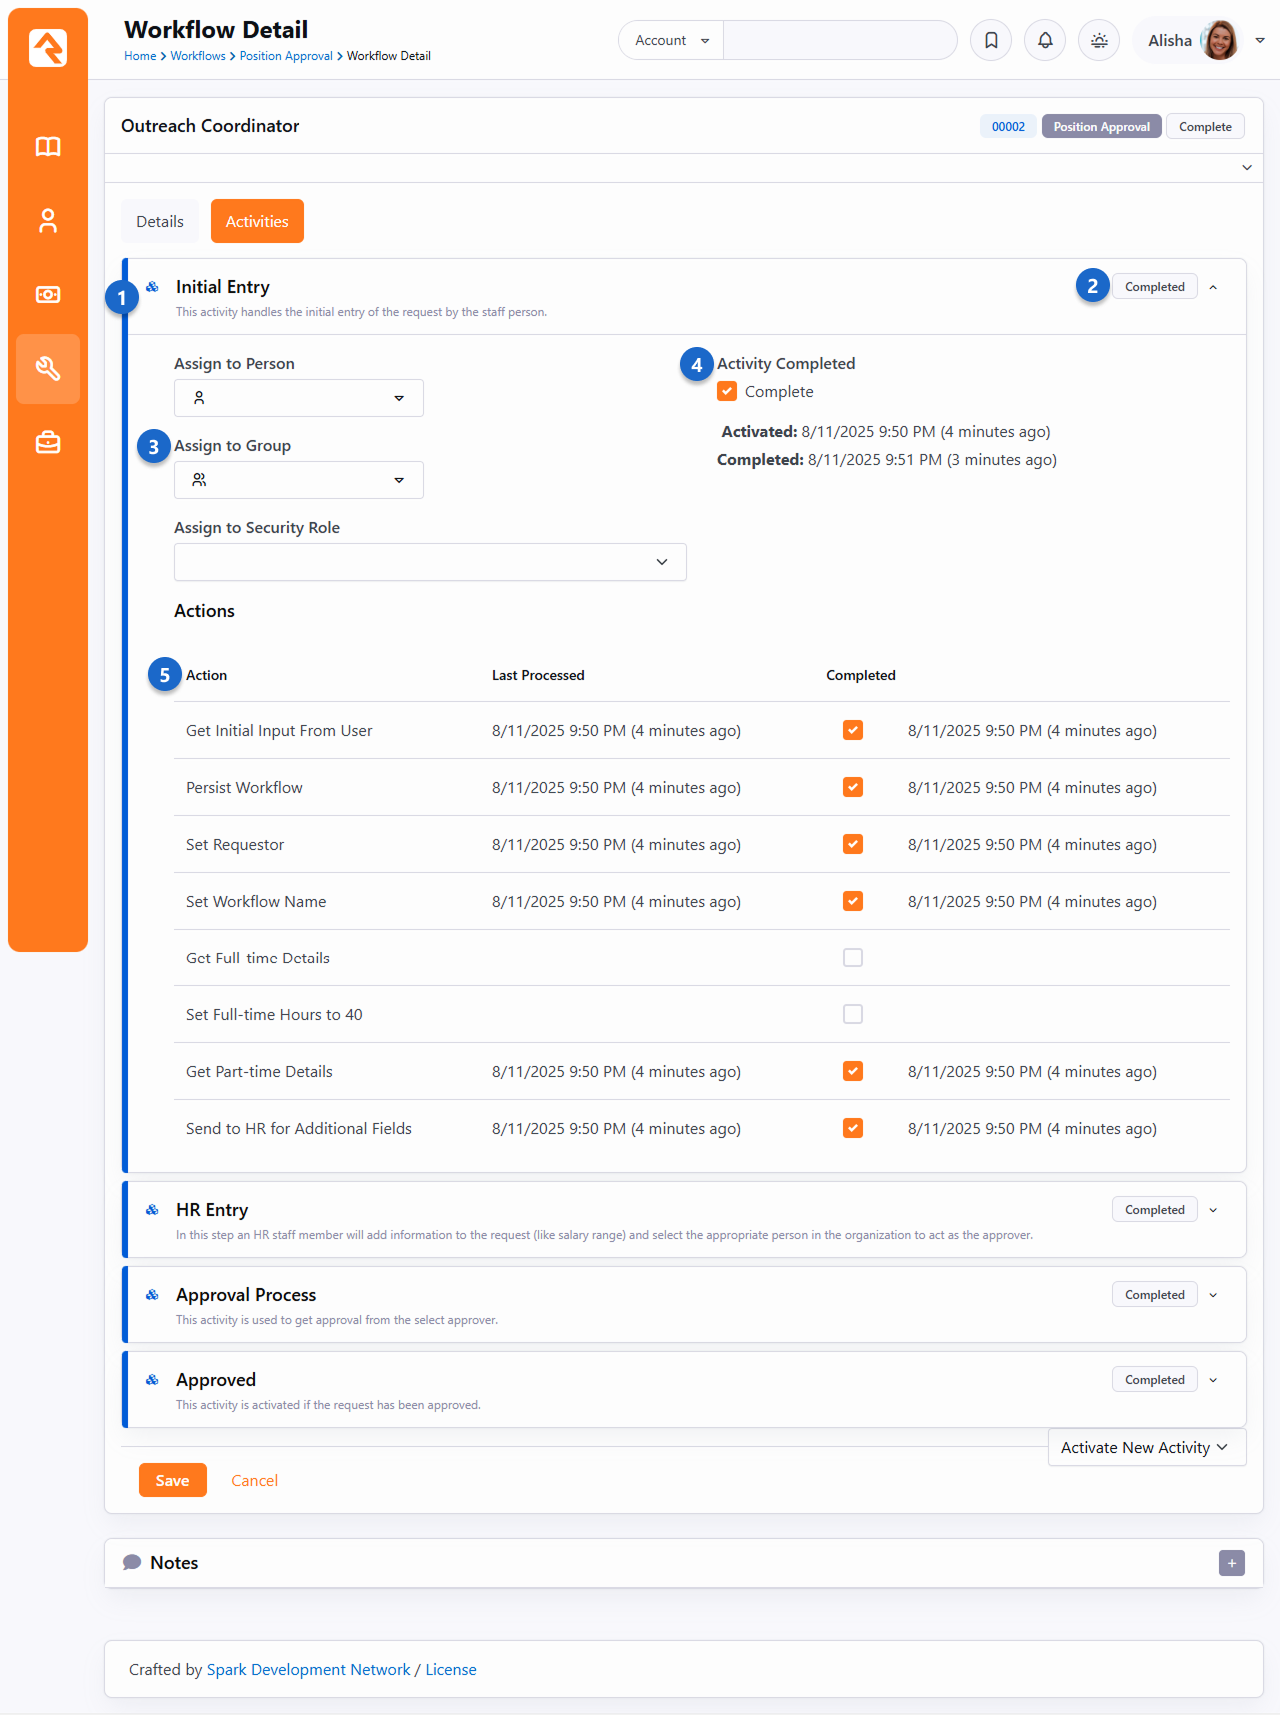
- 1 Activity Name / Description
- 2 Activity Completion Status
- 3 Assigned to Person / Group
- This will show the currently assigned person or group. From this screen you can
modify these values if you need to.
- 4 Completion Flag
- You can manually mark the activity as complete if needed. While you could also
mark an activity back to Uncomplete
it will most likely be marked complete again by the workflow engine the next
time it runs unless you alter the completion status of some of
the activity's actions also.
- 5 Action List
- Each action defined by the activity type is listed on this grid. You
can see the last time the action was processed as well as its
completion status and date. If you would like to re-run an action, you
can choose to uncheck its completion checkbox. As long as the activity
is still active, this action will be re-run. You can also mark an
action as complete. This is helpful if your workflow accidentally gets
stuck on an action due to improper configuration.
Log Tab
The log tab displays the logging messages from the workflow. The detail of
the logging will be dependent on the logging level you configured for the
workflow type. You can also define custom logging actions in your
activities to display custom log entries. Logging is a great tool for
watching your workflow to make sure that the logic you have configured is
working as expected.
My Workflows
The tools described above are great for working on workflows of a specific
workflow type. However, there are times you just want to see the workflows
that are assigned to you or that you have initiated. You can track active
workflows that are related to you under Tools > My Workflows.
My Workflows
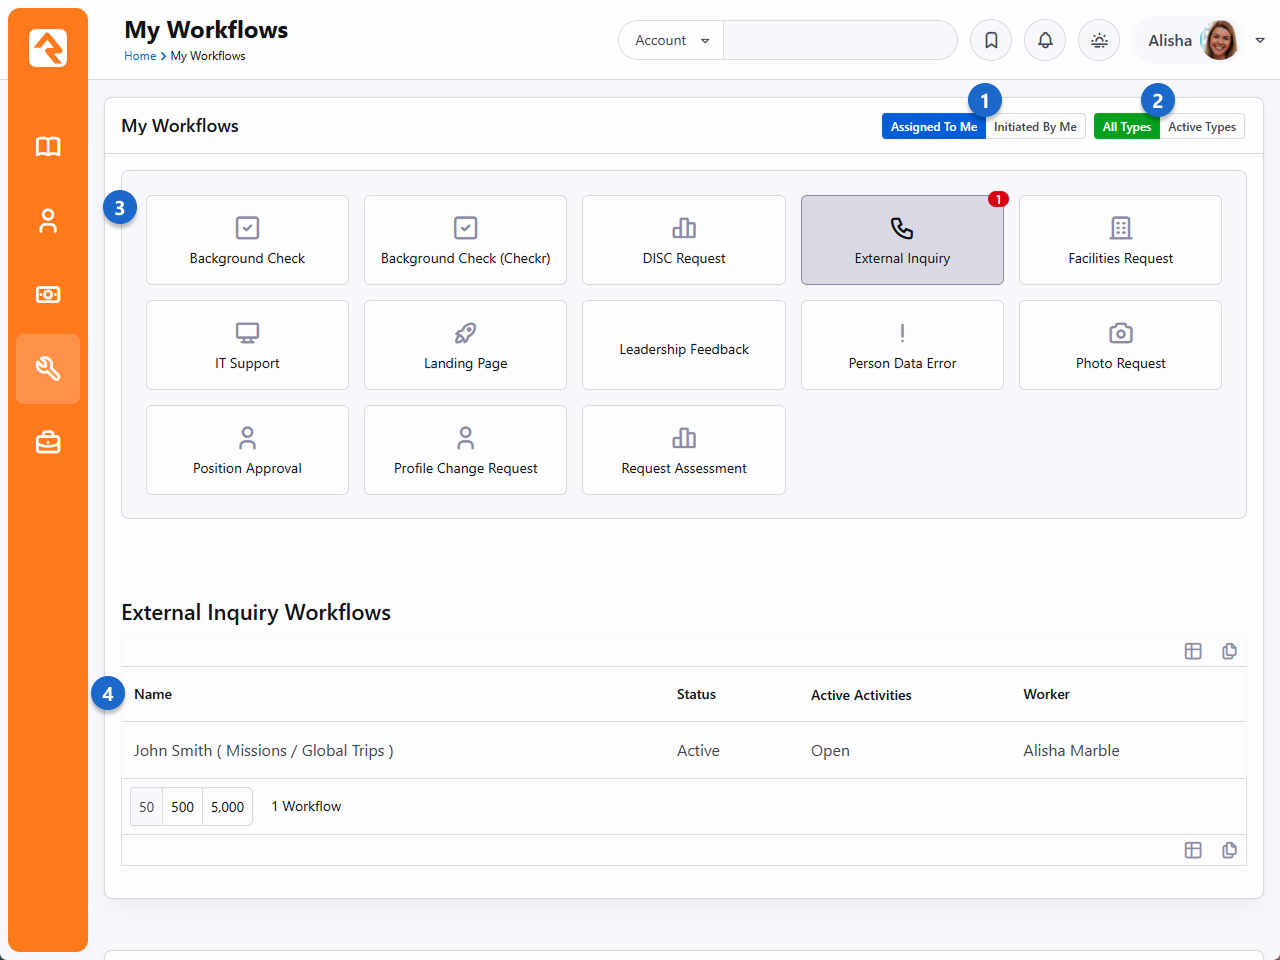
- 1 Initiated By Me / Assigned To Me
- This toggle allows you to filter the workflows by:
- Initiated By Me: Those that you started. For example, if you opened an IT Request it would be
listed here.
- Assigned To Me: These are the active workflows that are assigned to you. This
includes workflows that are assigned to a group that you are a member
of. Using this toggle is a great way for you to track your work and
what needs your attention.
- 2 Active Types / All Types
- This toggle determines which workflow types will be displayed.
- Active Types: This will only show workflow types that have active items related to
you. Using this option helps to reduce the clutter and noise by
showing only workflow types that need your attention.
- All Types: This will display all workflow types you have security to view.
- 3 Workflow Types
- Below the toggles you'll see a listing of all the workflows you have
security to view. If a workflow has active requests that you’re related
to, a small number will appear at the top of the workflow type showing a count
of the related workflows.
- 4 Workflow Grid
- When you click on a workflow type it will list the workflows that are
related to you. Selecting one of them will take you to the workflow
details screen.
Mini My Workflows
You'll notice that there is a miniature version of
My Workflows
on the homepage. This acts as a reminder to the individual of their task
list as well as providing a quick link to the workflow.
My Workflows (Mini)
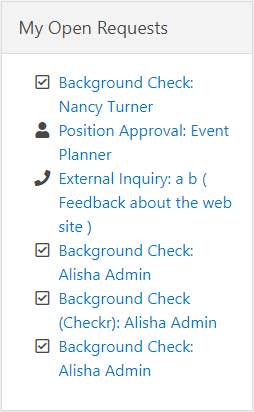
This block has several settings that allow you to customize it. These settings include:
-
The ability to filter the results to a specific category(s)
-
To include child categories
-
To show only workflows you are assigned to
-
To show only workflows you initiated
-
The markup that is displayed can also be fully customized using HTML and Lava.
Using these settings, along with the power of HTML/Lava, you can reformat
this block several different ways. Some organizations might even move it
into the main zone on the page to give it more space.
Persisted Vs. Non-Persisted Workflows
Persisted. That might seem like a strange term if you don't have a technology
background. It simply means to write something down so that it can be remembered in
the future. Think of it this way - some thoughts you have are relevant only to the
task you're currently working on. Sometimes, though, you have a thought that you
know you'd better write down because you'll need it for a task you'll complete in
the future. Writing the thought down persists the idea for use in the future.
Non-Persisted Workflows
Non-persisted workflows are executed but the attribute values are never written
down (or in tech terms never written to the database). They exist only in the
computer's temporary storage and go away when done. These types of workflows
are great when the entire workflow will be processed immediately and will then
be completed.
The check-in workflow is a non-persisted workflow. After the check-in process
is complete there is no need to store all of the workflow attributes that
helped the system pick the right room for the individual. Many of the entity
trigger workflows may turn out to be non-persisted. These workflows will be
used to make quick decisions about the nature of an update to the data. Keeping
the workflow around won't provide benefits in most cases.
Design Using Persisted Workflows
Even if you're certain that you want a non-persisted workflow it's wise to
design the workflow as a persisted workflow. This allows you to check the
logging and look at what happened under the hood as it ran. Once you're certain
everything is correct you can then check the setting back to non-persisted.
Persisted Workflows
Persisted workflows write their state and status down. This allows them to run
over long periods of time without forgetting their status. Most workflows that
individuals interact with will be persisted (e.g., IT Requests, Facility Requests,
HR processes, etc.). This allows the workflow to live for hours, days or even
years.
Persisted workflows should also be used when a history of what occurred is
important. These types of workflows allow you to go back and see what happened
when.
Morphing Persistence
Just because a workflow starts out as a non-persisted workflow doesn't mean it
has to stay that way. There is a workflow action called "Workflow Persist" that
will change the current workflow to a persisted workflow. This is commonly used
with workflow types that start with an entry form.
Picture this - a person comes to the first entry screen of a workflow and then
changes their mind and closes the page. What happens? In a persisted workflow
the loading of the entry screen started a new workflow that is now stored in
the database. In a non-persisted workflow, nothing happens. Because of this, it's
common for entry workflows to start as non-persisted and then change to
persisted after the first entry screen is completed.
We Know What You’re Thinking
Ok, so you’re probably thinking: Can I turn a persisted workflow into a
non-persisted workflow? The simple answer is no. Once a workflow has been set
to persisted it will remain persisted. You can, however, delete a workflow instance
from an action inside the workflow by using the 'Delete Workflow' action.
Building A Simple Workflow
Now let’s build a sample workflow from scratch. We’ll use the sample
Position Approval
as our guide. This process has been pre-configured in your Rock install under the
Samples category.
You might review the overview of the sample workflow in the chapter
What's The Use
so you have a good understanding of the purpose and steps of this workflow.
Workflow Details
Workflow types are configured under
Admin Tools > General Settings > Workflow Configuration.
After adding the workflow, we'll complete the detail section.
Workflow Details
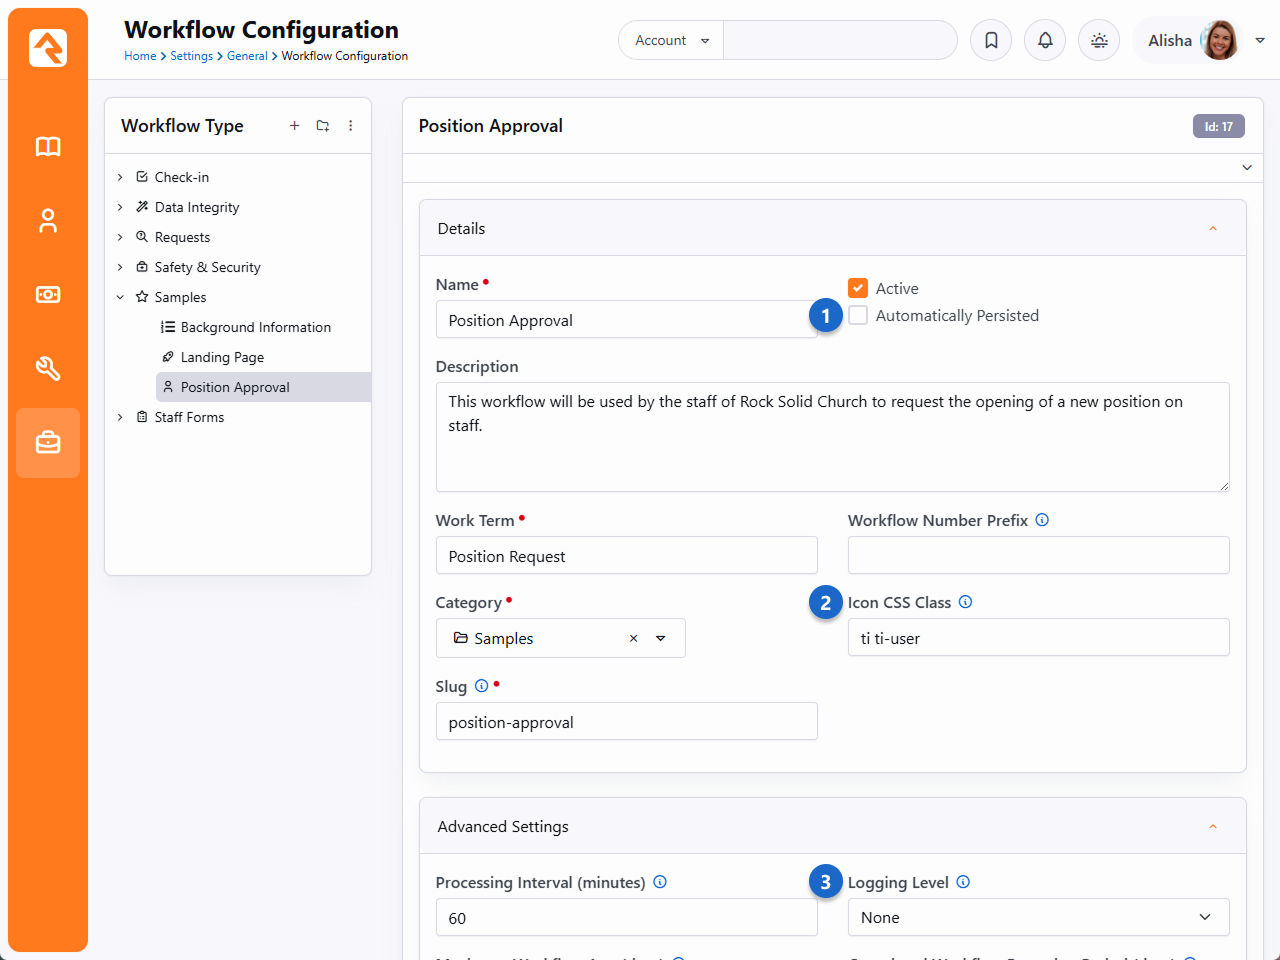
- 1Non-Persisted
- Note that this workflow is not automatically persisted. Workflows
that start with an entry form are usually configured this way to keep
workflows from being added to the database when the person clicks on the
form but never enters anything.
- 2Icon
- Note that we have also given our workflow a custom icon so that it stands out a bit.
These are simply FontAwesome CSS classes. See the
FontAwesome site
for a listing of all the icons.
- 3Logging
- We've set our logging level to Action
so we can see everything that is going on under the hood.
Workflow Attributes
Next, we will define all the attributes for our workflow.
The attributes for the position request workflow are pictured below.
Make note of the different field types for these attributes,
as this workflow uses several of them.
Workflow Attributes
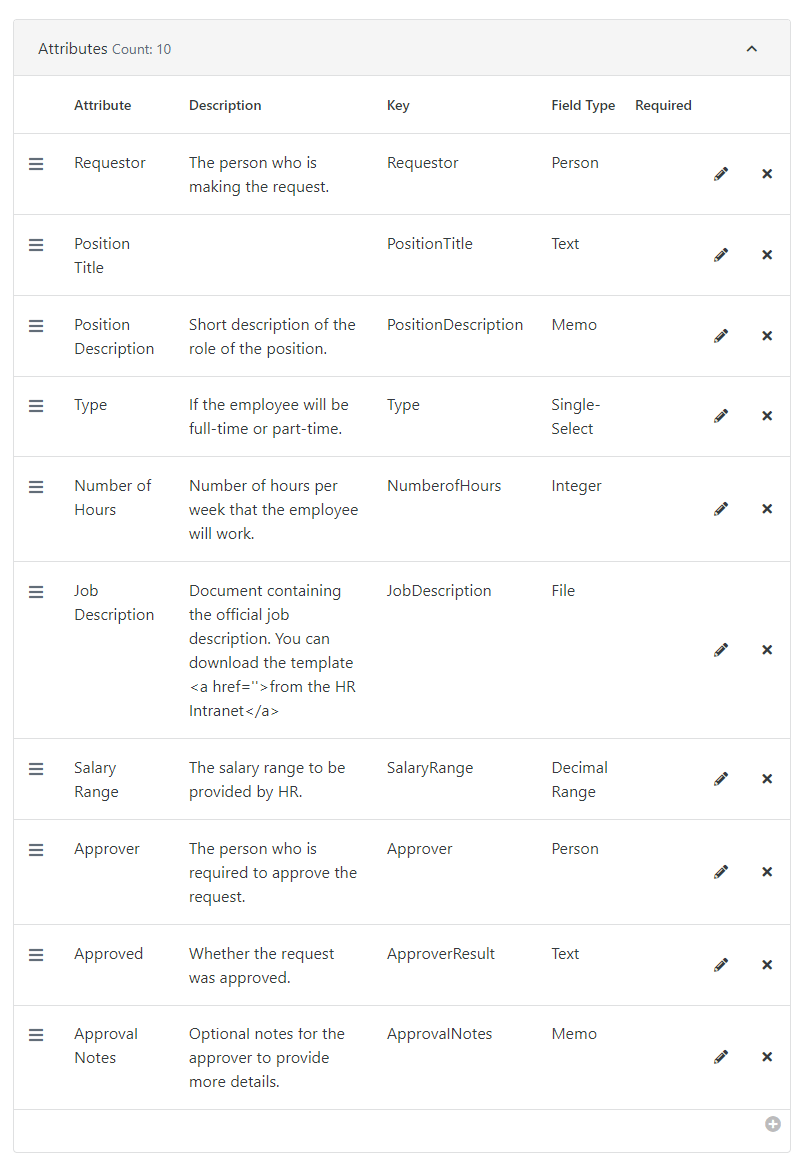
Workflow Activities
Finally, we'll define the activities and actions for our workflow. The activities
for this workflow are shown below. Note how the
Initial Entry
activity is in green. This means that it's configured to activate when the workflow is initially activated.
Workflow Activities
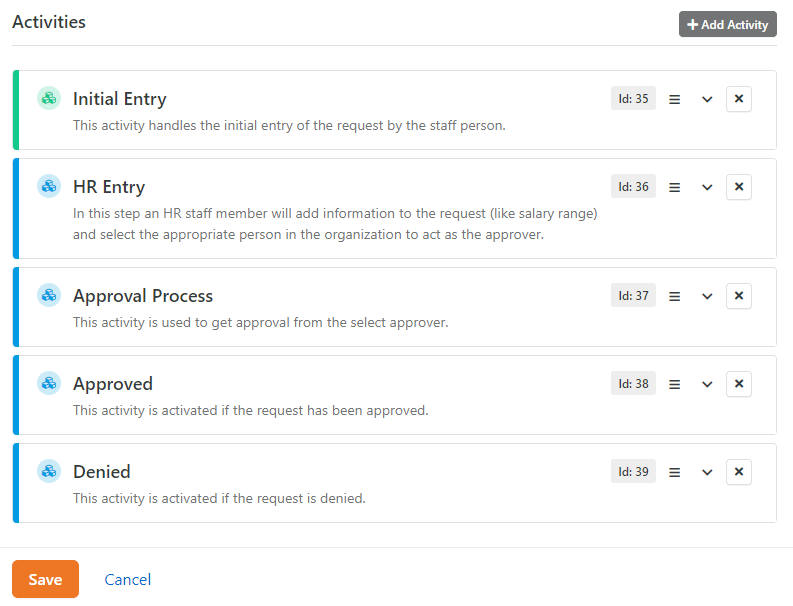
Let's walk through each activity now to look at its actions. We won't look at each setting of
each action, but we'll give you an idea of the purpose of each.
Initial Entry
The purpose of this activity is to get the person's position request details.
Some of these details will depend on whether they are asking for a full-time
or part-time request.
Initial Entry Activity
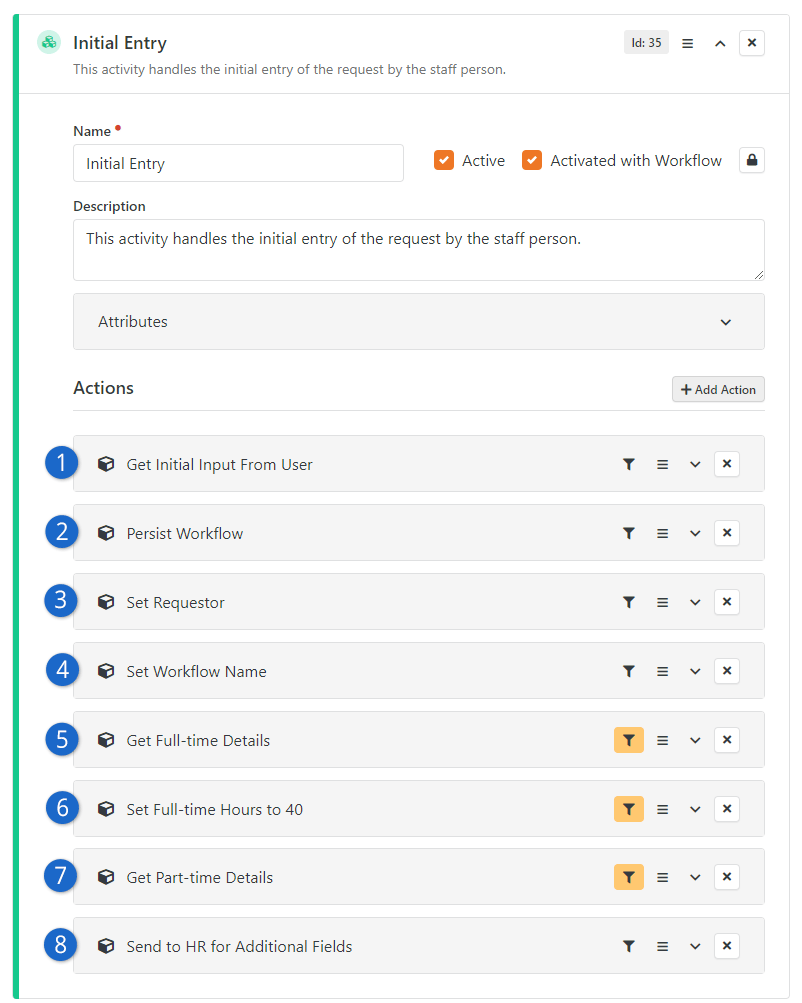
- 1Entry Form
- Initial entry form that asks for details about the position. One of these
fields, Type,
will allow the person to note if the position is full-time or part-time.
- 2Persist
- Next, we persist the workflow, now that the person has entered information,
so that we can maintain the values over time.
- 3Requester
- We can now set the requester for the workflow with the current person
who just entered the form.
- 4Name
- Another setup step is to provide the workflow with a name. This name
will be used on the various grid displays.
- 5More Information
- Now we'll start asking for more information. This next action will get
further details if the person requested a full-time position. Note that an
action filter limits this entry form to only be displayed when the person
selected full-time
as the position type.
- 6Full Time
- The next step sets the position hours to 40 if the person selected full-time,
using action filters.
- 7Part Time
- This action collects information for part-time positions. It also
uses filter actions to only display when appropriate.
- 8HR Entry
- Our final action activates the HR Entry
activity to handle the next step. This action is set to mark the current activity as complete when it runs.
HR Entry
This activity is responsible for getting additional details from the human resources
department. It has the following actions.
HR Entry Activity
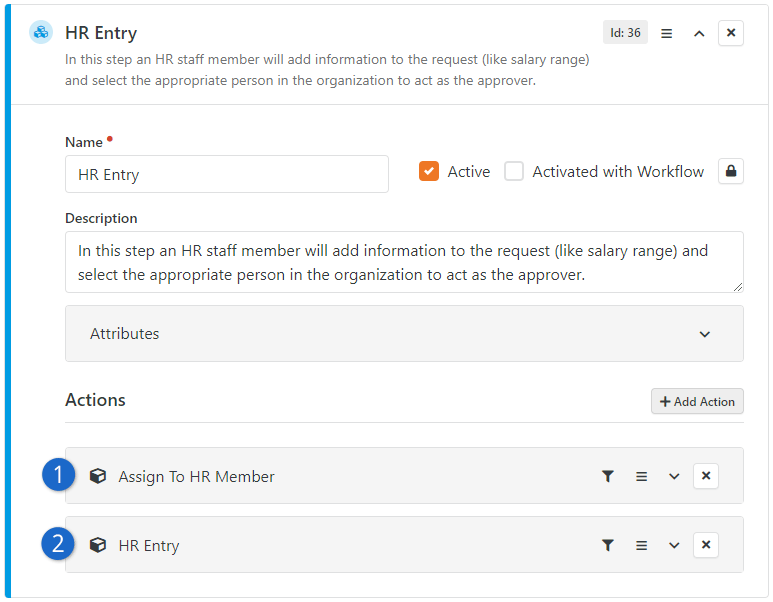
- 1Assign
- The first action assigns the activity to Alisha Marble, the human resources
representative for the organization. This tells the workflow who is responsible
for entering the human resources information.
- 2HR Entry
- The next and final action is the human resources entry screen. This entry form is
set to email the assigned person when the action is active. This saves us from
having to add our own email action. The command on this entry form is set to
activate the next step, which is the approval process.
Approval Process
This activity is responsible for getting the approval for the position. Achieving
this might be easier than you thought. Consider these actions.
Approval Process Activity
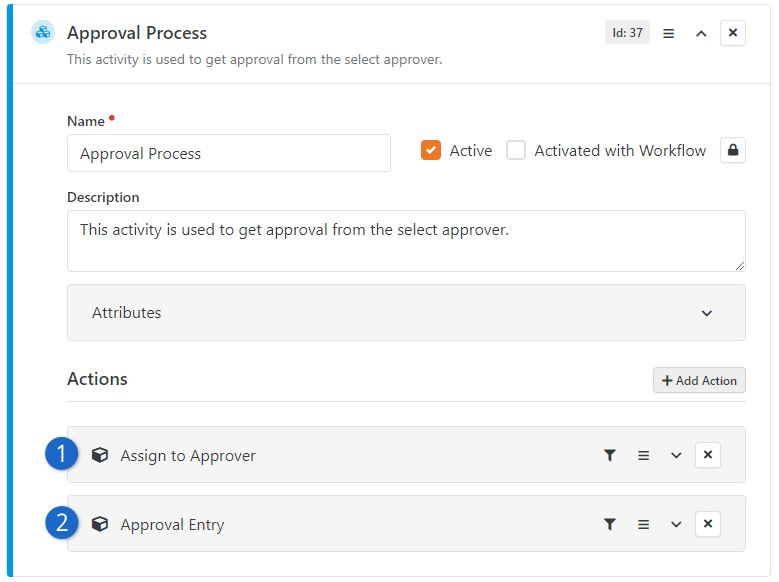
- 1Approver
- Just like the HR Entry, we assign this activity to the approver who was entered by human resources.
- 2Approval Information
- Then we add an entry form to get the approval information. This form has two commands: one
for Approve and the other for Deny. Each of these commands launches an activity to
process actions for each response. This entry form also has to be configured to send an
email. This email has the Include Actions In Email
enabled, which allows the individual to approve or deny the request right from the email.
Approved / Denied Activities
These activities are configured pretty much the same way, so we'll look at them together.
Approved / Denied Activities
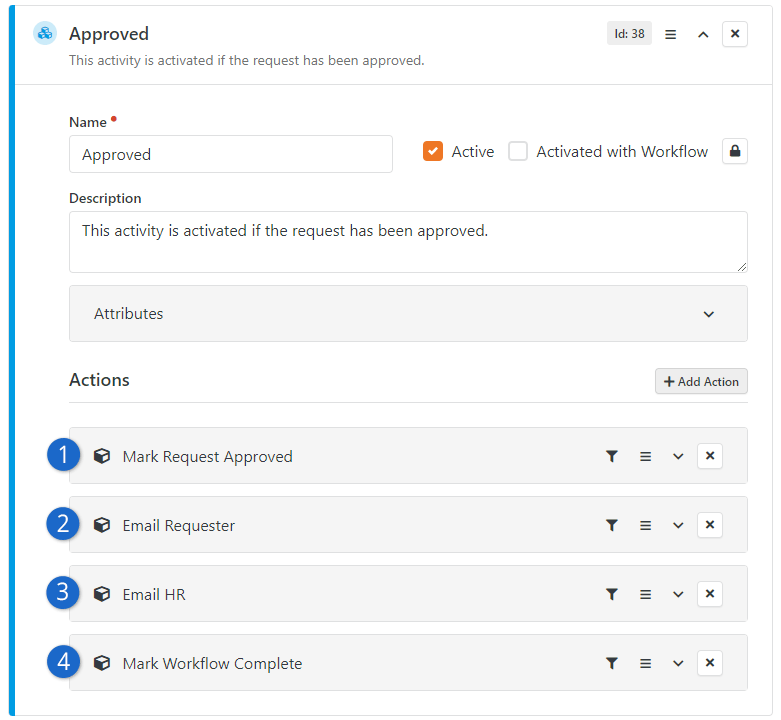
- 1Approve or Deny
- The first action marks the request as either approved or denied.
- 2Response to Requester
- Next, we email the requester with the approval response.
- 3Response to HR
- Then, we send an email to the human resources representative so that they are aware of the approval state.
- 4Complete
- Finally, we mark the workflow as complete.
Workflow Tips
Below are some tips to keep in mind when creating new workflows.
Built-In Workflows
Rock ships with a several workflows to help you get started. Hopefully you'll be
able to use them in your organization but, if not, they'll act as patterns when
you start to write your own. We cover the details of some of these workflows below.
Remember You Can Copy
Don't forget that you can copy a current workflow to create a clone of it. This
clone is a great place to start if your workflow is similar.
Unattended Check-in
You’ll notice the check-in workflow on the
Workflow Configuration
screen. This is the workflow that runs Rock's check-in system. Unless you know
exactly what you’re doing, we recommend that you do not alter this workflow.
Person Data Error
The Person Data Error
workflow is an example of a workflow that launches from the action menu on
the Person Details
screen. It allows your organization's staff to note any issues with the data
that they might not know how to fix. This is a great pattern to use when you go
to create your own person profile actions.
Photo Request
This is another example of a workflow that launches from the action menu on
the Person Profile
page. After ensuring the person hasn't opted out, this workflow type will present
a form to the person who launched it, where a custom message can be provided.
The custom message, and a link to upload a photo, will be emailed to the person.
The email also contains opt-out and unsubscribe options for the person.
Request Assessment
This workflow also launches from the action menu on
the Person Profile
page. The purpose of this workflow type is to send an email to a person to
request that they take one or more of Rock's assessments. The person who
initiates the workflow is asked which assessments should be requested and
has the option of providing a custom message that will be included in the
email.
External Inquiry
This workflow is used on the Contact Us
page of the external website. It's meant to help direct your guest's questions
to the correct staff. It also helps to provide accountability that your guest's
questions will be answered in a prompt timeframe.
Facilities Request / IT Support
These two workflows act as a request ticketing system for your facilities and
information technology teams. Using them allows your staff to report issues or
request new services.
Profile Change Request
A workflow of this type will be launched from the
My Account page
on the external site when a person clicks the
Request Additional Changes
button. The person will type their request and submit it, at which point the
workflow will alert an assigned staff member or volunteer via email. The
staff member or volunteer can then provide a resolution for the item, which
will be emailed to the initial requester to notify them that the change
has been made.
Workflow Notes
Workflows are a powerful tool to automate your organization's processes. When you're building them, you'll want to pay
close attention to how individuals interact with them. You especially want people to be able to interpret
the current state of the workflow and a history of events that have occurred. To help with that we've
created workflow notes. Let's look at a few ways that notes can be integrated into your workflows.
Adding Notes From the Workflow Details
When looking at the details of a workflow you'll notice that you have the option to add
notes. This is a great way to be able to provide context or additional information at
any time (even after a workflow has been completed).
Adding Notes From the Workflow Details
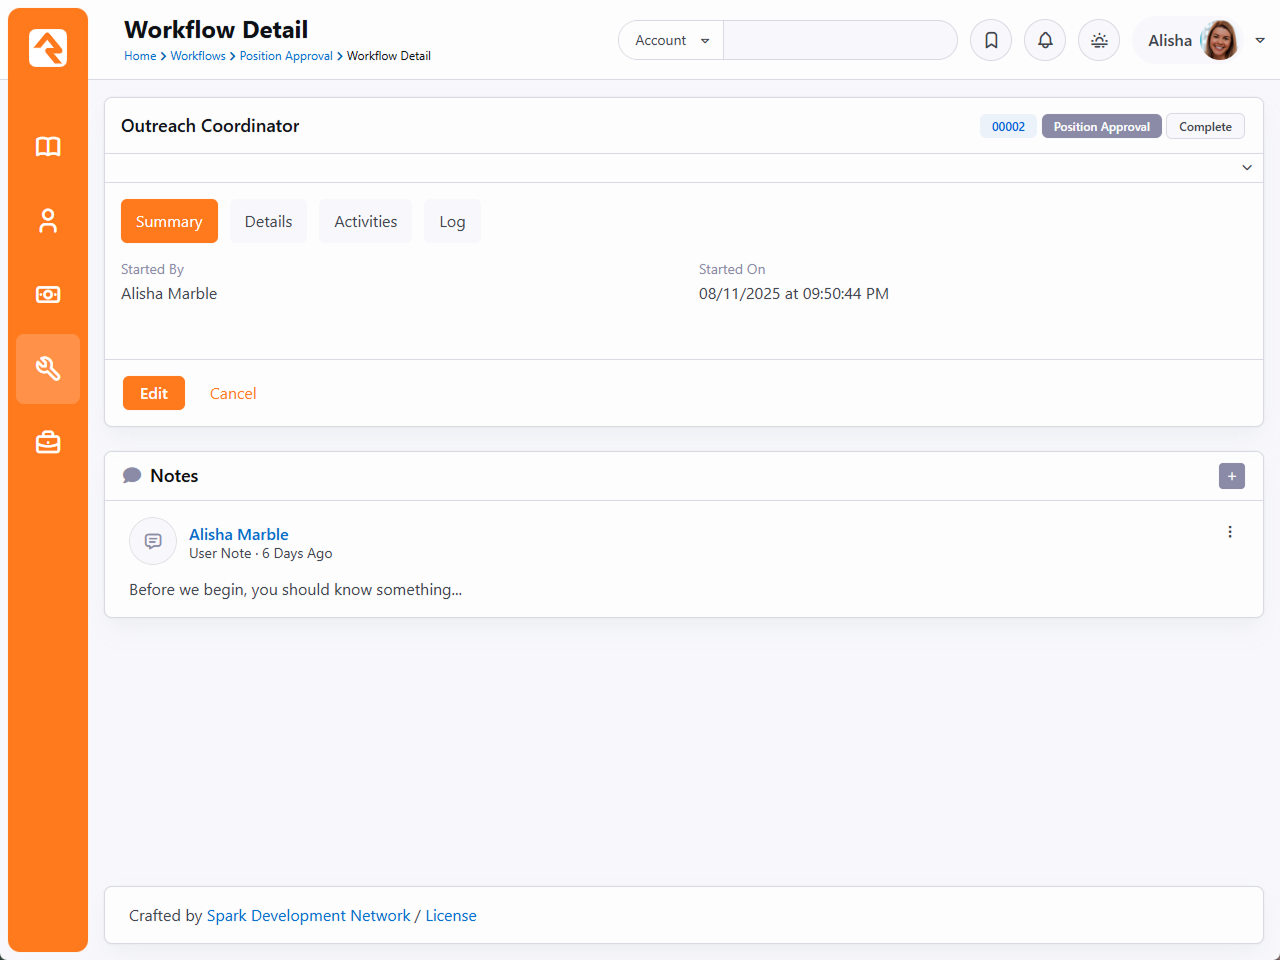
Adding Notes From Entry Forms
Another way to add notes is from entry forms. You'll notice on the
Form action there is a setting to
Enable Note Entry. When it's set, you'll see the
note entry form next to the selected form fields.
Adding Notes From Entry Forms
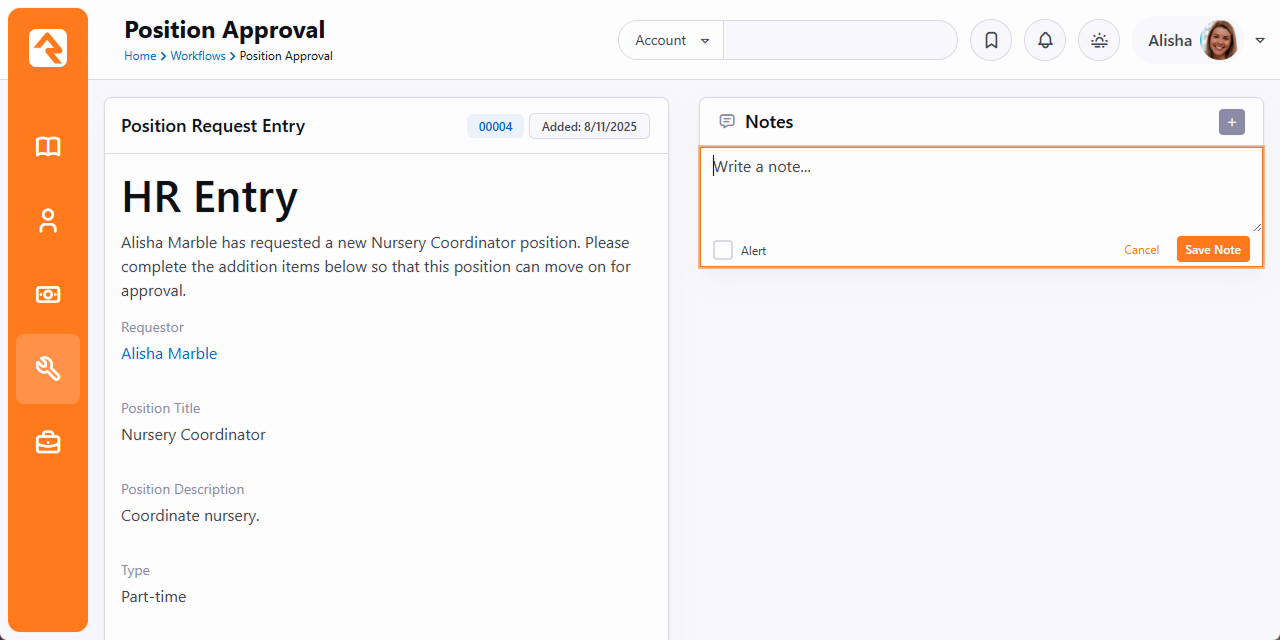
Adding Notes From Workflow Actions
The final way to add workflow notes is using workflow actions. This allows you, the workflow
author, to automatically create notes about the workflow processes.
Adding Notes From Workflow Actions
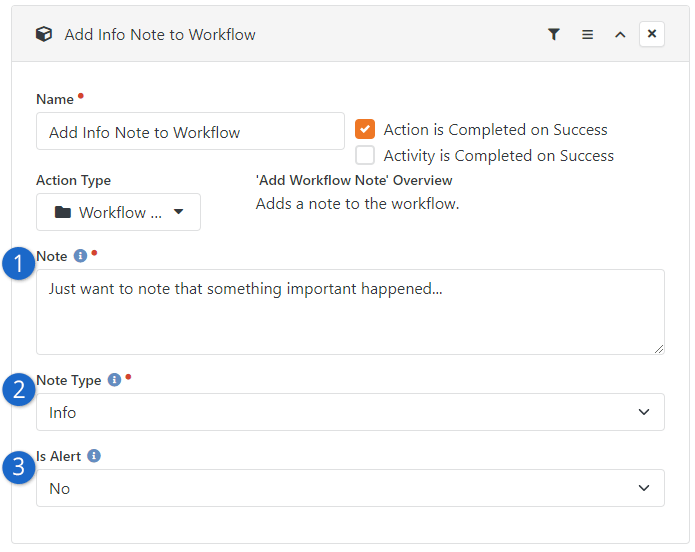
- 1 Note
- This is the text of the note. Be sure to use Lava for extra power.
- 2 Note Type
- When you add notes using actions, you can style the note in several different ways with
Note Types. These
note types are defined under
Admin Tools > General Settings > Defined Types > Workflow Note Types.
- 3 Is Alert
- Setting this property will cause the note to always be at the top and highlighted with the alert styling.
Adding New Note Types
Feel free to add new note types by adding more Defined Values.
When you add new types, you can customize the note's icon. The name of the note type will also be placed as a CSS class on the note markup
to allow you to style it. For example, the note type System Note
would have the CSS class system-note applied.
Lava Tips For Workflows
Lava is based on Liquid, a simple templating language developed by the folks at
Shopify. Rock uses Lava everywhere, so
hopefully you're already familiar with it. If not, you can find more information
about it on our Lava
page.
Lava lets you supercharge your workflows, creating powerful and personalized
experiences. The goal of this chapter is to open up the toolbox and show you what
you can create. You'll definitely want to keep this cheat sheet handy as you make
your workflows.
Action fields that support Lava will have a {{ Lava }} notation in
their help section. When you see this, you’ll have access to any of the data below.
Attributes
Attributes are the most commonly accessed merge fields for workflows. Let's
dig in to see how we can add strength to our workflows using the power of
Lava and workflow attributes.
Any attribute value can be referenced using the notation
{{ Workflow | Attribute:'AttributeKey' }}. By default, the attribute key is
the name of the attribute with all of the spaces removed, although you can provide your
attribute with a different key if you wish. So, if you want to display the value stored
in the Attribute Position Title,
you’d use {{ Workflow | Attribute:'PositionTitle' }}.
Referencing an attribute will always return the formatted value
of the attribute. For example, if the Requester
attribute was a Person type attribute, the {{ Workflow | Attribute:'Requester' }} merge field would return the full name of the person.
Workflow Attributes: Accessing Their Properties and Attributes
One thing to keep in mind when you use attributes is that they will always attempt to display the formatted value of the object you've identified. Think of this formatted value as a "friendly value". That works great when you've got a person attribute in your workflow and want to show their name. But if you want to show something other than the person's name, you need to give Lava a bit more information about what you're looking for.
For instance, since Email is a person property, you can use a second parameter on the | Attribute filter to tell Lava you want to show their email address. Your Lava would look like this: {{ Workflow | Attribute:'Requester','Email' }}.
If you need an attribute of the person instead (for instance, their Baptism Date), start by loading the full person object from your Requester attribute, and then use a second Attribute filter in your Lava. For example: {{ Workflow | Attribute:'Requester','Object' | Attribute:'BaptismDate' }}
Unformatted Attribute Values
There may be a time when you'd like to retrieve the raw value for an
attribute. This would be helpful in creating links to pages that would need
to know which person, group, etc. you are interested in. You can retrieve
the unformatted attribute value by appending
RawValue
as a second parameter in the attribute filter. For example, using Lava of
{{ Workflow | Attribute:'Requester','RawValue' }} would return
a Person Alias GUID, since that is how the Person type attribute stores its
value under the hood.
Keep In Mind
As noted above, the Person attribute stores the GUID of the PersonAlias record, not the GUID of the Person record.
This holds true even if the attribute is associated with a business.
Link Values
Some attribute types are also considered
linkable
by Rock (currently this only includes the Person
and File attribute types). For these attribute
types, you can also append a Url
to the attribute key to get a URL to the detail page in Rock used to view
that type. For example, a merge field of {{ Workflow | Attribute:'Requester','Url' }} would
return the URL value to the person profile page for the selected person.
Attribute Security on Triggered Workflows
When Workflow actions access attribute values (for a Person, Group, etc.) via Lava, Rock
performs authorization checking. When they are executed by a trigger or Job, Rock requires
All Users - Allow View
to read the values because there is no user (or CurrentPerson) to base security access
checking against.
However, you can override the CurrentPerson to a person who has authorization (such as a
Rock Administrator) inside your Lava by assigning the CurrentPerson like this:
{% assign CurrentPerson = Workflow | Attribute:'[AttributeOfAdminPerson]','Object' %}
Here's a detailed example of a Set Attribute Value
action setting a Workflow's Boolean attribute based on the age of a person's (Requester) BackgroundCheckDate. In this
example an attribute called 'Admin' of type Person
was added to the workflow with the default person set to the Rock Administrator:
{% assign CurrentPerson = Workflow | Attribute:'Admin','Object' %}
{% assign years = Workflow | Attribute:'Requester','Object' | Attribute:'BackgroundCheckDate','Object' | DateDiff:'Now', 'Y' %}
{% if years and years < 2 %}True{% else %}False{% endif %}
Warning
Make sure you don't have any extra spaces in your Lava output otherwise you will get unexpected results.
Checking Boolean Attributes
When checking boolean attributes you'll need to compare the value with the
True Text
or False Text
used when the attribute was defined. Unless you've changed it, by
default a boolean attribute uses the text "Yes" and "No".
Here's an example of a Set Attribute Value
action checking several Activity attributes in order to set a Workflow boolean attribute:
{% assign isStep1Ready = Activity | Attribute:'Step1Ready' %}
{% assign isStep2Ready = Activity | Attribute:'Step2Ready' %}
{% if isStep1Ready == 'Yes' and isStep2Ready == 'Yes' %}True{% else %}False{% endif %}
Workflow
The workflow item represents the current workflow instance. The following merge
fields are available:
Workflow = {
    "Id":,
    "Guid":,
    "Name":,
    ""Description":
    "Status":
    "WorkflowType = {
        "Id":,
        "Guid":
        "Name":,
        "Description":
        "Order":
        "WorkTerm":
        "Category": = {
            "Name":
            "Description":
        }
    }
    "Activities":[]
    "ActivityTypes": []
}
Examples:
-
{{ Workflow.Name }}
-
{{ Workflow.WorkflowType.Name }}
Current Activity
The activity merge object has the following fields available.
Activity = {
    "Id":,
    "Guid":,
    "AssignedPersonAliasId":,
    "AssignedGroupId":,
    "ActivatedDateTime":
    "WorkflowId":,
    "Workflow":,
    "ActivityType = {
        "Id":,
        "Guid":
        "Name":,
        "Description":
        "Order":
        "ActionTypes": []
    }
}
Examples:
-
{{ Activity.Id }}
-
{{ Activity.ActivityType.Name }}
Current Action
The action has the following merge fields available.
Action = {
    "Id":,
    "Guid":,
    "ActivityTypeId":,
    "ActivityType":,
    "ActionType = {
        "Id":,
        "Guid":
        "Name":,
        "Order":
    }
}
Examples:
-
{{Action.Id}}
-
{{Action.ActionType.Name}}
Global Attributes
Rock’s global attributes are also available for actions that support Lava.
You can get a full list of these attributes under
Admin Tools > General Settings > Global Attributes.
These attributes can be accessed through Lava using:
{{ 'Global' | Attribute:'[AttributeKey]' }}
Examples:
-
{{ 'Global' | Attribute:'OrganizationName' }}
-
{{ 'Global' | Attribute:'OrganizationAddress' }}
Additional Merge Fields
Merge Fields for Sending Emails
When using the Email Send,
or Email Send Template
actions, and using a person type attribute as the Send To Attribute Value, there will be an
additional Person
merge field that contains the current recipient. This is a full person object
and can be used to reference properties of the person. For example, a
merge field of {{ Person.NickName }} would display the recipient's nick name.
Merge Fields for Entry Forms
In addition to the merge fields described above, the entry form also has access
to the current person who is filling out the form. Merge values for the
CurrentPerson
object are listed below.
{
    "FirstName": "Alisha",
    "NickName": "Alisha",
    "MiddleName": "Mary",
    "LastName": "Marble",
    "IsDeceased": false,
    "PhotoId": 56,
    "BirthDay": 10,
    "BirthMonth": 10,
    "BirthYear": 1961,
    "Gender": 2,
    "AnniversaryDate": "1980-04-09T00:00:00",
    "GraduationDate": null,
    "Email": "alisha@rocksolidchurchdemo.com",
    "IsEmailActive": true,
    "EmailNote": null,
    "EmailPreference": 0,
    "ReviewReasonNote": null,
    "InactiveReasonNote": null,
    "SystemNote": null,
    "PrimaryAliasId": 1,
    "FullName": "Alisha Marble",
    "BirthdayDayOfWeek": "Friday",
    "BirthdayDayOfWeekShort": "Fri",
    "PhotoUrl": "/GetImage.ashx?id=56",
    "BirthDate": "1961-10-10T00:00:00",
    "Age": 52,
    "DaysToBirthday": 45,
    "Grade": null,
    "GradeFormatted": "",
    "CreatedDateTime": null,
    "ModifiedDateTime": "2014-08-26T21:28:56.99",
    "CreatedByPersonAliasId": null,
    "ModifiedByPersonAliasId": 1,
    "Id": 1,
    "Guid": "ad28da19-4af1-408f-9090-2672f8376f27",
    "UrlEncodedKey": "EAAAACE88i304vQJcwoNWW6P7fZ!2bSxiGgjyCooBFy4H332mMnPJoySCsXjQXVMJF87MynUFCAKPz4gIs1RshCy3dL7M!3d",
    "ConnectionStatusValue": {
        "Value": "Member",
    },
    "MaritalStatusValue": {
        "Value": "Married",
    },
    "PhoneNumbers": [
    {
        "NumberTypeValue": {
            "Value": "Mobile",
        },
        "CountryCode": "1",
        "Number": "5555555555",
        "NumberFormatted": "(555) 555-5555",
        "IsMessagingEnabled": true,
        "IsUnlisted": false,
        "NumberFormattedWithCountryCode": "+1 (555) 555-5555",
    }],
    "RecordStatusReasonValue": null,
    "RecordStatusValue": {
        "Value": "Active",
    },
    "SuffixValue": {
        "Value": "Ph.D.",
    },
    "TitleValue": {
        "Value": "Mrs."
    }
}
Securing Workflows
While we've already covered workflow security in other chapters, we thought
we'd summarize workflow security in one place. This should give you a good
understanding of what's possible.
Editing A Workflow Type
To be able to add or edit a workflow type, you’ll need Edit
access to the workflow configuration page
(Admin Tools > General Settings > Workflow Configuration)
and the Workflow Type Detail
block on it. While the Rock Administrator role has full access by default, Workflow Types inherit security from their parent Category. This means anyone with Edit permissions at the category level can also manage, clone or delete workflows within that category.
Simple Security
To simplify administration, security flows from the Category down to the individual Workflow Type. If a team needs the ability to Clone or Delete forms in the Form Builder, you simply need to grant them Edit permissions on the parent Category. This removes the need to manually add security to every new workflow created.
Workflow Navigation Page
The workflow navigation page
(Tools > Workflows)
is a great place for your staff to start and manage workflows.
Below is a summary of the security needed to interact with the various components of this page.
Securing Workflow Navigation
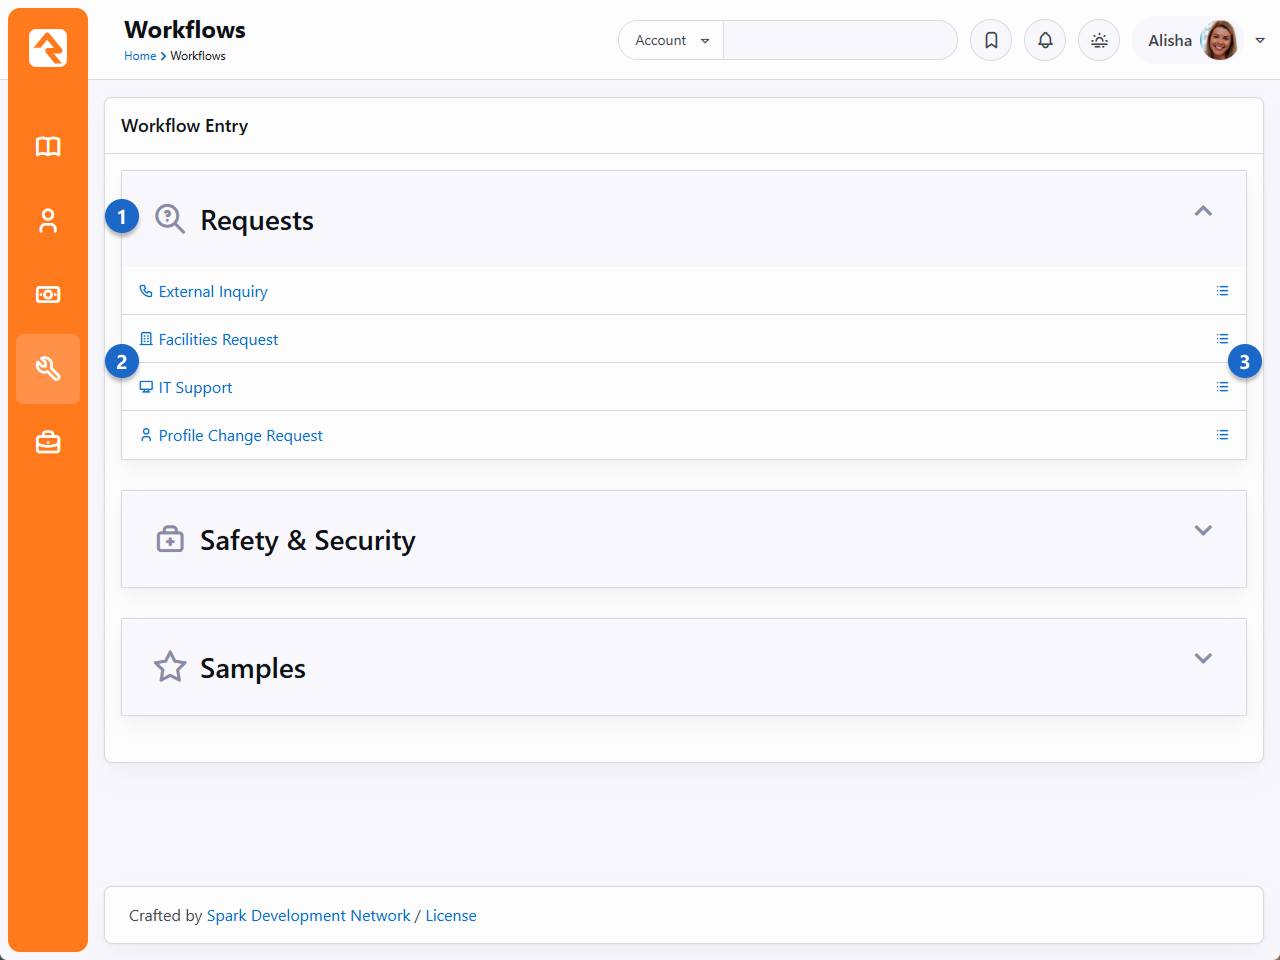
- 1View Permission
- One must have View
permission to the workflow category in order for it to display. The category also must be selected
in the block settings to be shown.
- 2View Access
- Once the category is displayed, the current person must also have view
access to the Category or Workflow Type in order for it to be displayed on the list.
- 3View List
- If the logged in individual has View List
access to the workflow type, they'll also see the
link to be able to view the active/completed workflows of this type.
Workflow Type Not A Link?
You may notice that when some workflow types are listed, they are not linked. This means the workflow
type does not have an entry form configured for the current person.
Workflow Entry and URL Links
The following security is required for the Workflow Entry block:
-
The person must be authorized to View
the workflow type in order to enter information.
-
The first active action form that the person is assigned to will be displayed.
-
The person must also be authorized to either Edit
the block or View the activity type.
Workflow List
The Workflow List block requires that a person must be authorized to
Edit
workflow types in order to view a list or add/edit/delete a workflow.
Workflow Detail
The following security is required on the Workflow Detail block:
-
The person must be authorized to View
the workflow in order to view read-only details.
-
The person must be authorized to Edit
the block, or Edit
the workflow, in order to edit the workflow.
My Workflows
The My Workflows block has the following security settings.
Securing My Workflows
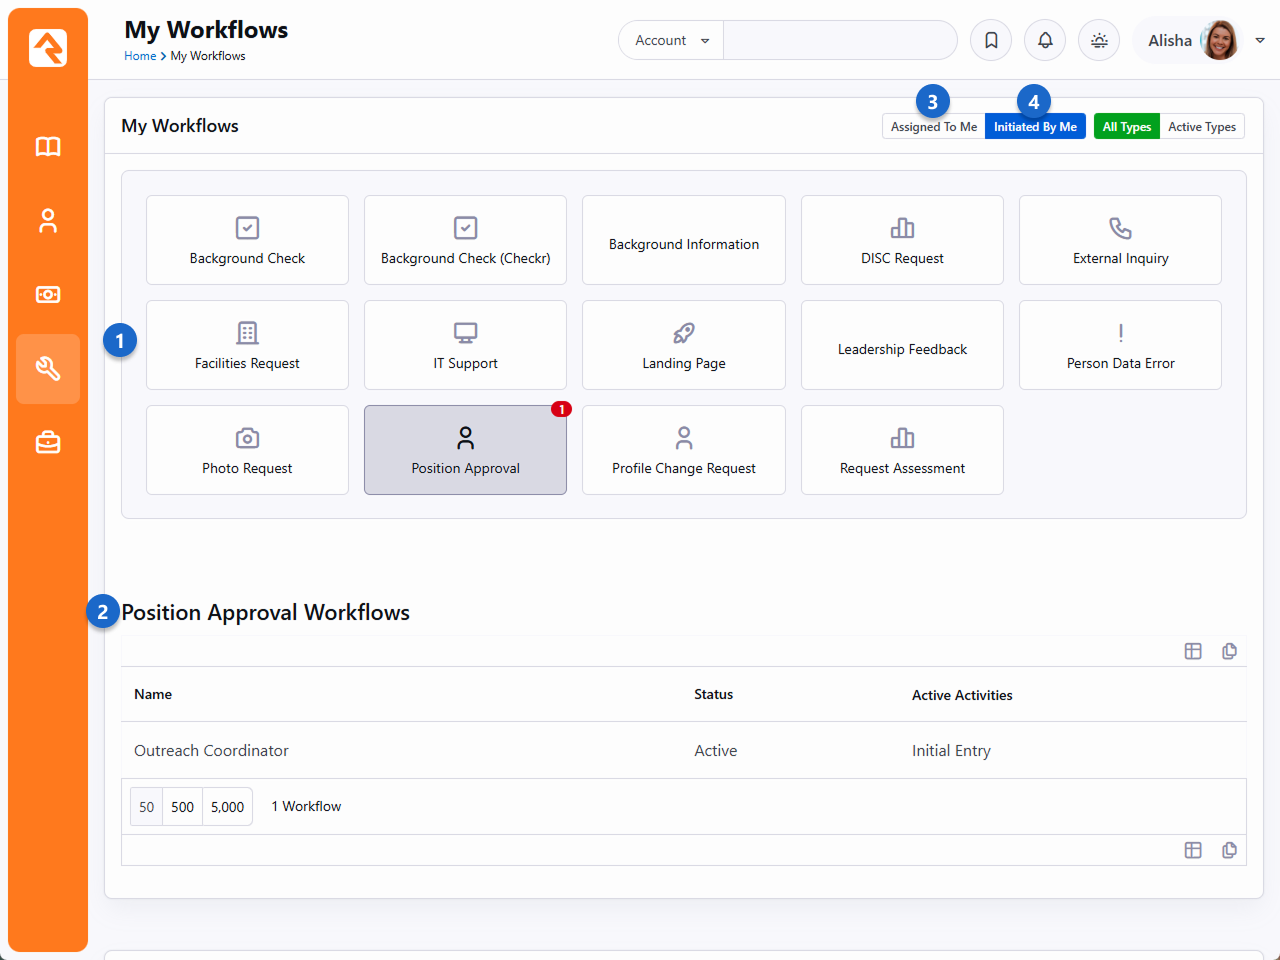
- 1Authorized
- The person must be authorized to View the workflow type.
- 2Criteria
-
Displays workflows for any activity that meets the following criteria:
-
Workflow type is active
-
Activity is active and has an active form
-
The person must be authorized to View the activity
- 3Assigned
- If viewing Assigned to,
the person must be assigned to the activity
- 4Initiated
- If viewing Initiated by,
the workflow must have been initiated by the person.
Linking To Workflows
All of the workflow entry and management tools in Rock should be able to meet all
of your needs. If you want to extend some of the functionality, say linking the
Dynamic Data
block with workflows, it's helpful to know some tricks about interacting with
workflows using URL links.
Workflow Entry
The Workflow Entry
block checks for a WorkflowId
or WorkflowGuid
parameter in the URL. If found, it will load the existing workflow. If parameters are
not included, or a workflow is not found, a new workflow is created (in this case,
a WorkflowTypeId
query string parameter is required). Either way, the workflow is processed, and
the block will look for the first active form action on the first active
activity.
If a command
query string parameter is included, the block will immediately process the
form, assuming the person selected the included action.
The out-of-the-box workflow entry page is configured with the route of
http://yourservername/WorkflowEntry/17. Note that in this case, 17 is the
WorkflowTypeId.
A Few Technical Details
Attribute Values
When working with workflows and attributes, it's helpful (actually it's pretty much
essential) to know how those attributes store their values. Below is a list of a few
commonly used attribute field types, with a description of how the value is stored
internally.
| Field Type | Stored Value |
|---|
| Boolean | 'True' or 'False' |
| Campus | A campus's GUID |
| Defined Value | A comma-delimited list of defined value GUIDs
(if attribute is not configured for multiple values,
there should only be one GUID) |
| Group | A group's GUID |
| Group Member | A GroupMember Record's GUID |
| Multi-Select | A comma-delimited list of the values (e.g., 1,2,3)
of the selected items |
| Person | A person alias GUID |
| Single-Select | The value (e.g., "1") of the selected item |
| Text | The value of the textbox |
The full list of field types can be found in our
Workflows & Lava
documentation.
When creating workflow actions that update an attribute value,
make sure to reference this list so that your attribute values get set correctly.
Webhook to Workflow
Now that you're a workflow guru, let's turn up the volume to 11. As you've seen, there are several ways that you can launch workflows
built into Rock. But what if we told you you could launch workflows from Twitter, Wufoo, Formstack, Dropbox, Evernote, Email, or... basically
any modern web service? That's the power of Webhooks to Workflows.
Most modern Web Services use the concept of webhooks. This allows the service to make calls out to other systems when certain events occur.
For instance, Formstack can call out to Rock, using a webhook, every time a form is completed. There are also services like
Zapier or Flow that help to manage the flow
of webhooks from service to service.
Configuring a Webhook to a Workflow
You configure the linkage from a webhook to a workflow using a
Defined Value. These are configured under
Admin Tools > General Settings > Defined Types > Workflow Webhook.
Each webhook that comes in will go through this list to determine which workflow types to launch. That determination is made by evaluating
the Lava in the Process Request attribute of the
Defined Value. If the Lava returns 'True' a workflow of that type
will be started.
All of the Defined Values will be considered for
each webhook that is called. All of the defined values whose
Process Request Lava returns 'True' will run. It's
important that this template is very discerning in making sure that only the correct workflow types are launched. One way to simplify
this matching is to use query string parameters in the URL you define in your webhook. The default URL you provide for the
webhook is:
http://rock.yourchurch.com/Webhooks/LaunchWorkflow.ashx
To help in your matching you could tack on a query string parameter such as:
http://rock.yourchurch.com/Webhooks/LaunchWorkflow.ashx?WorkflowTypeId=12
You could then provide the following template for your
Process Request.
{% if QueryString.WorkflowTypeId == "12" %} True {% else %} False {% endif %}
This makes the selection of the workflow type very easy.
When No Workflow Is Found
For security reasons if no workflow is matched a 404 error will be returned. This can be confusing at first when you
are attempting to debug, but it's a best practice to help ward off evildoers.
Ok, we've now discussed how to select the workflow type to launch. Now let's look at ways we can pass information to those workflows. You'll first notice
that you can configure a Lava template for setting the Workflow Name. This allows you to customize the name on each run based on information from
the webhook call.
You can also list attribute keys from the workflow and provide Lava templates for setting their values. The challenge here is knowing what data is
available to you. The Defined Type screen has a feature that shows/hides these available
fields. The basic items are:
- Url
- RawUrl
- Method
- QueryString
- RemoteAddress
- RemoteName
- ServerName
- RawBody
- Headers
- Cookies
Each of these items can have a lot of child properties. The documentation on the Defined Type
screen shows some of these details, but the actual values will change greatly based on the calling service. We recommend that you start by setting various
test attributes with items like 'RawBody' to see what is available.
While you can put Lava into the Workflow Attribute configuration on the
Defined Value it's recommended that a majority of that
logic be done inside of the workflow using the RawBody. The Lava on the Defined Value
can't contain special characters like a | that are required in Lava filters.
Example
For instance if you passed the RawBody into the workflow using the attribute key of 'Body', then the Lava below could
be used to access properties of the body.
{% assign body = Workflow | Attribute:'Body' | FromJSON -%} {{ body.propertyname }}
SMS Pipeline Workflows
In this chapter we'll describe how to configure workflows that are launched from the
SMS Pipeline.
Looking for Text to Workflow?
Before the SMS Pipeline was introduced, Text to Workflow was the go-to solution for automating
SMS processes in Rock. If you're already using Text to Workflow your configuration will still work,
but we recommend using the
SMS Pipeline
feature going forward. You'll find it's even more powerful and flexible than Text to Workflow.
Workflows initiated from the SMS Pipeline
page are configured like other types of workflows described in this guide. The only difference is
that these workflows will need to be configured to receive information about the SMS message from
the pipeline. We'll walk you through that process below.
Workflow Configuration for SMS Pipeline
As you've learned throughout this guide, there are lots of different ways to configure your
workflow types. The example below is not intended to be a set of instructions that you must
follow exactly for your workflow to function. We'll go over other options a little later. For
now, we'll walk through an example just to explain the features.
First, keep in mind that the pipeline can send the information it has to your workflow
automatically. For instance, your workflow configuration doesn’t require an action to identify
the person. You’ll still need workflow attributes to store that information, so that’s where
we’ll start. In this example we’ve set up only a few attributes that the pipeline can populate.
See below for the full list.
Configure Workflow Attributes

These attributes allow the person, their phone number and the content of their SMS text message
to be sent directly to the workflow. From there, you can perform any number of Actions or
Activities using those attributes.
In the example pictured below, we’ll add a Person Note that contains the person’s name and the
text of the SMS message they sent.
Example Workflow Action
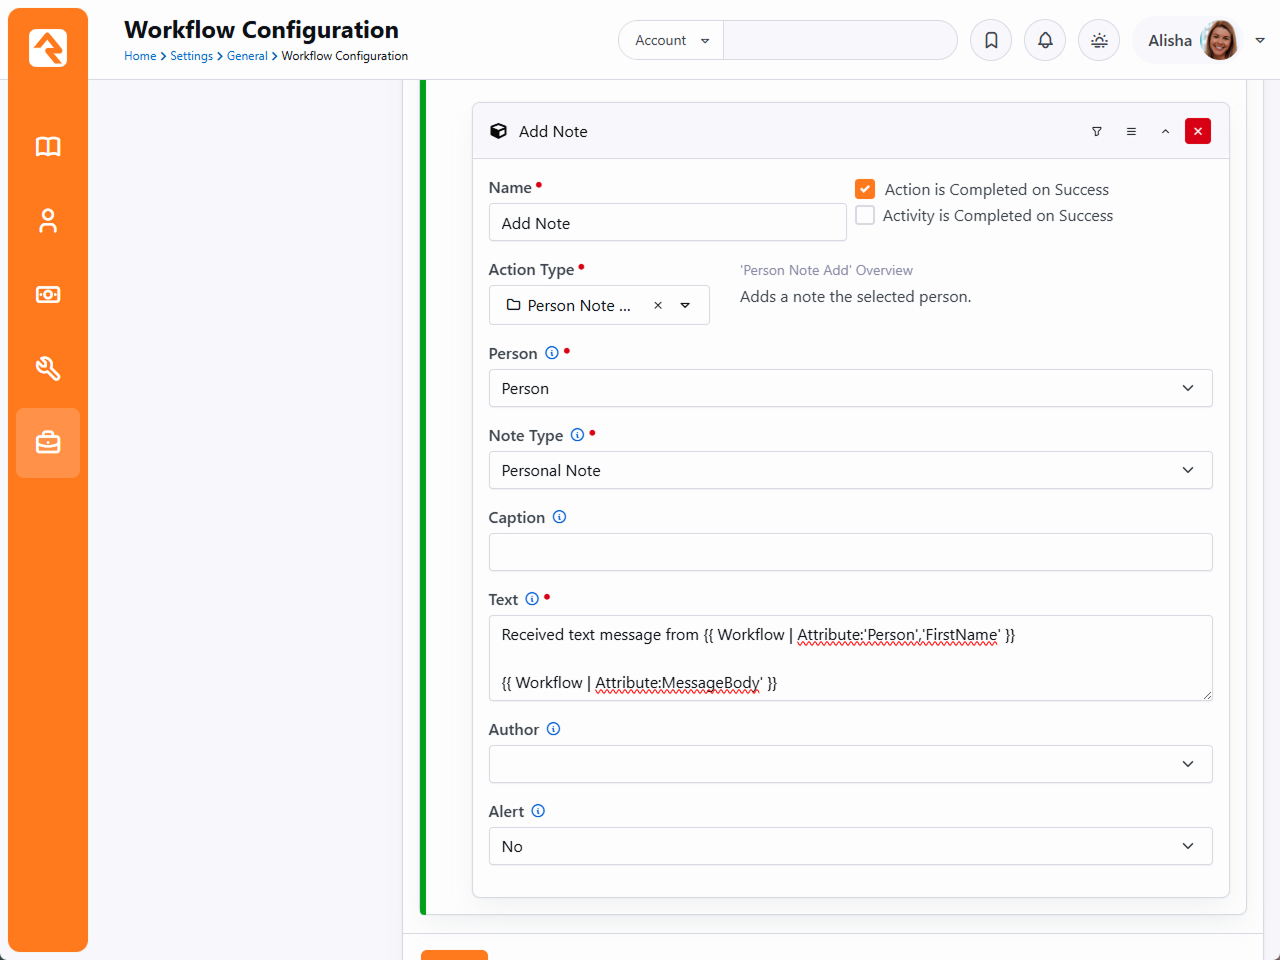
As you can see in the above example, your workflow configuration for pipelines won’t be very
different from other kinds of workflows. Actions and Attributes are set up and used in the same
ways. However, there is some configuration you’ll need within the SMS Pipeline itself to make it
all work. We’ll cover that in the next section.
Working with the SMS Pipeline
After your workflow has been configured, you're ready to add it to the
SMS Pipeline. In this section
we'll highlight the pipeline configuration related to workflows.
For information on
SMS Pipelines in general, see the
SMS Pipeline
chapter of our
Communicating with Rock
guide.
Pictured below is a basic example of a workflow configuration in the pipeline. Keep in mind the
workflow configuration that was described in the prior section, because it will be referenced
here.
SMS Pipeline - Workflow Configuration
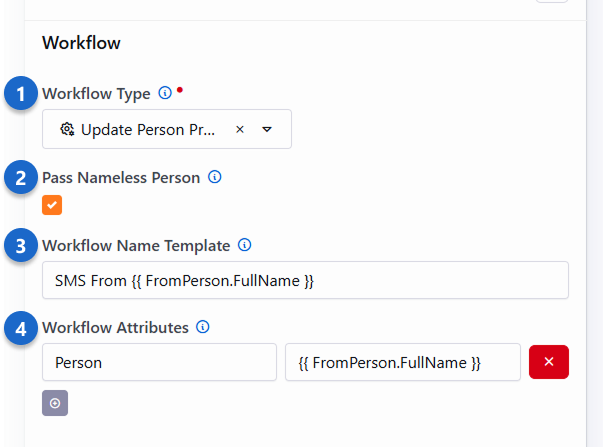
- 1 Workflow Type
- This is the workflow type that we want to launch for an SMS message.
- 2 Pass Nameless Person
- You can disable this setting to prevent
Nameless People
records from being sent to your workflow. We’ll talk more about working with
Nameless People
below.
- 3 Workflow Name Template
- This field lets you dynamically assign the name of each launched workflow, for each SMS
message received. In this example, the workflow name would be "SMS From Ted Decker" if
Ted Decker sent the message.
- 4 Workflow Attributes
- This is where you can feed information from the SMS message directly into your workflow.
You'll use the Key
value of the workflow's attribute in the first field. In the second field you'll add the
Lava that identifies how you want to fill in that attribute's value.
As described above, your pipeline configuration can send attribute values directly to your
workflow's attributes. In the next section, we'll look at the details of how this works and the
different attributes you can set.
SMS Pipeline - Workflow Merge Fields
The SMS messages that you receive have more information associated with them than you might
think. You can use
Lava to send that
information directly from the pipeline to the workflow.
In the example pipeline above we used {{ FromPerson.PrimaryAlias.Guid }} in the
Workflow Attributes
Merge Template field. Using {{ FromPerson.PrimaryAlias.Guid }} identifies the
person who sent the SMS message in a way that the workflow can receive it. This will be assigned
to the 'Person' workflow attribute when the workflow is launched, using the attribute's
Key as a reference point
between the pipeline and the workflow. Similarly, we used {{ FromPerson.FullName }} to set
the name of the launched workflow. Adding .FullName gives you the name of the
person, as text.
Warning: FromPhone is automatic
Don't add an attribute called FromPhone to the Workflow action in the pipeline unless
you are intentionally trying to overwrite it. The one that is automatically placed there
is the 'raw' value which has the '1' (country code) prepended onto it. If you manually add
FromPhone, it will overwrite the value and use the one without the country code. That
could lead to
unexpected behavior
in your workflow.
The table below lists other merge fields you can use to pass different types of information
from the pipeline to your workflow's attributes.
SMS Pipeline Lava Merge Fields
| Merge Field |
Description |
Field Type |
| {{ FromPerson.PrimaryAlias.Guid }} |
The pipeline uses the person's phone number to look up the first person with
that phone number. If it finds a match, it assigns that individual's record
to FromPerson. If the phone number is used in more than one profile, the
pipeline defaults to the first record of an adult with children. |
Person |
| {{ FromPhone }} |
The person's phone number, pulled from the inbound message, from the SMS
gateway. This will automatically get added to the workflow as FromPhone and
will include the country code (i.e., the raw phone number 18645555555). |
Phone Number |
| {{ ToPhone }} |
The SMS gateway number where the message was sent |
Phone Number |
| {{ ReceivedDate }} |
The date the message was received. |
Date |
| {{ ReceivedTime }} |
The time the message was received. |
Time |
| {{ ReceivedDateTime }} |
The date and time the message was received. |
Date Time |
| {{ MessageBody }} |
The content of the SMS message that was received. |
Text or Memo |
| {{ MatchedGroups }} |
If the RegEx expression provided contains matched groups, they are loaded into
an array here. This is an advanced feature, so if you’re not sure what this
means, don’t worry. You probably don’t need it. |
Typically, you fill in a text field with a merge expression of a single
result from the MatchedGroups array. |
In your workflow, avoid naming any attributes
SMSResponse.
If the workflow type that is initiated by the pipeline has an attribute with a key of
SMSResponse, the contents of that attribute will be immediately sent to the person
who texted in, bypassing any workflow processing.
Using Attribute Set to Initiator
There are some reasons why you might want to have the workflow find values for its
attributes instead of sending them from the pipeline. The first consideration is
maintenance. The workflow attributes and the pipeline configuration must be kept in sync to work
properly. Using the
Attribute Set to Initiator
approach instead, you don't have to worry about changes to the pipeline impacting your
workflow's functionality as long as your workflow accounts for different scenarios.
The above point leads to the second consideration, which is flexibility. Using a method like
Attribute Set to Initiator
means the workflow can be launched from a variety of different sources. It will be more
difficult to use the workflow in other contexts if it's designed to rely on specific data
from the pipeline.
Get Person and Name
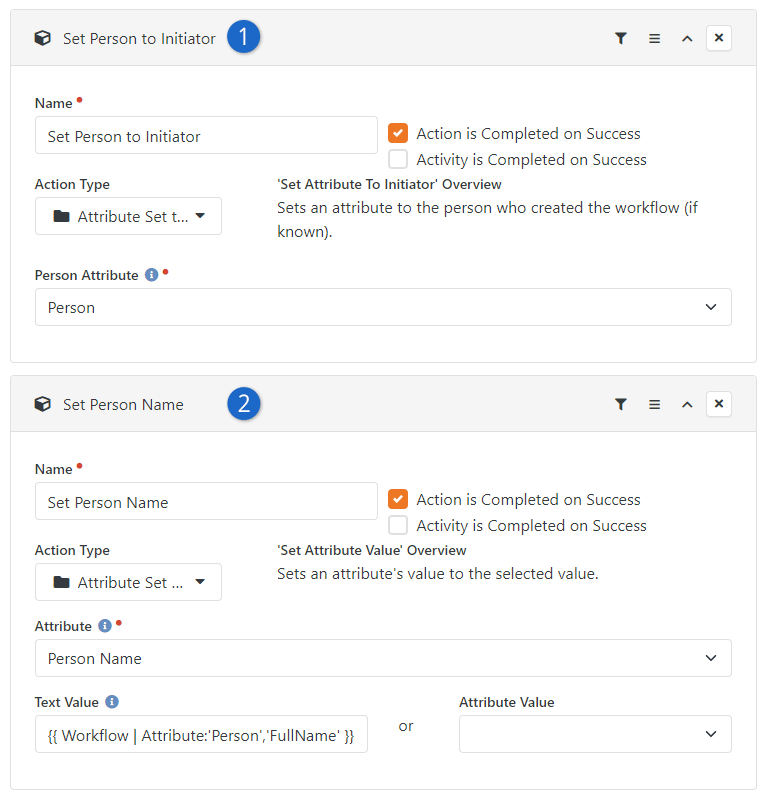
- 1 Attribute Set to Initiator
- The person who sent the SMS message is the initiator. By assigning the initiator to the
"Person" attribute, we now have the person’s record in the workflow.
- 2 Attribute Set Value
- Here we'll use some Lava to get the name of the person we identified above. We'll use
the name in the next workflow action (see below) to see if the person has a record
in Rock.
Let's pause here for a moment to mention
Nameless People. When an SMS
message is received, Rock will automatically try to identify the person. If the person isn't in
Rock, a Nameless Person
record is created. This special type of record gives Rock a way to keep track of the person even
though all we have is their phone number. For more details, see the
Nameless People
section of our
Communicating with Rock
guide.
The next workflow action, pictured below, is where we'll check for a
Nameless Person. Your
workflow options are limited if you don’t have a person’s record to work with. However, that
doesn’t mean your process needs to exclude
Nameless People. For
instance, you can send the person a link to create a profile as pictured in the example below.
Nameless Person - Send SMS
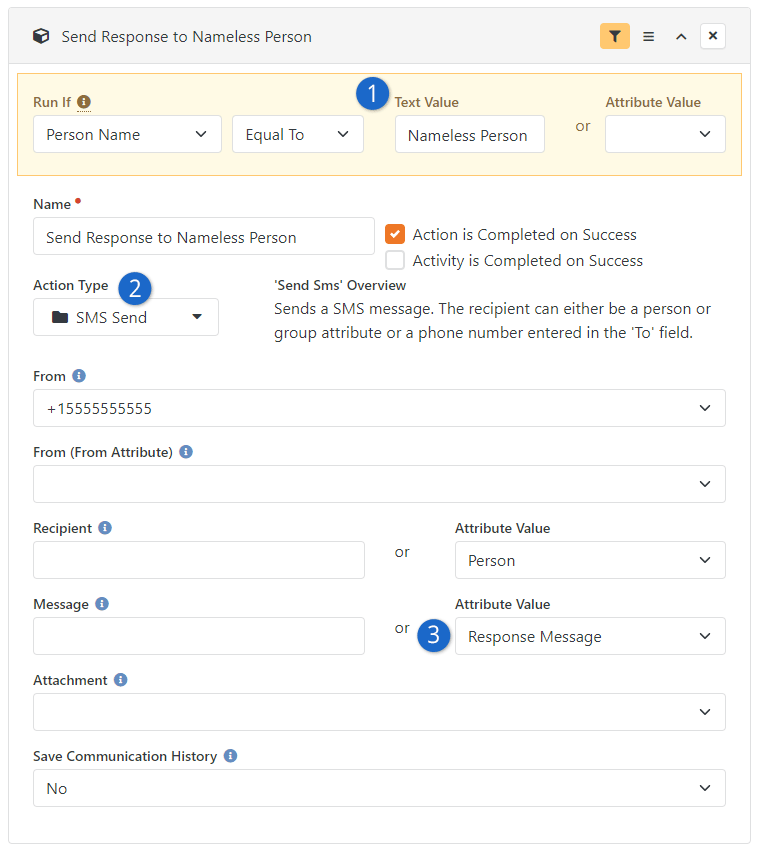
- 1 Action Filter
- This workflow action filter checks the name of the initiator, which we obtained in the
prior action. If the person's name is "Nameless Person" then we know the sender of the
SMS message doesn't have a record in Rock.
- 2 Send SMS Message
- In this case, we'll send an SMS message to the person. We can do that because
the Nameless Person
record contains the phone number the person used to send their original message.
- 3 Message Attribute
- The content of the SMS message the person receives is maintained as a workflow attribute
in this example. The message encourages the person to visit the website to create a
profile, so we'll know who they are going forward.
If it's not a
Nameless Person record, then
the workflow action described above wouldn't run. Instead, we now know the workflow has a
complete person record in-hand. You can use that information to perform any other actions or
activities you need. At this point in the workflow configuration, we've left the pipeline behind.
From here, the same tools and features described earlier in this guide can be used to build the
rest of your workflow according to your needs.